Eclipse and SVN Instructions
What is Eclipse?
In computer programming, Eclipse is an integrated development environment (IDE). It contains a base workspace and an extensible plug-in system for customizing the environment. Written mostly in Java, Eclipse can be used to develop applications.
What is SVN?
Subversion is an open source version control system. A version control system (also known as a Revision Control System) is a repository of files, often the files for the source code of computer programs, with monitored access.
For happiness, please read the below installation instructions carefully and fully. Missing an important note here can waste hours of your time. You can also visit office hours and use Piazza to get help.
Installing Eclipse on your machine
If you are interested in using Eclipse on your own machine, you can install it yourself. You need to install Java JDK (described below) before you can use Eclipse.
Fall 2015: Installing JDK 6
We strongly recommend you install Java Development Kit (JDK) 6 on your laptop. You may get more recent distributions to work, but you will encounter headaches along the way. It is worth the time now to ensure you have JDK 6 running and it is your default java environment for this class.
- Mac OSX: If you're using Mac OS X life is easy: Apple provides JDK6 (http://support.apple.com/kb/dl1572)
- Linux: Linux distributions usually have the incomplete GNU version of Java which is incomplete and insufficient for this class, so install Oracle's Java 6 JDK instead. link here
- Windows: Download the latest version of Java Development Kit (not JRE) version 6 from Oracle (try this link).
- Modern 64 bit CPU: always choose 64 bit versions—they will be labeled with "64" as part of their name. (Note if you see *x86 without "64" attached, it means Intel 32 bit.)
Scroll down and download the just the JDK (not jre). The JDK ("Java Development Kit") includes a compiler and other developer tools, the smaller JRE ("Java Runtime Environment") does not. Install the JDK, and the included JRE, but due to security issues we recommend you disable the applet web browser plugin.
Installing Eclipse and Android Development
Download Eclipse CS125 bundle.
- Windows_: unzip the file to any desired location and run eclipse.exe from that location.
- Mac OSX: unzip the file and drag the folder somewhere useful (eg your Applications folder). Then click on the Eclipse icon inside the sub-folder to start Eclipse.
Upon startup, you will be asked to select a workspace (i.e. a folder where all your projects are stored). Do not move Eclipse / Android files once you've started Eclipse as Eclipse's internal configuration uses absolute paths.
Setting up the SVN Repository
Your SVN Repository is where your projects are installed, the URL is as below:
https://subversion.ews.illinois.edu/svn/fa15-cs125/YourNetId
Important: "YourNetId" in the URL above should be your actual netid, i.e. the first part of your email address ___@illinois.edu. You MUST change this in order for it to work.
Lecture examples are here: https://subversion.ews.illinois.edu/svn/fa15-cs125/_shared/
To continue setting up your SVN repository, you will need to add the above repositories to Eclipse. Follow are the directions:
- First, you'll need the SVN Repository Perspective. (Window >> Open Perspective >> Other..., Select SVN Repository Explorer)
- In the SVN Repository Perspective, right click and select "New->Repository Location".
- In the window that comes up, put in your repository URL from above and click "Finish".
- Eclipse will ask you for a login and password. These are the same login and password you use for the EWS workstations. Login is your NetID and your password is your Active Directory password. You should save your password so you don't need to type your password each time.
- If a window comes up asking if you want to accept the certificate, click "Accept and Save".
- You can now see your repository. To see what is in your repository, right click on the repository and click "Refresh".
Using the SVN plugin
In CS125, you will mainly be using the following three features of the SVN plugin:
- Adding projects to your repository
- Getting projects from your repository
- Updating and Adding file(s)/folder(s) to your repository
These features are explained below.
Adding projects to your repository
For this you need to use the Java Perspective. (Window >> Open Perspective >> Java)
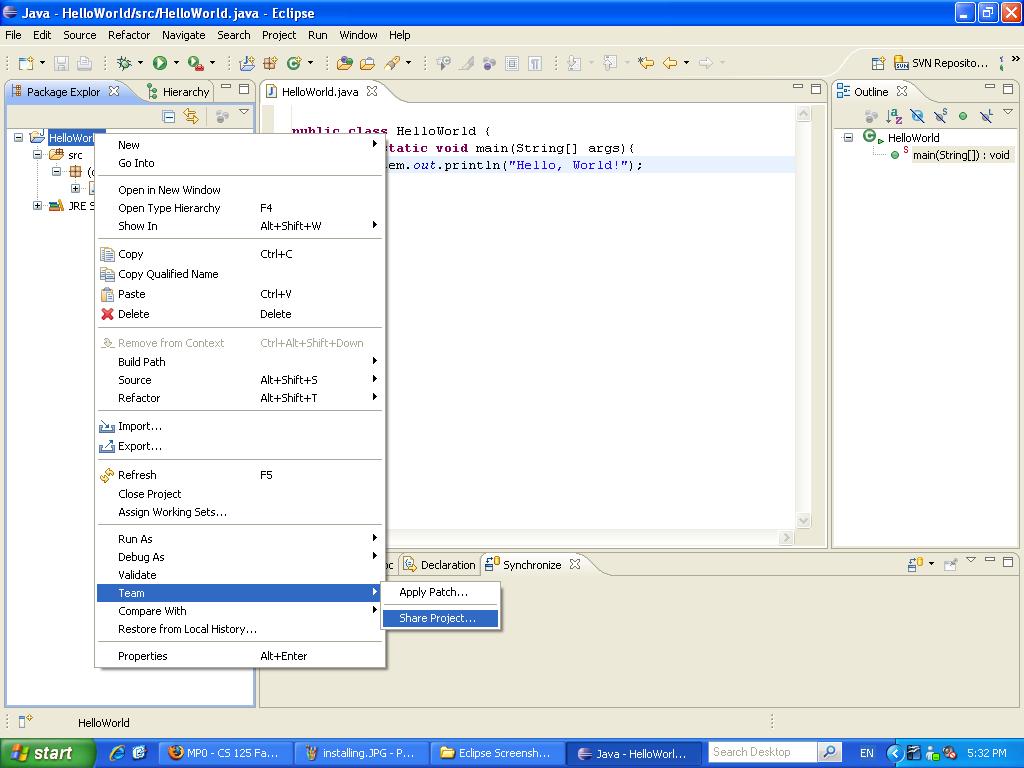
- In the Java Perspective, right click the project that you want to add and select "Team->Share Project..."
 (Click on image to enlarge.)
 - Select SVN and click "next".
- Choose "Use existing repository location" is selected. It should list the repositories that you have added.
- You can use either option for the shared folder name, click "next".
- Enter any comments you wish and click "finish".
- To make sure your project was added, right click on the repository in the SVN Repository view and select "Refresh".
Getting projects from your repository
Getting a project from your repository is called checking out. You need to have the SVN Repository Perspective open.
- Find the project that you want in the SVN Repository Perspective, then right click on it and select "Checkout..."
- Select "Check out as a project in the workspace". The revision to check out should be HEAD unless you want an earlier version of the project.i
- Click "finish". Eclipse will now get the project from your repository. When it finishes you will see your project in the Java Perspective.
Updating/Adding file(s)/folder(s) to your repository
Updating/adding files to your remote project is called committing. You need to have the navigator view open.
- Select the file(s)/folder(s) that you want to commit to the repository, then right click and select "Team->Commit..."
- Put in a comment if you want.
- If you are adding files, click "Select All" and make sure that the files that you want to add have their check boxes checked.
- Click "OK".
Updating/getting file(s)/folder(s) from your repository
Updating means updating your local copy using a remote one. You can update any file(s), folder(s), or the entire project. You need to have the Java Perspective open for this.
- Select the item(s) that you want to update, then right click on them and select "Team->Update HEAD".
- If you have changed your local copy since the last update (there should be a black symbol with a white star in it over the file/folder), Eclipse will bring up a compare window. Updating this way is the same as replacing your local copy. See Advanced Features of SVN: Rolling back local changes->Using SVN - Last revision
Advanced Features of SVN
Please see Advanced Features of SVN.