MP 4: Linux Security Modules
Goals and Overview
- Understand Linux Security Modules
- Understand the basic concepts behind mandatory access control
- Understand the basic concepts behind security IDs and opaque security contexts
- Understand the basic concepts behind extended file system attributes
- Add custom kernel configuration parameters and enable them upon compilation
- Design and implement a simple Linux Security Module
- Design a Least Privilege Policy for /usr/bin/passwd
- Enforce the implemented policy using the implemented LSM
Extra Credit Checkpoints
You can earn extra credit by starting on this MP early:
- EC Checkpoint 1: Complete all steps in Part 1 by Monday, Apr. 19 at 11:59pm for +5 points.
- EC Checkpoint 2: Complete all steps in Part 1, Part 2, and Part 3 by Monday, Apr. 26 at 11:59pm for +5 points.
TA Walkthrough
Introduction
The Linux Security Module (LSM) project grew out of a discussion initiated by
the NSA when they presented their work on Security Enhanced Linux (SELinux) at
the Linux Kernel Summit in 2001. The goal of the LSM project is to provide a
framework for general access-control without the need to modify the main
kernel code. By default, the Linux kernel provides support for discretionary
access control, and prior to LSM, lacked support for more general access
control mechanisms. The LSM framework has allowed developers to add support
for various security models without the need for changes to the core kernel
code. The currently accepted security modules in the mainstream kernel are
AppArmor, bpf (for eBPF hooks), integrity, LoadPin, Lockdown,
safesetid, SELinux, Smack, TOMOYO Linux, and Yama.
In order to allow for module stacking, the security modules are separated into major modules and minor modules. There can only be one major security module running in a given system, while minor modules can be stacked to provide different security features. Historically, major modules had access to opaque security blobs provided by the LSM framework while minor modules did not, but this distinction is fading with more recent kernel releases. (Note that these changes are very recent, and don’t apply for Linux v4.4). In this machine problem, we will be developing a major security module.
The LSM framework works by introducing hooks into a wide variety of kernel
functionalities. Generally, the access control checks occur in the following
order: after performing error checking, the kernel consults the discretionary
access control mechanism, then calls the hooks for the minor modules if any
are present, followed by the hooks of the major security module in place at
the time. The full list of the hooks exposed to security modules, along with
their description is located in include/linux/lsm_hooks.h.
![Figure 1: LSM Hook Architecture Example [5]](1.png)
Figure 1 shows the LSM hook architecture for a sample open system call. Note
that security modules, unlike the modules we have previously developed, are
not loadable at runtime (the term “module” in LSM is somewhat of a misnomer).
Security modules must be compiled alongside the kernel and enabled through the
appropriate configuration switches. Default modules can be configured at
build-time using CONFIG_DEFAULT_SECURITY but can also be overridden at
boot-time using the security=<module> (or, for more recent kernel versions
[which does NOT include Linux v4.4], the newer parameter lsm=<modules>))
kernel boot command line parameter.
Developmental Setup
In this assignment, you will again work on the provided Virtual Machine and
you will develop your security module for the linux-4.4 kernel that you
compiled as part of MP0. Again, you will have full access and control of your
Virtual Machine, you will be able to turn it on, and off using the VMWare
vSphere Console. Inside your Virtual Machine you are free to install any
editor or software like Gedit, Emacs and Vim.
Development in this assignment is different from previous machine problems.
Security modules must be compiled with the kernel at build-time, and
appropriate configuration parameters should be enabled for them to work
correctly. Before starting this assignment, please take a snapshot of your vm
in working condition. The development you will do in this machine problem
will affect your kernel’s boot procedure and bugs in your code are likely to
prevent your machine from booting and/or break the filesystem. Furthermore, if
you have access to a more powerful machine on which you would like to carry on
the compilation of the kernel and the production of the .deb packages, you
are allowed to do that as long as a copy of your code ends up on your virtual
machine and the VM is running the correct kernel at the time of the grading.
Finally, you are encouraged to discuss design ideas and bugs in Campuswire. Campuswire is a great tool for collective learning. However, please refrain from posting large amounts of code. Two or three lines of code are fine. High-level pseudo-code is also fine.
Starter Code
We have provided some starter code to get started on this MP. As in previous MPs, You will receive this code in your CS 423 github.
-
If you have not already done so, Create your CS 423 github by following our “Setting up git” guide here. You probably don’t need to do this again.
-
Run the following commands in your
cs423/netid/git repo:git fetch release git merge release/mp4 -m "Merging initial files"
Problem Description
In this MP, we will develop a Linux security module that implements a
mandatory access control policy for file accesses in the Linux environment.
The module will only focus on programs labeled by the target label, and
provide minimum access control for the remaining program. The goal of this
approach is to ensure proper functioning of the virtual machine since our
access control policy does not cover all the possible cases. Our module will
be embedded into the kernel at build-time and we will select it as the default
major security module at boot time. Additionally, we will inspect the
user-space program /usr/bin/passwd and generate the Least Privilege Policy
for it. We will then label our file system accordingly and verify that our
security module can enforce that policy.
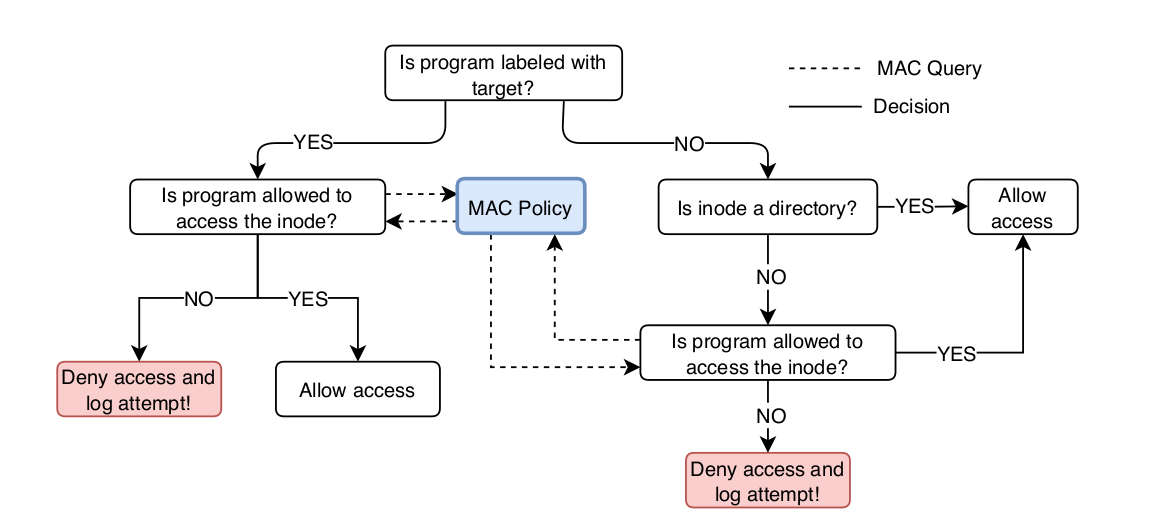
Figure 2 shows an overview of the process that happens in our security module
when a program attempts to access an inode. In order to be able to enforce an
access control policy, our module will require security labels on the inodes
and the tasks in the system. For the inodes, we will make use of the
filesystem’s extended attributes (or xattr). Extended attributes provide us
with a way to associate our file with metadata that is not interpreted by the
filesystem. Instead the metadata will be interpreted by our custom security
module. It is common practice for linux security modules to use extended
attributes under the prefix security. In this machine problem, each inode
that we care about will be assigned an attribute value under the name
security.mp4.
As for the linux tasks, we will make use of the opaque security fields that
are provided by the kernel. Opaque security fields (or from now on, security
blobs) are void * pointers available in the credentials structure (struct
cred *) associated with each task_struct created by the kernel. In this MP,
these blobs will contain the security label of the task being run, which we
will obtain by examining the security attribute of the binary file used to
launch the process (in other cases, for example a fork, the process will
inherit its parent’s security blob).
As previously mentioned, our module specifically enforces access control for
the programs that have been labeled with the target label. For those
programs that are not labeled as target, our module will allow them full
access to directories (regardless of the directories’ security labels), and
will allow them read-only access to files that have been assigned one of our
custom labels. The labels we will use along with their semantics are shown
in Figure 3 below:
/* mp4 labels along with their semantics */
#define MP4_NO_ACCESS  0    /* may not be accessed by target,
                             * but may by everyone other */

#define MP4_READ_OBJ   1    /* object may be read by anyone */

#define MP4_READ_WRITE 2    /* object may read/written/appended by the target,
                             * but can only be read by others */

#define MP4_WRITE_OBJ  3    /* object may be written/appended by the target,
                             * but not read, and only read by others */

#define MP4 EXEC OBJ   4    /* object may be read and executed by all */

/*
 * NOTE: FOR DIRECTORIES, ONLY CHECK ACCESS FOR THE TARGET SID, ALL OTHER NON-
 * TARGET PROCESSES SHOULD DEFAULT TO THE REGULAR LINUX ACCESS CONTROL
 */
#define MP4_READ_DIR   5    /* for directories that can be read/exec/access
                             * by all */

#define MP4_RW_DIR     6    /* for directory that may be modified by the target
                             * program */
Figure 3: The labels that we will use for our security module.
Implementation Overview
Part 1: Compiling and Configuring the kernel tree
-
Start by installing the necessary packages needed for this MP:
# apt install libncurses5-dev attr -
Next, add configuration options for our security module in the kernel’s
Kconfigenvironment. Start by creating a directory for the module in the kernel’s security directory. From the root of the kernel source tree, use$ mkdir -p security/mp4In the newly created
mp4directory, create a file namedKconfig. This file will define the configuration entries for our module as follows:config SECURITY_MP4_LSM bool "CS423 machine problem 4 support" depends on NET depends on SECURITY select NETLABEL select SECURITY_NETWORK default n help This selects the cs423 machine problem 4 security lsm to be compiled with the kernel. If you are unsure how to answer this question, answer N. -
Next, under the
security/directory, modify theMakefileand theKconfigfiles to read from our module’s appropriate files. Add the following to line 125 ofKconfig:source security/mp4/KconfigAlso, modify the
Makefileto include themp4module by adding the following at the appropriate location (you will see similar lines for other modules):subdir-$(CONFIG_SECURITY_MP4_LSM) += mp4and this at the appropriate location:
obj-$(CONFIG_SECURITY_MP4_LSM) += mp4/ -
You can now compile the kernel in the same way we did for MP0. When you get to the configuration phase, you will be prompted whether you want to enable
CONFIG_SECURITY_MP4_LSM, answer this with yes and continue with your compilation.NOTE: If you are not making use of debugging software, you might want to compile your kernel without the DEBUG symbols to speed up the process of generating the Debian packages. To do that, you can use
make menuconfigwhich will provide you with an in-shell UI that you can use to configure the kernel build. Navigate to theDEBUG_INFOentry in the configuration and switch it off. You can also check and change the value of our custom configuration entry from this menu.Additionally, you do not need to clean the kernel build every time you make some changes to your source code; it is better to build incrementally. When actively developing, you can compile the kernel without producing the
.debpackages usingmake -j<nprocs>. When you are ready to generate your packages, you can usemake -j<nprocs> bindeb-pkg. -
Finally, you need to add your security module as the default only major LSM to run on your machine. To do that, we will edit the
grubconfiguration and make the change persistent (the option will be ignored for other kernel builds that do not support the module). Open the file/etc/default/grubwith your favorite editor and change the lineGRUB_CMDLINE_LINUX_DEFAULT="quiet nosplash"to
GRUB_CMDLINE_LINUX_DEFAULT="quiet nosplash security=mp4"and then update grub using
# update-grubNote that the VM management service appears to reset
/etc/default/grubevery time you you reboot. You can try making/etc/default/grubimmutable to prevent this:# chattr +i /etc/default/grubbut do note that you will have to unset the immutable bit (via
chattr -i) if you need to make changes in the future, AND bugs in/etc/default/grubcould make your system unrecoverable.
Part 2: Implementing and Testing the MP4 LSM
Just like any other module, Linux security modules must have an initialization
function and must register hooks with the kernel’s security system. We have
provided you with the functions that perform these operations in the file
mp4.c. In addition, mp4_given.h provides you with the definition of an mp4
custom security structure along with some additional helper functions that you
might find useful. We recommend that you use pr_info, pr_debug, and
pr_err for logging. The line at the top of mp4.c ensures that all messages
printed using these functions will get prefixed with cs423_mp4. This will
make it easier for you to find your log messages in the kernel log dumps.
In this MP, we will be implementing six hooks into the kernel. We have provided you with the code that registers these hooks with the system along with their empty skeletons in mp4.c. These hooks are:
mp4_cred_alloc_blankmp4_cred_preparemp4_cred_freemp4_bprm_set_credsmp4_inode_init_security-
mp4_inode_permission
-
Start by implementing
mp4_cred_alloc_blank,mp4_cred_prepare, andmp4_cred_free. These hooks are used to allocate (and free) memory for our security blobs. Your structures should always be initialized to theMP4_NO_ACCESSlabel. -
Implement the
mp4_bprm_set_credshook. This hook is responsible for setting the credentials context (and thus our security blob) for each process that is launched from a given binary file. Your code should read thexattrvalue of the inode used to create the process, and if that label isMP4_TARGET_SID, you should set the created task’s blob toMP4_TARGET_SIDas well.For your convenience, we have provided you with the function
static inline int cred_ctx_to_sid(const char *cred_ctx)that will convert an
xattrtext value into the appropriate sid value.For obtaining the
xattrof an inode, you might find it useful to look at the source code of the filesystem you are using and at other drivers/modules in the kernel code. Note that when dealing withstruct dentry *, the kernel keeps reference counts for each pointer you use, so you MUST always put astruct dentryback using the call todput(struct dentry *). Not doing this will induce errors in your filesystem. While modern filesystem can detect these errors and remove danglingdentriesat boot time, this will significantly increase your boot time and might break your filesystem. -
Implement
mp4_inode_init_security. This hook is responsible for setting thexattrof a newly created inode. This value will depend on whether the task that creates this inode has thetargetsid or not. For those inodes that were created by a target process, they should always be labeled with theread-writeattribute. For all other inodes, you should not set anyxattrvalue. -
Implement the
mp4_inode_permission_hook. This hook implements our main mandatory access control logic, and should be a direct translation of the label semantics and operation shown in Figures 2 and 3. In order to speed up the boot process, your code MUST first obtain the path of the inode being checked, and then use the helper functionmp4_should_skip_pathprovided to you inmp4_given.hto skip over certain paths heavily used during boot time, and that we will not touch throughout our implementation. Hint: In order to obtain the path of an inode, you can use its dentry.The macro
current_cred()can help you obtain the security blob of the current task. Additionally, you can find the definition of the filesystem operation masks inlinux/fs.h.Furthermore, your access control logic MUST log all failed access attempts to the kernel logs. However, be careful not to overload the boot process with printouts. If you must print debug messages, you may find the function
int printk_ratelimit(void)useful.In order to avoid breaking your system due to incorrect permission checks during boot time, we recommend that your initial access control checks would perform the logic but always grant access and log the requests that should have been denied. Then you can test your code’s correctness by looking at the kernel logs and making sure that printed message are correct. After doing that, you can then return the appropriate values in your code and test their operation.
Part 3: Testing Your Code
In order to test your code, pick a harmless application (e.g., cat or vim)
and label its binary as your target application. We recommend that you follow
the following procedure:
-
Create two scripts called
test.permandtest.perm.unload, the first script will contain the commands that set the security attribute value for files in your system, while the second will reverse all the effects created by the first script. We strongly recommend that you always remove all of the attributes you set during a testing session in order to ensure that your system can boot successfully the next time you reboot. -
If you would like to provide
catwith read-only access to the file~/file.txt, we first start by labelingcat’s binary astarget, and then providingcatwith directory access rights to/homeand~. Finally, label~/file.txtwith theread-onlyattribute. Yourtest.permshould look something like:setfattr -n security.mp4 -v target /bin/cat setfattr -n security.mp4 -v dir /home setfattr -n security.mp4 -v dir ~ setfattr -n security.mp4 -v read-only ~/file.txt -
Run the script using
source test.permorsh test.perm. -
Test
cat’s access to the file by trying to read it. You can then change the permissions on the file and then try again to make sure your module is working for all the cases. -
Don’t forget to source or run your unloading script when you’re done with
source test.perm.unload.
Part 4: Obtaining the Least Privilege Policy for /usr/bin/passwd
In the final piece of the MP, you will generate the Least Privilege Policy for
/usr/bin/passwd and then make sure that your module can enforce it. You will
generate two scripts, passwd.perm and passwd.perm.unload, and submit them
as part of your MP submission. In order to obtain the files and the
permissions that /usr/bin/passwd requires to run correctly, you should make
use of the tool strace. Start by creating a dummy user on your VM that you
can use to test things out. PLEASE DO NOT TRY TO CHANGE THE PASSWORD FOR YOUR
USER ACCOUNT; your accounts are configured to use the University’s Active
Directory servers.
-
Create a dummy user and change its password. Use
straceto profile/usr/bin/passwd’s run and look at the files that it requests access to. -
Look into the report generated by
straceand figure out the files and the permissions that/usr/bin/passwdrequests access to. We recommend that you use a text manipulation tool such assedorawkto speed up this process. -
Generate the least privilege policy for
/usr/bin/passwdand store it inpasswd.perm. Note that your script MUST always start by setting thetargetlabel onpasswd’s binary. -
Load the policy and test your module’s enforcement.
Software Engineering
Your code should include comments where appropriate. It is not a good idea to repeat what the function does using pseudo-code, but instead, provide a high-level overview of the function including any preconditions and post- conditions of the algorithm. Some functions might have as few as one line comments, while some others might have a longer paragraph. Also, your code must be split into small functions, even if these functions contain no parameters. This is a common situation in kernel modules because most of the variables are declared as global, including but not limited to data structures, state variables, locks, timers and threads.
An important problem in kernel code readability is to know if a function holds
the lock for a data structure or not; different conventions are frequently
used. A common convention is to start the function with the character _ if
the function does not hold the lock of a data structure. In kernel coding,
performance is a very important issue; kernel code uses macros and
preprocessor commands extensively. Proper use of macros and identifying
possible situations where they should be used is important in kernel
programming.
Finally, in kernel programming, the use of the goto statement is common
practice, especially to handle function-level cleanup. A good example of this
is the implementation of the Linux scheduler function schedule(). In this
case, the use of the goto statement improves readability and/or performance.
“Spaghetti clde” is never a good practice!
Submission Instructions
Push your all your relavant code to your assigned github-dev repo. Please
make sure you have the policy files that you generated for passwd, namely
passwd.perm and passwd.perm.unload.
Final Submission
For your final submission, please have your kernel and LSM loaded. We will grade your final submissions on your VMs.
Checkpoint Submissions
We will grade your latest pre-deadline commit for each checkpoint. However, if you want us to grade a specific commit, you can tag it with a specific tag. Assuming that your tagged commit is before the deadline, we will grade your tagged commit instead of your latest pre-deadline commit. This will allow you to continue to work on your MP after ensuring you have made your submission for the checkpoint.
The tag names to use are as follows:
- For Checkpoint #1:
mp4-cp1 - For Checkpoint #2:
mp4-cp2
(If you do not have a tag with the name, we will grade your latest pre-deadline commit+push. It’s not necessary to add the tag, but it may give you extra assurance. :))
Grading Criteria
- The VM is running the correct kernel and the mp4 security module is loaded
- Correct implementation of security blob allocation and freeing
- Correct implementation of the transfer of labels from the binary to the
task_struct - Correct assignment for the labels of inodes created by a target program
- Correct implementation of access control enforcement
- Obtained the least privilege policy for
/usr/bin/passwd - Your module correctly enforces the policy for
/usr/bin/passwd - README briefly describing your implementation
References
-
The Linux kernel source tree. Available at https://elixir.bootlin.com/linux/v4.4/source.
-
Linux Security Module usage. Available at https://01.org/linuxgraphics/gfx-docs/drm/admin-guide/LSM/index.html.
-
David Howells. Credentials in Linux. Available at https://www.kernel.org/doc/Documentation/security/credentials.txt.
-
Greg Kroah-Hartman. Using the Kernel Security Module interface. Outdated, but provides useful information. Available at https://www.linuxjournal.com/article/6279.
-
James Morris, Stephen Smalley, and Greg Kroah-Hartman. Linux Security Modules: General Security Support for the Linux Kernel. In USENIX Security Symposium, 2002.