Solo MP This MP, as well as all other MPs in CS 225, are to be completed without a partner.
You are welcome to get help on the MP from course staff, via open lab hours, or Piazza!
Image and Image Traversal
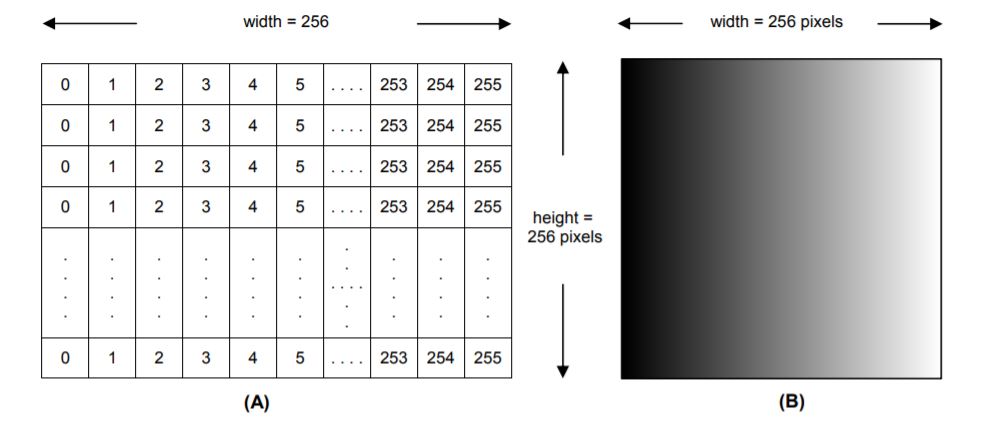
Mathematically, an image can be considered as a function of two variables, f(x, y), where x and y are spatial coordinates and the value of the function at given pair of coordinates (x, y) is called the intensity value.
In the figure below - Values in the grid represent the grayscale intensity of the image on the right. A) Intensity values shown in a grid of same dimension as image. B) Image as seen on monitor
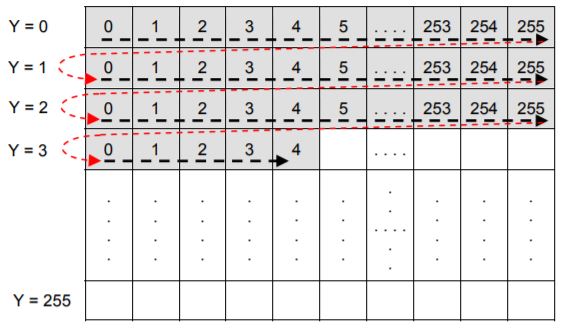
One way to traverse the image is in row first order. Figure below describes this Note that rows are being accessed one after the other. This is known as ‘Row First Traversal’. The graphic suggests that in the current iteration, x = 4 and y = 3 both starting from 0.
Checking Out the Code
All assignments will be distributed via our release repo on github this semester. You will need to have set up your git directory to have our release as a remote repo as described in our git set up
You can merge the assignments as they are released into your personal repo with
git pull --no-edit --no-rebase release main
git push
if you are using multiple machines you may need to use the following to allow them to work correcly.
git pull --no-edit --no-rebase release main --allow-unrelated-histories
git push
The first git command will fetch and merge changes from the main branch on your remote repository named release into your personal. The --no-edit flag automatically generates a commit message for you, and the--no-rebase flag will merge the upstream branch into the current branch. Generally, these two flags shouldn’t be used, but are included for ease of merging assignments into your repo.
The second command will push to origin (your personal), which will allow it to track the new changes from release.
You will need to run these commands for every assignment that is released.
All the files for this lab are in the mp_traversals directory.
Preparing Your Code
This semester for MPs we are using CMake rather than just make. This allows for us to use libraries such as Catch2 that can be installed in your system rather than providing them with each assignment. This change does mean that for each assignment you need to use CMake to build your own custom makefiles. To do this you need to run the following in the base directory of the assignment. Which in this assignment is the mp_traversals directory.
mkdir build
cd build
This first makes a new directory in your assignment directory called build. This is where you will actually build the assignment and then moves to that directory. This is not included in the provided code since we are following industry standard practices and you would normally exclude the build directory from any source control system.
Now you need to actually run CMake as follows.
cmake ..
This runs CMake to initialize the current directory which is the build directory you just made as the location to build the assignment. The one argument to CMake here is .. which referes to the parent of the current directory which in this case is top of the assignment. This directory has the files CMake needs to setup your assignment to be build.
At this point you can in the build directory run make as described to build the various programs for the MP.
You will need to do the above once for each assignment. You will need to run make every time you change source code and want to compile it again.
Part 1 : Image Traversals
As you learned in lecture, there are many ways to traverse a data structure. In this MP, you will use object-oriented programming techniques to develop classes that traverse an image in a generic way.
Background – Understanding an ImageTraversal
The goal of an ImageTraversal is to create a traversal that starts at some start point and visits every point within some tolerance in a specific order.
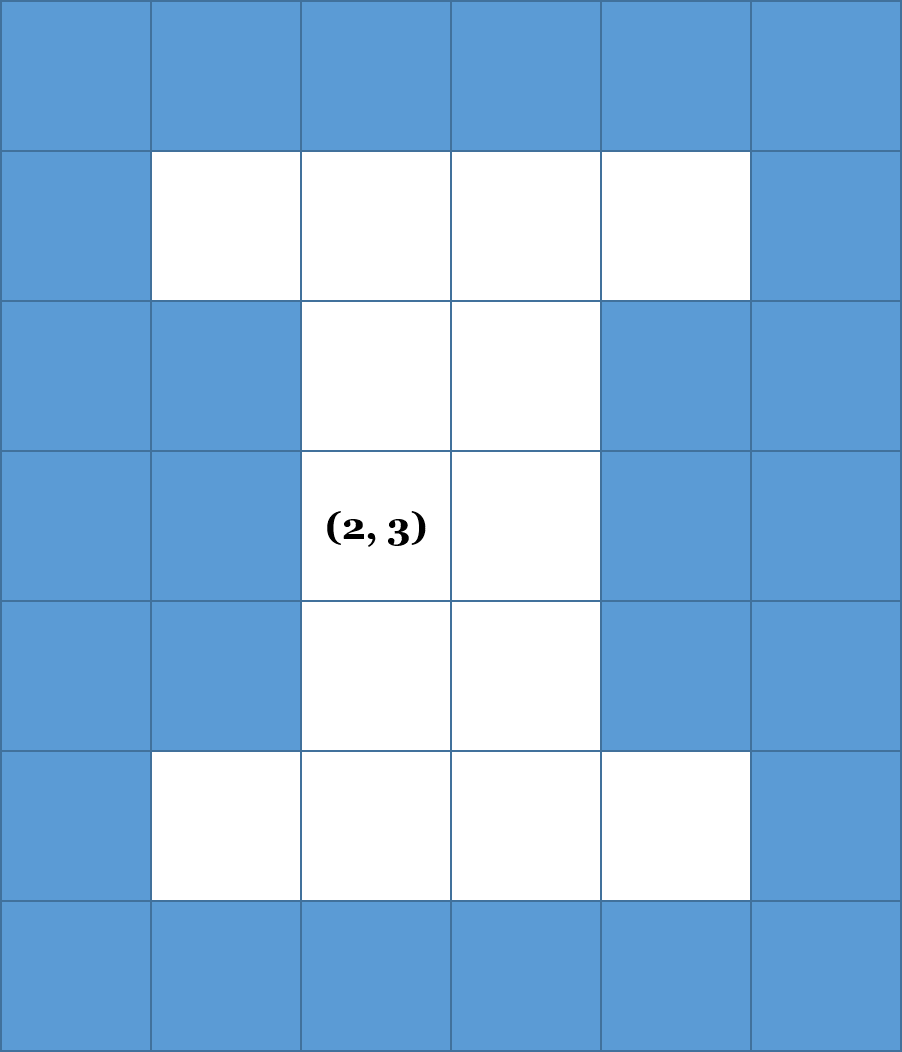
For example, consider a “Block I” image that is exactly 6 pixels wide and 7 pixels tall:
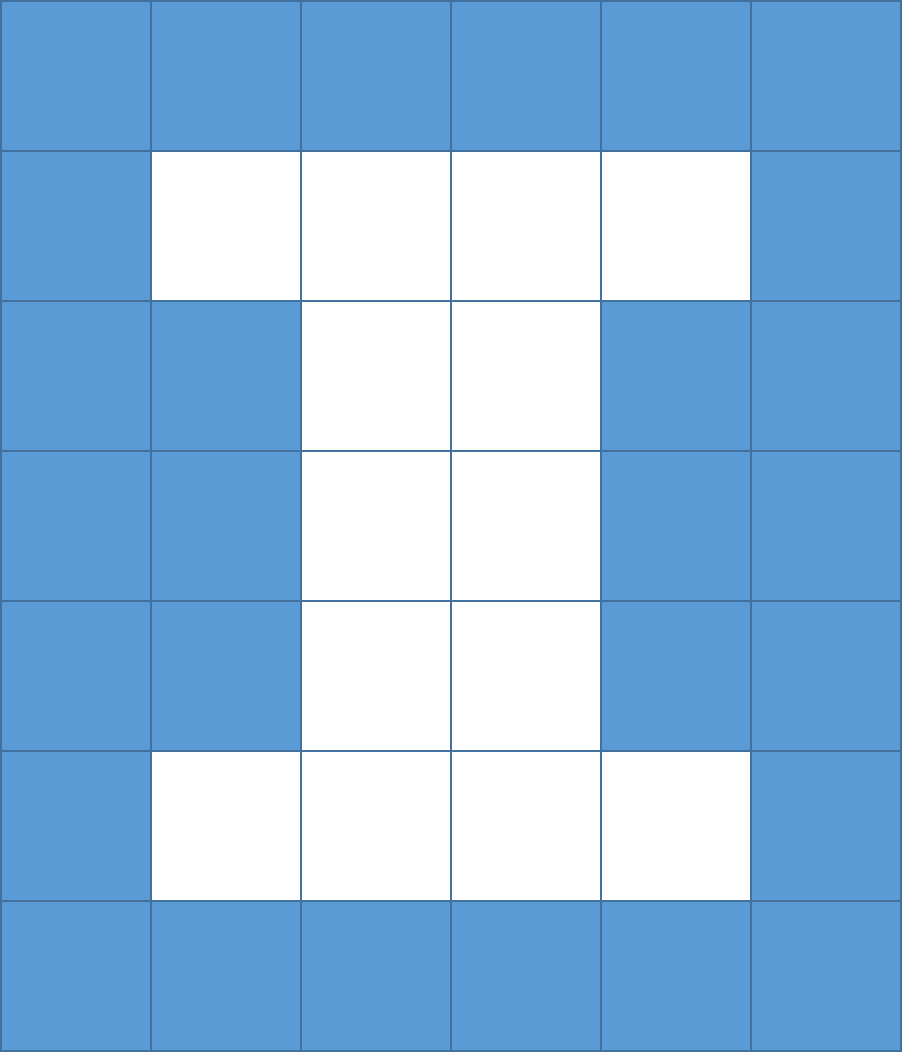
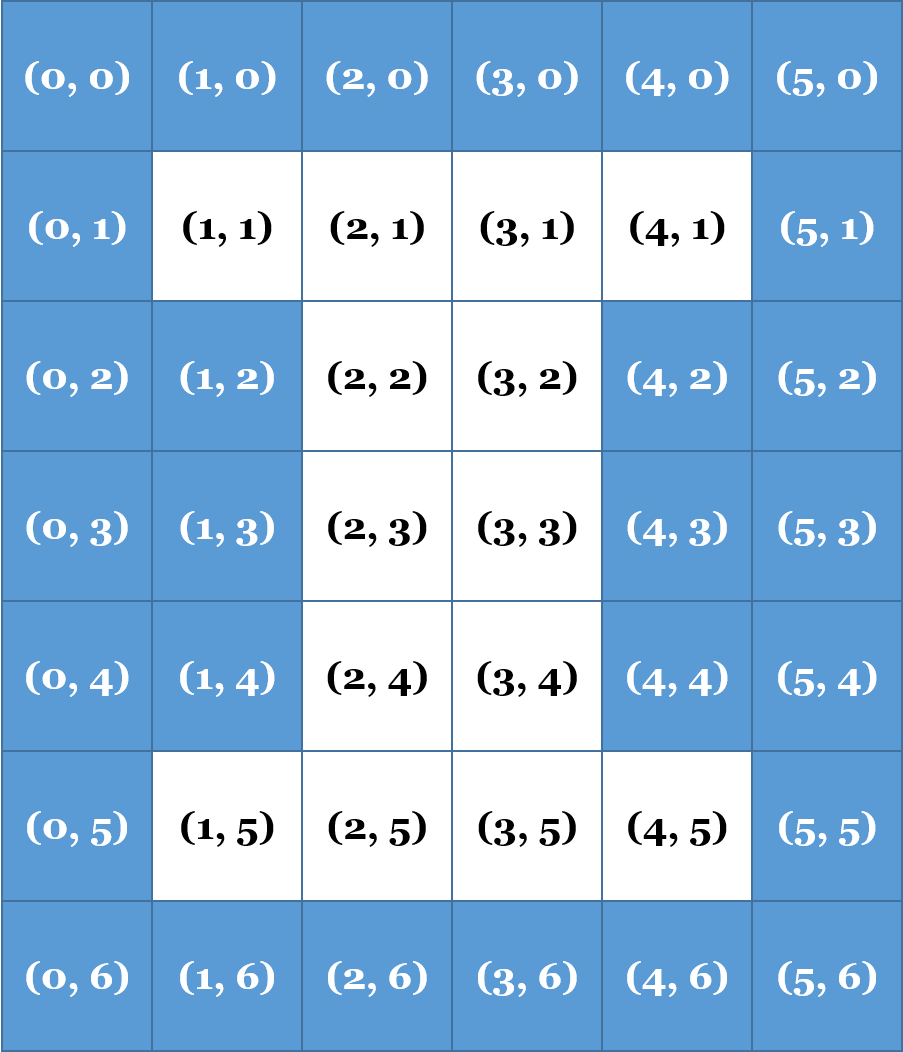
One possible traversal of this image is a Row First Traversal, where every pixel in a single row (within a tolerance) is visited before a pixel in any other row is visited. Starting at (2, 3), such a traversal visits every pixel in Row 2 before moving to Row 3 and visited everying pixel in Ro 3 before moving to Row 4:
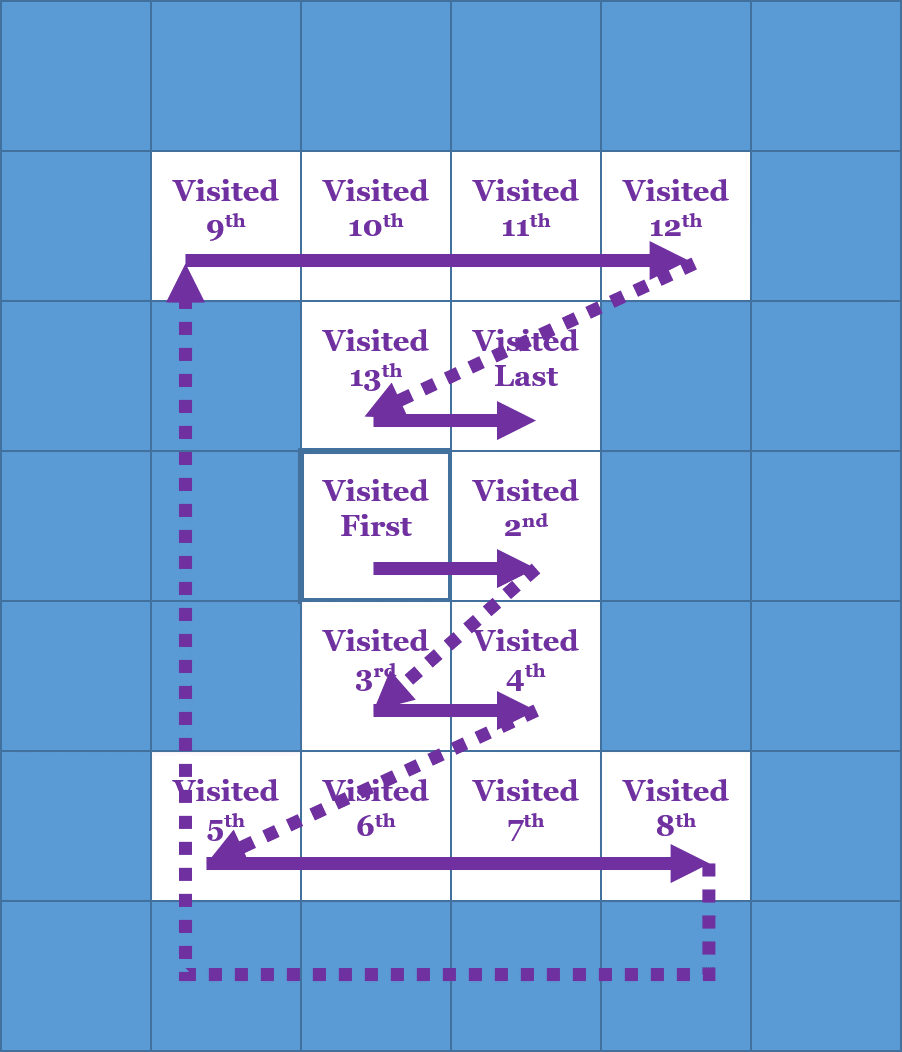
Two things to note:
- The blue pixels are not visited, because they are outside of a
tolerance - The traversal requires only that all pixels in a row are visited before visiting the next row. Therefore, the order may vary depending on the implementation.
Below are few traversals with iterators (only the pixels within the shape are within the ‘tolerance’ ):
| Entire Image | Rectangle | Circle | Line | Polygon |
|---|---|---|---|---|
 |
 |
 |
 |
 |
| Ellipse | Spiral | |||
 |
 |
Components of an ImageTraversal
ImageTraversal is a class that provides the setup to return an Iterator for the actual traversal. ImageTraversal only contains two member functions:
ImageTraversal::begin()andImageTraversal::end(), used to return Iterators
Developing an ImageTraversal
Consider a simple image of 16 pixels:
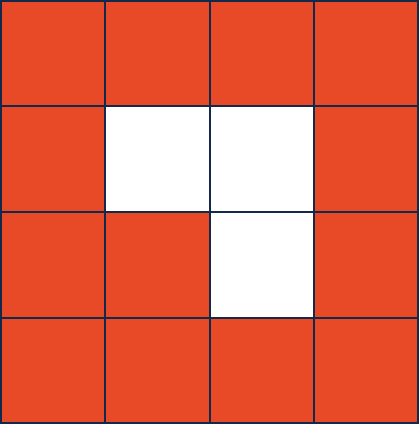
Every ImageTraversal will start at a provided Point. In this image above, suppose we
start in the bottom-left corner (0, 3). The first pixel a traversal will “visit” will
almost always be that starting point (0, 3).
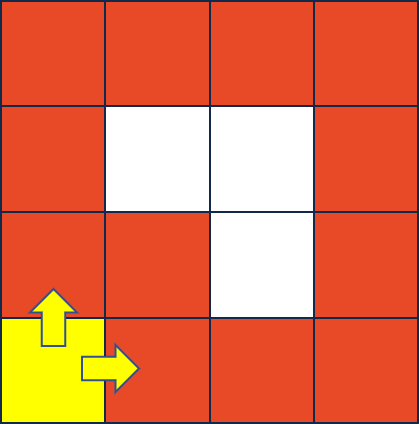
As part of “visiting” a point, a traversal must add all of the neighbors that will be
visited at some time in the future. Every point has up to four neighbors (and the
neighbors MUST be added in the following order):
- The pixel to the right,
(x + 1), - The pixel below,
(y + 1), and - The pixel to the left,
(x - 1). - The pixel above,
(y - 1),
As our starting point (0, 3) is a corner, it has only two neighbors (1, 3) and (0, 2):
After visiting the first point (the starting point), the next point visited is determined
by our ImageTraversal. The logic in add and pop determines the order the nodes are visited.
For example, if we visit the point that was most recently added, we create the following traversal:
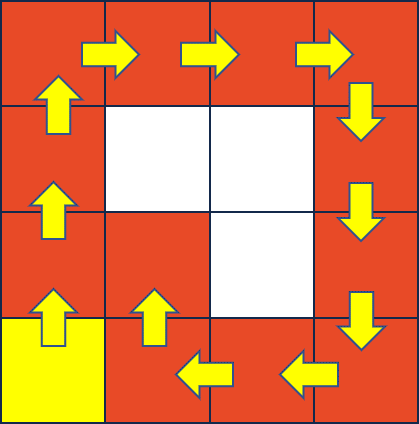
Finally, in the image above, only orange pixels were visited. A point must NOT be visited in a traversal if either of the following statements are true:
- The point has already been visited (a traversal never visits the same point twice), OR
- The pixel at the point is greater than or equal to a given
toleranceaway from the pixel at the starting point. The functionImageTraversal::calculateDeltais provided for you to calculate the difference between two pixels.
The ImageTraversal::Iterator
You can read about iterators here. You need only to create the simplest of all the iterators – a forward iterator – which requires three operations:
operator*, to access the current Point in the image traversaloperator++, to advance to the next Point in our image traversaloperator!=, to check if two iterators are different
A call to ImageTraversal::begin() must return an ImageTraversal::Iterator that starts at the starting point
(eg: *(traversal.begin()) == startingPoint) and must move through the traversal in the order based on the type of traversal (determined by the pop/add functions which are passed in).
To store the points that are know that still have to be visted by the traversal we provide a std::deque. You will use this to mantain the points to be visted by the traversal. To control the use of this you will write two functions for each traversal type.
add_function, add points to be visitedpop_function, remove and return the next point to visit
Part 1a: Implement DFS Specific Functions
To support DFS you will need to write the functions dfs_add and dfs_pop. You can find their
documentation in the doxygen.
Part 1b: Implement BFS Specific Functions
To support BFS you will need to write the functions bfs_add and bfs_pop. You can find their
documentation in the doxygen.
Part 1c: Implement ImageTraversal::Iterator
Finally, create an iterator that will use the functions that you have written above to traverse the image.
As you work through this:
- You may assume the
PNGimage will not change after your object is created. - Iterators must be independent (moving one iterator forward does not change other instances of an iterator).
- Remember that
begin()returns an iterator at the starting point, butend()returns an iterator one past the end. - It is common for
end()to be a sentinel value (eg: aNULLpointer, etc). It should not be necessary to run through the full traversal to get to one past the end.
Finally, simple test cases for this part can be run with the following command:
make test
./test [part=1]
Extra Credit Submission
For extra credit, you can submit the code you have implemented and tested for mp_traversals, Part 1. You must submit your work before the extra credit deadline as listed at the top of this page. The extra credit submission will appear as a separate submission on PrairieLearn.
Part 2 (Curated): Flood Fill
In this MP, you will be flood-filling an image using a ColorPicker and an ImageTraversal. You built the ImageTraversal class in Part 1 and we have provided some ColorPicker classes for you (including RainbowColorPicker, SolidColorPicker, and others).
The FloodFilledImage class outlines the three member functions you must implement for this part.
- Feel free to use a
std::vector,std::list,std::stack, orstd::queueif they would be helpful.
Part 3 (Creative): Your Flood Fill!
Finally, time to be creative with what you built! Two separate things are required:
-
Create a new color picker called
MyColorPicker, found in thecolorPickerfolder. This picker may be anything, but must be different than the color pickers we provided. -
Modify
traversals.cppto create aFloodFilledImageusing at least two flood fill operations (two calls toaddFloodFill). Yourtraversals.cppmust save the last frame asmyFloodFill.png.
To test and create your artwork,
make
./traversals
Testing
The following warning is only if you are not developing in the container. The container has ImageMagick.
ImageMagick Note that you must have ImageMagick installed if you’re developing on your personal machine. You can test for this requirement by running
convert
in your terminal. Windows users should visit ImageMagick to download the latest binary. OSX users can use homebrew or MacPorts to install it if missing. Linux users likely already have it installed. If not, then you can install it via your system’s package manager.
To run all of the tests for this MP:
make test
./test
Grading Information
The following files are used to grade mp_traversals:
ImageTraversal.cpp(Part 1)ImageTraversal.h(Part 1)FloodFilledImage.cpp(Part 2)FloodFilledImage.h(Part 2)colorPicker/MyColorPicker.cpp(Part 3)colorPicker/MyColorPicker.h(Part 3)
All other files including any testing files you have added will not be used for grading.