On Your Own Machine
by Tamara Nelson-Fromm, Jenny Chen, Brad Solomon, G Carl EvansThis guide will help you get started setting up an environment on your personal computer to let you do most of the labs and MPs without going into the EWS computer labs in Siebel. We are only supporting working with a VM this semester but are including other options for students who can support themselves.
For those who are unfamiliar with these terms, here is a short explanation of what each method means and the pros and cons of each.
- Working locally with a VM: you download a disk image and software required to emulate a standardized coding environment. Despite imitating a different architecture, you can still access and use the files stored on your own machine.
- Pros: Supported by CS 225 Staff. Don’t need to worry about installing any tools (e.g. valgrind, gdb, VS code) on your main operating system. Don’t need to worry about your code runs differently than when we grade it. Don’t need a stable internet connection or worry about EWS machine capacity.
- Cons: Not every operating system can emulate a VM (M1 Macs do not have compatible software as of Spring 2021). Most VMs have limited hardware resources and are slower than a native installation. You have to download and install additional commercial software.
- Working remotely: you connect your computer to your EWS machine through the internet. Even though you are giving commands from your own computer, the files are stored on EWS and the commands are run in an EWS (linux) environment.
- Pros: Don’t need to worry about installing any tools (e.g. valgrind, gdb, VS code) on your own computer. Don’t need to worry about your code runs differently than when we grade it.
- Cons: You need good internet connection when you work. FastX provides GUI but can be really laggy. SSH can be more reactive but only provides a terminal.
- Working natively: you download code and tools onto your own machine before working. You run commands on your own machine’s environment during development.
- Pros: You only need internet connection at the beginning to fetch our code, and during your development you can work offline. The process of setting up text editor and working environment prepares your machine for future coding projects.
- Cons: Since your machine is very likely different from our testing environment, you will need to test your code on EWS to get the same results as our grading runs. This means you will need to learn how to sync up code between two different places (on EWS vs. on your own machine) with git, and learn how to remotely connect to your EWS machine.
Disclaimer: Our grading runs are done on using a Docker VM, and we expect you to test your code thoroughly on EWS or a Docker VM to ensure compatibility. You will be responsible for any issues arising from insufficient testing; no regrades will be given.
Working with a VM
1) Installing Docker
Docker is a lightweight container engine used to emulate OS-level virtual environments. For the purposes of this class, it will serve as an all-in-one tool for your local VM as there are existing addons for running a container through VSCode.
To install Docker, use the appropriate operating system installation.
-
For Windows / MacOS:
You can install Docker using Docker Desktop. Be sure to run Docker Desktop once installed, as it has some ‘first-time setup’ in order to actually install Docker on your system. There is a separate installer for M1 Macs!
-
For Linux:
Depending on your Linux distribution and architecture, install the appropriate package using the following installation instructions: Docker
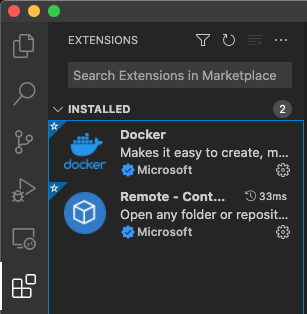
2) Installing VSCode
If you have not already installed VSCode, you are encouraged to download the software at the following link: VSCode
Once it is installed, you can find the Remote-Containers extension by either searching the marketplace or using the following link: Remote-Containers
You can confirm the presence of VSCode extensions by clicking on the ‘Extensions’ icon on the navigation bar. While you will likely add many extensions based on your own preference, you should confirm the presence of Remote-Containers before continuing.
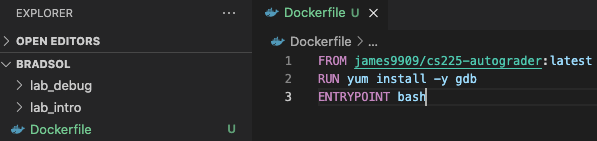
3) Create the course Dockerfile
The Dockerfile describes the base image and modifications required to match that of the EWS system. For this class, your Dockerfile will be very small:
FROM james9909/cs225-autograder:latest
RUN yum install -y gdb
ENTRYPOINT bash
To ‘install’ the Dockerfile correctly, make a new file with the above lines of text. Then save the file as ‘Dockerfile’ with no file extension and place it in the directory you will do your work in.
4) Create your ‘remote’ container
With the Remote-Container extension on VSCode, run the command ‘Remote-Container: Open Folder in Container’. You can do this by clicking on the bottom lefthand corner widget (the green ‘Open a Remote Window’ button) or by pressing F1 and typing the appropriate command.

The folder you want to open is your CS 225 Git repo – the first time you do this tell it to use ‘From ‘Dockerfile’. This option is only possible if you have successfully created the above Dockerfile in the correct location (inside the folder you are opening).

The first time you run this command it will take some time, as your computer will be creating a local VM container. In the future, telling VSCode to open up the folder will automatically reopen the correct image and be much faster! (You should also now see a .devcontainer folder in your main directory.)
If done correctly, you will be able to edit your local files using VSCode and run them using a VSCode terminal inside your local container.
Working Remotely
Please Note: if you are on an off-campus network you will need to use a VPN before connecting remotely
Out of the following methods, we recommend connecting with SSH since an excessive amount of FastX sessions tends to become unstable on the EWS cluster, and FastX connections can have unexpected behavior.
Use FastX for GUI
You can run a full desktop GUI session in browser or with a client using FastX. Follow the link to learn how to use it.
Use SSH for a terminal/console session
SSH stands for secure shell. It allows you to connect to a remote server using terminal securely.
- For Mac OS X or any other Unix-like variant, you will need to open a terminal session. (Applications->Utilities->Terminal)
- Run the command:
ssh NETID@linux.ews.illinois.edu(replacingNETIDwith your NetID) - If this is your first connection, it will then prompt you to accept the public key from the host; type
yesat this prompt and hit enter. - At this point you should be prompted for your university password; note that you will not see any characters displayed as you type.
- If your password was successfully accepted you should have a fully functioning EWS shell.
- Run the command:
- For Windows you will need to download PuTTY.
- Once you download PuTTY you will be prompted to enter the address to the server. Use
NETID@linux.ews.illinois.edu, substituting in your NetID. - You can save this by clicking the save button to the right of the highlighted default session. Optionally you could name this connection EWS.
- Now click connect and click “Yes” if it prompts you to accept the public key of the host machine.
- You will be asked to enter your university password; note you will not see any characters as they are typed.
- If your password was successfully accepted you should have a fully functioning EWS shell.
- Once you download PuTTY you will be prompted to enter the address to the server. Use
For first time shell users who don’t know how to edit files through terminal, try these common command line text editors: nano, vim, and emacs.
Working Natively
Follow the guide for your own operating system.
Windows
The Windows Subsystem for Linux (WSL) is a tool allowing Linux to run in Windows natively.
- Follow Microsoft’s instructions for installing WSL, choosing Ubuntu as the distribution.
- Continue following Microsoft’s instructions for initializing your Ubuntu distribution
- Download the packages used for C++ by running the following command to install the packages we will be using:
sudo apt-get update; sudo apt-get install clang-6.0 libc++abi-dev libc++-dev git gdb valgrind graphviz imagemagick gnuplot make
sudo update-alternatives --install /usr/bin/clang clang /usr/bin/clang-6.0 100
sudo update-alternatives --install /usr/bin/clang++ clang++ /usr/bin/clang++-6.0 100
sudo update-alternatives --install /usr/bin/llvm-symbolizer llvm-symbolizer /usr/bin/llvm-symbolizer-6.0 100
- If you’re using Ubuntu 20.04 and/or running into issues with standard library
includestatements:sudo apt-get install clang
Using your Windows Desktop in WSL/Ubuntu
When you start Ubuntu, your shell will begin in the Linux home directory. However, you will likely want to work with files that are inside of your Windows file system. By default, your C: drive is mounted at /mnt/c.
Some find it useful to create a shortcut to jump directly to your Windows Desktop:
- Navigate to your Windows desktop within the Linux shell:
  cd /mnt/c/Users/
  cd <Your-User-Name-on Windows>  // Use `ls` to find the available users in green
  cd Desktop
- In your Windows Desktop directory you just navigated to, run the following command to create a symbolic link (ex: a shortcut) from your Linux home directory to your Windows desktop to easily navigate there in the future:
ln -s `pwd` ~/desktop
- In the future when you launch WSL/Ubuntu, you can immediately jump to your Windows desktop by running
cd desktop.
Linux
You should make sure you have the following packages installed:
- Clang and libc++ and the libc++abi: The Clang compiler and the libc++ C++ standard library implementation. This provides all of the compiler Utilities. On most distros you will need to make sure you have
clang,libc++andlibc++abi(or similar) packages installed. - Valgrind: A tool for finding memory leaks and general programming errors.
- Graphviz: Graph plotting tools used for assignments which display graphs and trees as images.
- GNUPlot: Plotting tools used for assignments which display graphs and charts as images.
- GDB: The GNU Debugger.
After installing the required packages, you should now be able to check out, build, and run assignments as described in their documentation.
Ubuntu >= 14.04
To get the packages you will need:
sudo apt-get update; sudo apt-get install clang-6.0 libc++abi-dev libc++-dev git gdb valgrind graphviz imagemagick gnuplot make
sudo update-alternatives --install /usr/bin/clang clang /usr/bin/clang-6.0 100
sudo update-alternatives --install /usr/bin/clang++ clang++ /usr/bin/clang++-6.0 100
sudo update-alternatives --install /usr/bin/llvm-symbolizer llvm-symbolizer /usr/bin/llvm-symbolizer-6.0 100
If you have a different version of clang installed, you might need to remove it first. Alternatively, if you don’t mind using a different version of clang, you can use the other version instead – just make sure to test your code on EWS.
Arch
To get the packages you will need:
sudo pacman -Sy base-devel clang gdb valgrind graphviz imagemagick git gnuplot make
You will also need to install libc++ and libc++-abi from the AUR.
MacOS
Tools used on macOS will not always give results consistent with those used on EWS. Make sure to test your code on EWS to make sure it will work with our grading environment.
To install Homebrew: (You can skip this if you already have Homebrew installed)
In your terminal, (Applications->Utilities->Terminal) run:
xcode-select --install
to install the Xcode command line tools.
Next, we will install the Homebrew Package Manager for macOS using the following command:
/bin/bash -c "$(curl -fsSL https://raw.githubusercontent.com/Homebrew/install/master/install.sh)"
To install the necessary packages:
We need to install some tooling packages for future assignments. Run:
brew install ghostscript
brew install imagemagick
brew install graphviz
As you run each of these commands, it is recommended to follow Homebrew’s instructions for updating your PATH and compiler variables.
LLDB
LLDB is the default debugger for Xcode, so you should already have it installed by now. It is very similar to the GNU debugger, GDB. Here is a LLDB cheatsheet
Valgrind
Valgrind might not be compatible with your version of MacOS. Please check whether it is compatible on valgrind’s official website before trying to install.
Homebrew can also be used to install Valgrind.
To do so, run:
brew edit valgrind
This will open your default code editor. In the opened file, change the URL in the head section from https://sourceware.org/git/valgrind.git to git://sourceware.org/git/valgrind.git and run the following:
brew update
brew install --HEAD valgrind