Project Contributers:
| Name | Net ID | Section |
|---|---|---|
| Matt Kapnick | kapnick3 | ECE 297 |
| Sam Foley | safoley2 | ECE 110 |
| Alexis Santos | asantos7 | ECE 120 |
| Alyssa Fieldman | alyssaf5 | ECE 110 |
Introduction
______________
Purpose: In our project we will attempt to create a conveyor belt that can measure the weight on top of the conveyor belt, and when given a weight measurement for an item it can find how may of said items are on the conveyor belt. Our goal is to understand how we can complete these tasks using electronics and computers. Continuous improvement in manufacturing is a must now more than ever, but there is lots of data collection necessary as metrics to ensure that improvements being made are actually improvements 2. We are trying to aid in this effort by designing and creating a conveyor belt that records loads that it is subjected to, and communicates that to a computer so that the number of items and the rate that they come through can be calculated and plotted. This will make it easier for manufacturers to assess their modifications to their processes.
Research:
When deciding for a design of the structure we looked into several possibilities but ultimately decided on the central motor that attaches right to the belt inspired by a German small conveyor belt 3. Using wood for the overall structure because it is cheap and easy to work with. We also decided that the use of an Arduino would be our best way to do computer interfacing with our motor and force probes.
For the motor controller, we plan on using or are thinking of using these items listed above. With these items, we will be able to communicate the gear motor that will be responsible for moving the conveyer belt with a computer that will let us control the speed of the gear motor. We will be using the Arduino code to be able to code the different aspects and features the gear motor will be doing, for example the speed of it and when to turn it on or off. We will be able to wire the Arduino board with the driver that will control the Motor Drive controller to a breadboard in order to be able to program it and its features.
Design:
___________
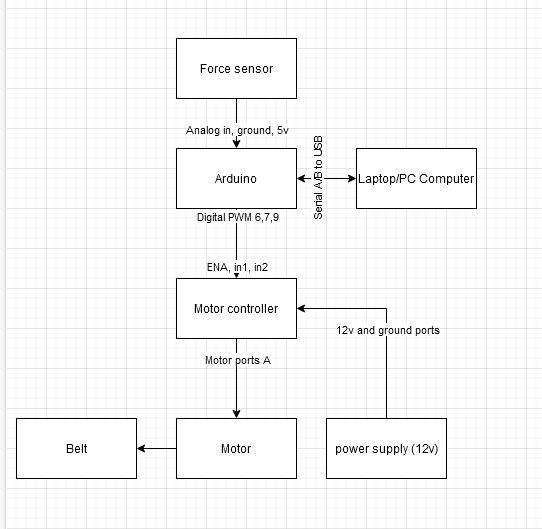
Flowchart:
Systems overview:
- Force Sensor: Measures the force, which can be used to determine the weight on the conveyor. One pin of the force sensor is connected to the Arduino in the 5V pin, the other pin is connected to A0 directly and to the Gnd pin through a resistor on the breadboard. Once the Arduino USB is plugged into a laptop, we will be able to see the data collected from the sensor. The photo below shows the set up for the force sensor that we will be using.
- Arduino: This will let us interface with both the motor and the force sensor. The force sensor data will be collected by the Arduino through the analog in and communicated back to the computer via USB. The Arduino will also send signals via the digital PWM outputs to turn the motor off and on.
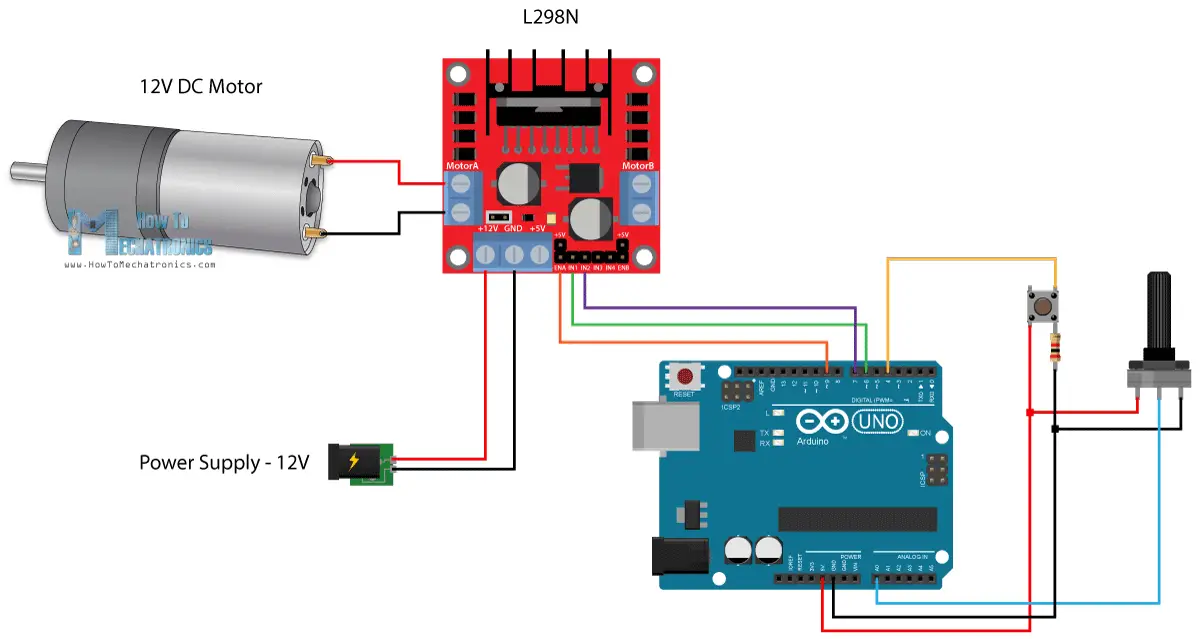
- Conveyor Motor/ Motor Controller: The Conveyor motor will turn our conveyor belt. It will be controlled by the L298N Motor Drive controller, which will be supplied power from a 12v power supply and will be attached to three analog pins on the Arduino which will allow us to control the speed and direction of the Motor through the Arduino software. The picture below is fairly helpful in giving an idea of what we plan to do, however we don't currently plan to use the knob to physically control the speed of the motor. The motor controller will be controlled through the computer communicating with the Arduino and Motor Drive controller.
- Computer: The computer will be used to recover data from the force probes and control the motor.
- Power Supply: Gives power for the motor, hooks up to the 12v and ground of motor controller
Parts list:
_____________
- Force Sensor
- $11.25 Link
- 3' x 6" light duty belt
$13.02 Link
- Belt wheel (3D printed)
- ~ $0.43
- Sandpaper
- $3.33 link
- 1" x 4" x 8' wood
- $2.48 link
- Nuts, bolts, screws, washers - $17.27
- Bolts/Nuts/Washers- 10.99
- Screws - 6.28
- Small Breadboard
- HL inventory (5)
- Wires
- Got em
- 100k ohm resistor
- HL inventory (8)
- Qunqi L298 N Motor Drive Controller
- $6.69 Link
- Gear Motors
- $13.99 Link
- Power Supply
- $6.99 link
- Arduino Uno
- HL inventory (2)
- Serial to USB
- HL inventory (81)
Total Cost: $75.45
Challenges
______________
One possible challenge that we may run into is getting stuck on how to achieve certain aspects of our project, because none of us have a lot of prior experience working with electronics. An example of an issue that we may run into is figuring out how to change the speed that the belt moves based off of how heavy the weight of the object is. Another challenge that we will have to deal with is figuring out how to work together at this point in time, when a lot of communication is done virtually and restrictions are placed on meeting in person. Despite these challenges and others that we may face we will work hard to overcome them. One of the best things that we can do to try and prevent issues is to communicate with each other. If we all communicate to the whole group any issues that we are having we will be able to work together to resolve them and hopefully get the team back on track.
References
_______________
[1]"Understanding Conveyor Systems - Types, Applications and Considerations", Thomasnet.com, 2020. [Online]. Available: https://www.thomasnet.com/articles/materials-handling/understanding-conveyor-systems/#register.
2 talk with Melissa Forbes, an industrial engineer at GEHC
3 Vetter Kleinförderbänder. Mini Conveyor with Middle Drive - FR-20-20-M. Youtube, 18 Feb. 2013, www.youtube.com/watch?v=jjB_LxU2nDs&list=LLoaAp2ys1qhYvNY48s2ENhg&index=1&t=123s.
[4]"Arduino DC Motor Control Tutorial - L298N | PWM | H-Bridge - HowToMechatronics", HowToMechatronics, 2020. [Online]. Available: https://howtomechatronics.com/tutorials/arduino/arduino-dc-motor-control-tutorial-l298n-pwm-h-bridge/. [Accessed: 24- Sep- 2020]
[5]Bakker, B., 2020. Force Sensing Resistor (FSR) Arduino Tutorial (3 Examples). [online] Makerguides.com. Available at: <https://www.makerguides.com/fsr-arduino-tutorial/> [Accessed 25 September 2020].


