| Athena Try | try2 | ECE120 |
|---|
Introduction:
The Roomop is a multisurface machine that can detect loose debris on a surface and vacuum the solid waste into it’s trash compartment for later dumping. This device will also be able to detect liquid spills and spray cleaning solution on the desired area before moving on towards vacuuming again. The project itself will focus on constructing a device that is autonomous in movement and can detect the difference between solids/liquids. This product can be useful for homeowners with children/pets who don't have time to take care of the mess themselves.
Background Research:
The idea of building a Roomba came to me during my ECE110 final lab project last semester. Unfortunately, my partner and I did not agree and the Roomba was not created. But with the time and resources, I would like to do more than just build an ordinary Roomba. I think it would be pretty interesting to work on/with submarines one day, so I wanted a project that worked with liquids in some capacity. There are numerous tutorials on how to build a Roomba from scratch, so if I get stuck there are a variety of sources to draw inspiration from, so I believe this project will be feasible. Also fun fact! The man who invented the Roomba also created an human-controlled underwater robot that captured live lion fish since they are an invasive species! There are sensors for all of the functions I need to perform these functions. There is a sensor for detecting surface liquids (Surface Liquid Sensor), a sensor for detecting walls (ultrasonic sensors), and with the construction of an H bridge and a motorized pneumatic pump so this project will be a great learning experience!
Design Details:
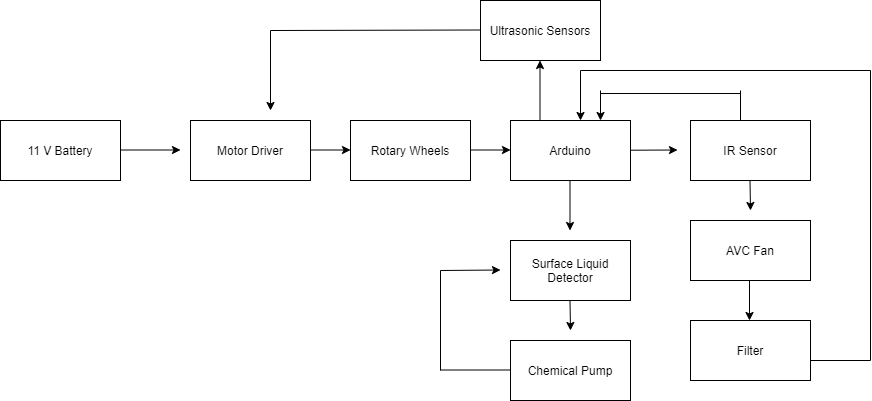
Block Diagram:
System Overview:
- The motor driver will run the rotary wheels across a randomly generated pattern on the bottom of a floor.
- The Arduino will only run if the motor driver has a voltage across it and will transmit data back to the motor driver on direction to move based on the sonar imaging sensor.
- A variety of ultrasonic sensors will be placed on different spots of the robot to detect walls which will activate and H bridge to move backwards and will detect solid objects on the floor as well as walls.
- Once an object has been detected on the bottom-most sonar imaging sensor, the internal fan blades will turn on and propel the waste internally into the robot until the threshold is no longer met.
- The Arduino will also control a surface liquid sensor that will measure the matter of the trash to see if it is solid or liquid and if a certain threshold is not met a chemical pump will deliver specific doses of cleaning liquid until the threshold safety minimum is met.
Parts:
Arduino Board ($19.62)
Ultrasonic sensor (In stock)
Microcontroller ($1.84)
MB7360 HRXL MaxSonar Sensor ($109.95)
9 V Batteries (x2) ($8.00 each)
L298 Motor Driver ($6.89) **** Order soon
3D printed board for vacuum
4" Vex Wheels (In stock) x4
12 V AVC Fan (&=$8.99)
Filter ($5.50)
For Chlorine Pump (also open to ideas):
Piston: 2.36g PLA Filament ($0.08)
Sleeve: 10.32g PLA Filament ($0.33)
Case: 16.92g PLA Filament ($0.54)
DC Motor in Micro Servo Body ($3.50)
Adafruit Micro Lipo - USB LiIon/LiPoly charger - v1 ($5.95)
2x Lithium Ion Cylindrical Battery - 3.7v 2200mAh ($19.90)
TOP Module + Accessory Pack ($50.00)
Possible Challenges:
I don't have experience programming with an Arduino board so I will need assistance in the initial coding aspect of my project. I think I will have to adapt the chemical pump with specific aspects of an insulin pump in order to get the correct dosage of chlorine after the sensor reads insufficient, that will take a lot of research into medical distribution devices that I am not familiar with. I found a sonar sensor that is "rugged" for outdoor use, I am hopeful that this sensor will still be able to detect small solid objects on the ground of the pool, but that will also need to be tested through a series of trials. I am also concerned that this project may be covering too much in a short time frame and that I won't be able to master the chlorine dispensement and the vacuum suction simultaneously.
References:
Nieto, C. (2020). DIY Vacuum Robot. [online] Instructables.com. Available at: https://www.instructables.com/id/Build-Your-Own-Vacuum-Robot/ [Accessed 12 Feb. 2020].
Gantt, C. (2015). Triggering a Servo Using a HC-SR04 Distance Sensor and an Arduino. [online] theMakersWorkBench.com. Available at: http://www.themakersworkbench.com/tutorial/triggering-servo-using-hc-sr04-distance-sensor-and-arduino/ [Accessed FEb. 20. 2020].
Lewis, Dana. (2016). How I Designed A "DIY" Closed Loop Artificial Pancreas. [online] DIYPS.org. Available at: https://diyps.org/2016/05/12/how-i-designed-a-diy-closed-loop-artificial-pancreas/ [Accessed 13 Feb. 2020].
Changes Made:
I have already made the adjustments for the machine to work on land instead of water as per many, many suggestions. This has no doubt made the whole process much easier already. I have shifted my focus of this project into 2 areas, first making sure the machine can moves in various directions by itself and vacuum, and then onto the distributing liquid portion of the project.

