Group Members:
Xinglong(Alex) Sun(xs15) xs15@illinois.edu ECE120
Aryan Prinjha (prinjha2) prinjha2@illinois.edu ECE120
Tonglong(Tony) Liu(tl20) tl20@illinois.edu ECE110
Final Project Report and Code
Introduction
Statement of Purpose
Some industrial products develop cracks or fissures on their sides due to defective production or time. These cracks if left undiscovered, can cause excruciating problems and consequences. However, it’s not easy to spot them early on, especially in finely honed and elaborate products. Therefore, in this honor lab, we intend to make a crack detector robot based on ultrasonic sensors and display a data map on the screen using Python after collecting and processing.
Through this project, we hope to achieve the following goals:
- Utilize information learned in ECE110 and ECE120 to produce a functional product
- Take our knowledge to the next level through application of concepts learnt during online research
- Deepen our understanding of programming and circuits
- Build strong relationships with group members
Background Research
Through background research, we determined the material needed for this project, which is listed in detail in the following section. The idea of this project comes from a proposal by Nissan. Our project is essentially a more simple version. Instead of designing a whole chair, we decided to design a small guiding attachment which will be placed under the chair. We will use Arduino boards along with ultrasonic sensor and infrared sensor to build an internal guiding system. Four to five motors and four wheels will be used to provide driven power for the attachment in order to push the chair to their position. Since there are very few online resources about this project, we still have a lot of research to do.
The above was our initial research for the project. However as we delved into it we realized that for making an autonomous chair. We then focused on the mapping aspect of the project and made an Industrial Crack Mapping robot.
Design details:
Materials:
- Arduino Circuit Board
- Four HC-SR04 (Ultrasonic sensors)
- Servo Motor
- LED Lights
- Logic Gates (AND, NOT, OR, XOR)
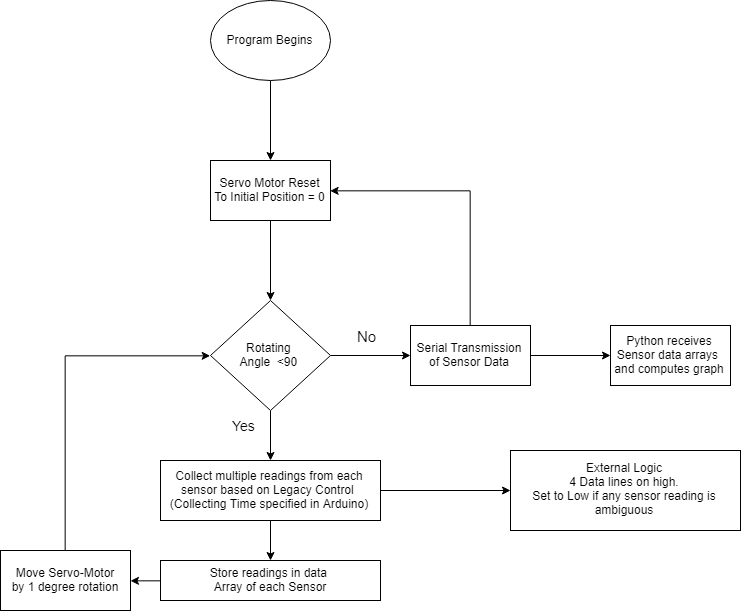
Block Diagram: Arduino Functioning
As shown above, the flowchart of the entire design is not complicated. The servo motor drives four ultrasonic sensors placed on it to different angle positions. The sensors measure distances multiple times (reason for that will be explained later) and store each measured data in an array. After the entire data collecting process, Arduino sends those data to Python (a detailed explanation of python code will be performed later). Also, during the process, four output signals from Arduino will go through an external logic that tests if each sensor is working proper or not.
Sensor – Data Stream Error-Detection
The Arduino code measures sensor data, multiple times at each degree up to 90. At each point it gets an array of readings. These readings are compared and averaged. Four pins on the Arduino, from A0 to A3 are initially set to high. They correspond to each of the 4 sensors. If the deviation between readings at each degree vary greater than numerical value ten, then the corresponding pin to the faulty sensor is set to low.
References:
Weekly journal:
Week 1
Met with lab partners and discussed the project we want to pursue
Week 2
Ordered the parts and worked on logic diagrams
Week 3
Started writing code for the Ultrasonic Sensors
Week 4
Made the base for the Ultrasonic Sensors
Week 5
Soldered the Ultrasonic sensor onto the base and connected wires
Week 6
Items arrive. Begin testing components with code
Week 7
Debugged code and got readings from all Ultrasonic Sensors
Week 8
Mounted the Ultrasonic sensors onto the Servo Motor and wrote the code for the motor
Week 9
Debugged code for the Servo Motor
Week 10
Started working on the Sensor Health Detection Logic as well as Python code for Serial Transmission
Week 11
Debugged code. Tested Components
Week 12
Debugged Python transmission. Tweaked Arduino code
Week 13
Completed the Sensor Health module
Week 14
Completed the Python code and Integrated all parts into a single cardboard box unit
Week 15
Project Completed and Final Presentations


