| Name | Net ID | Section |
|---|---|---|
| Ethan Fransen | ethansf2 | 110 |
| Yixuan Jia | yixuanj3 | 110 |
| Jiayu Zhu | jiayuz6 | 110 |
Project Proposal
- Introduction
a. Statement of Purpose
As any guitar player knows, guitars are always going out of tune. Whether getting ready before a big concert or just practicing in your room, it is very important that the instrument is properly tuned so that all of the notes sounds like it is supposed to. However, not all tuners are created equally. As guitar players ourselves, we are curious to see how these devices actually work, so we plan to try to create a highly accurate guitar tuner that will be able to effectively compare the frequency of the sound produced by the string and a reference frequency for the desired note.
b. Background Research
We have found several similar projects on YouTube, each of which have slight variations that make them unique. We intended to try and capture the best elements of these other projects and synthesize them with a few of our own ideas so as to create a guitar tuner that is as accurate as possible while still maintaining a simple and efficient user interface. - Design Details
- Block Diagram / Flow Chart
- System Overview
- Block Diagram / Flow Chart
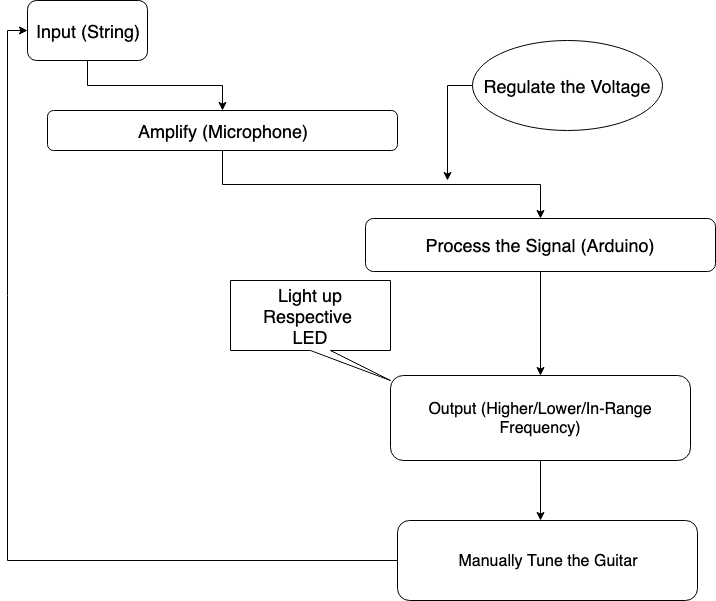
- Input: The microphone/vibration sensor will pick up a signal from the oscillating string
- Amplify: The microphone will increase the amplitude of the wave in order to make it easier to read on the Arduino, but will not change the frequency
- Regulate Voltage: MOSFETs and capacitors will be used to avoid sudden changes in voltages
- Process Signal: The Arduino will compare the input frequency with the acceptable range for each string and determine if is higher than, lower than, or in the range
- Output: Depending on what the Arduino determines, the respective LED will light up, telling the user how to tune the guitar
- Tune Guitar: The user will now adjust the tuning and re-strum the string to repeat the process until the frequency is within the acceptable range
3. Parts List
- Arduino Uno x1
- LM386 x1
- Condenser Mic x1
- Microphone / Audio jack x1
- 10k potentiometer x1
- O.1µF capacitor x2
- 100Ω resistor x4
- 10Ω resistor x1
- 10µF capacitor x3
- 5mm yellow LED x2
- 5mm green LED x1
- Normally Open Push Buttons x6
- Jumper wires
- Breadboard
4. Possible Challenges
- It will be difficult to get an accurate and consistent reading for the measured frequency of the guitar string. We plan to build prototypes that use either a microphone, vibration sensor, or both to measure the frequency of the guitar string. After thorough testing, we will determine which is the best method for determining the frequency and implement that into our final design.
- If we decide to add a mechanical component to the tuner that will turn the guitar pegs automatically, it will be challenging to provide enough power to a servo motor to actually turn the pegs. They tend to require a sizable amount of torque that would be challenging for the circuit to provide.
5. References
a. https://circuitdigest.com/microcontroller-projects/arduino-uno-guitar-tuner
b. https://create.arduino.cc/projecthub/metrowest_aug/arduino-based-automatic-guitar-tuner-2093fe
Final Report Guideline
Final report should be 3 to 5 pages. Large circuit schematics, long program flow charts, PCB layouts, and Arduino codes should be put in the appendix and reference within your text. Appendices will not count toward your page limits.
- Introduction
Statement of Purpose
Please provide a brief description of your project. List the goals and objectives of your project and explain why this project is useful for the problem your group want to solve or functions that make your project unique. Revise your statement of purpose from your proposal as necessary.
Features and Benefits
List and provide description of the features and benefits of your project.
- Design
- System Overview
Provide a block diagram for your overall system and a brief description of how the different blocks interact with each other. - Design Details
For each block in your system block diagram, provide the design details. Include any relevant design considerations, block diagrams, calculations, pictures, circuit schematic, flow charts, truth tables, etc. that will aid your description.
- System Overview
- Results
In this section provide the characterization of your sensors and actuators. Also provide the results of any test you have conducted with your system that verifies its functionality. - Problems and Challenges
- Future Plans
Briefly comment on your future plans for the project.- References
List all references you used in your final report. IEEE citation format is highly recommended. You can use citethisforme.com's IEEE citation generator to painlessly generate your references in this style.
