| Name | NetID | Section |
|---|---|---|
| James Yang | jamesey2 | ECE 110 |
| Lingxiang Cai | lcai15 | ECE 110 |
Statement of Purpose
The purpose of our project is to create a belt drive electric skateboard that is capable of moving someone standing on it. In order to create it, we plan to first obtain a skateboard and one motor that attaches to one wheel with a belt pulley. We will use an electronic speed control to control the motor speed. Additionally, we plan to incorporate a pressure sensor that will stop powering the skateboard if the rider steps off as a safety measure. Hopefully, this will help us get to certain classes faster than walking.
Background Research
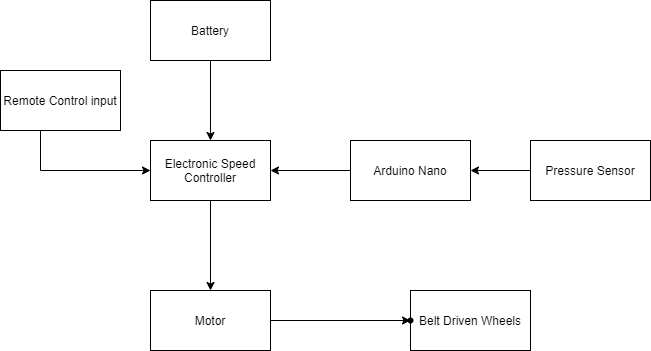
There are two versions of electric skateboards: a belt drive and a hub drive. We chose the belt drive because it only requires one motor so it is cheaper to make. It uses any regular skateboard or longboard and attaches a motor to spin one of the wheels. The motor is connected to the wheel using a belt and gears so as the motor directly turns one of the gears the belt will also turn the other one that is attached to the wheel. The motor is controlled by the electronic speed control that receives input from a wireless remote. Additionally, the skateboard will only receive power if the pressure sensor is stepped on. This is determined by an Arduino circuit. We will be using Velostat to make the sensor. It varies resistance based on pressure and with by running a current through it, we should be able to modify our ESC. Hopefully, being able to complete this project will allow us to have a better understanding of ESC and motor controls. There have been many designs of DIY belt drive electric skateboards on Youtube as well. Some of them use quite expensive motors and parts, but we are trying to make ours on the cheaper side.
Block Diagram / Flow Chart
Provide a simple block diagram of your hardware design. A block diagram is a schematic graphic that shows the interactions between different components in a hardware or software system. If appropriate, please also include a flow chart showing the steps your design needs to go through to function. The online program draw.io is a great tool to create polished block diagrams and flow charts. Likewise Microsoft's visio is also a great program to create block diagrams and flow charts.
System Overview
A Li-ion battery will power the ESC and the motors. Pushing a button on the wireless remote will determine ESC how much power to send to the motor depending on the user's input with a wireless remote. Additionally, in order for the ESC to send power to the motors, the pressure sensor must be stepped on. If you step off, the ESC will not send power to the motors.
Parts
Provide a list of parts that you may need for your project. You should include details such as the quantity, model number, purpose, vendor, and price (excluding taxes and shipping) for each part. This list may change as you work on your project.
| Part | Link | Price |
|---|---|---|
| Motor | Already have | |
| ESC | walmart | 24.41 |
5s 3000 mAh Battery | hobbyking | 29.92 |
| lipo charger | walmart + walmart | 28.70 + 14.99 |
| Velostat | adafruit | 4.95 |
| Motor Mount + Gears | 3D print: 40g | |
| XT-60 Adapter | Already Have | |
| Arduino Uno | Already have | |
| Timing belt | Already have | Honors Lab Inventory |
| deck | Already have | |
| 4 flywheels + truck | Already have |
*still working on pricing
Possible Challenges
Some possible challenges could be the mechanical assembly of the motors and the gearing as well as attaching everything. If the truck is too small to house the motor, we might need to use a Dremel. For the electrical part, the Li-ion has to be able to power the ESC with the correct voltage, so we must find the correct one. We are going to try using one battery, but if it is not enough power, we might need more. The pressure sensor and the Arduino might also be a little difficult. We both have little experience with coding an Arduino as well as combining our ESC with the arduino module. For 3D printing, we must find the right model for the gears. Hopefully, they wont break.
References
List all references you used in your proposal. This is important, you do not want to be blamed for plagiarism. IEEE citation format is highly recommended. You can use citethisforme.com's IEEE citation generator to painlessly generate your references in this style.
Understanding How Electric Skateboards Work – E-Skateboarder
Pressure Sensitive Electric Skateboard : 7 Steps - Instructables
3D-Printed Electric Longboard : 8 Steps (with Pictures) - Instructables
3D print files:
Final video link:
https://drive.google.com/file/d/1kUqXxa1iLwmj3XvFaTx-jgrev1K5Qcrm/view?usp=sharing
Final Report link:
https://docs.google.com/document/d/1eUWWlm2zmwG38xkh-xXDWdhLvM1nG4H9SODyW5zHAw4/edit?usp=sharing
