| Name | Net ID | Course |
|---|---|---|
| Tom Danielson | tsd3 | ECE 110 |
| Matthew Ghanayem | mg37 | ECE 120 |
Project Proposal
Introduction
Purpose
Dance Dance Revolution is a game that we both enjoyed in our past. However, is the transition from arcade game to console, the dance pads themselves had to become better suited for travel, so people could bring them home to connect and play. Unfortunately, this meant the mats were made from a more flexible material, so they could be stored more easily, but this resulted in unresponsiveness and input lag when it came to using the mats. This is because it was harder for a step to be considered a button press since the structure of the mats made it so that the player had to press down harder to make the connection for the button press. This slowed mobility and, in a fast game like Dance Dance Revolution, made it more of a pain to play than before, especially in harder levels. To date, no dance pads made of sturdy materials (like those used in arcades) are able to be connected to consoles for play, so we want to change that. We are a model dance pad from the gamecube's "Mario DDR" in order to make this work, although we don't have the technical expertise to wire it to a gamecube, and no usb to gamecube ports exist (that we know off), so we will be wiring it to a computer and running it via Dolphin Emulator. Hopefully, when our dance pad is completed, it will create a more enjoyable experience for people wanting to play DDR on consoles. We plan on making at least two, so that people can play with their friends (if they have any).
Background Research
We have found a few similar projects on Youtube, including ones that detail what goes into making a DDR dance pad, including videos from making functioning pressure plates to videos that help us configure the wiring for said pressure plates, to videos that show how to construct the dance pad itself. We will be using these videos throughout the project as guides for our work to make sure we make the best model possible.
- This was the most useful one.
- Design Requirements
- Flowchart
- Required materials
- Wood
- Aluminum (foil)
- Foam tape
- Wires
- Arduino Leonardo (Order Form Submitted)
- USB to USB Cable
- Possible Challenges
- Pressure pad sensitivity
- Durability/Longevity
- Weight (should be light enough to carry)
- Future Plans
- To make it able to connect to a gamecube
- Adding lights to indicate button presses
- References
- YouTube. (2016). USB DDR Dance Pad (Arduino, Pull-Up Resistors) - Super Make Something Episode 9. [online] Available at: https://www.youtube.com/watch?v=nXjj9IXUaA4 [Accessed 24 Sep. 2019].
- YouTube. (2016). USB DDR Dance Pad (Arduino, Pull-Up Resistors) - Super Make Something Episode 9. [online] Available at: https://www.youtube.com/watch?v=nXjj9IXUaA4 [Accessed 24 Sep. 2019].
- Midterm Report
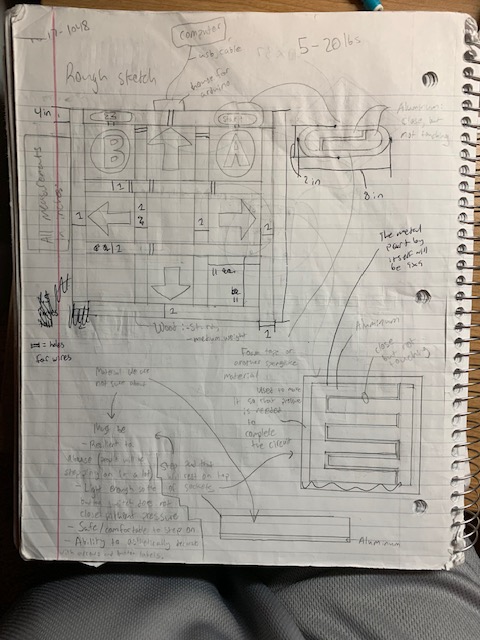
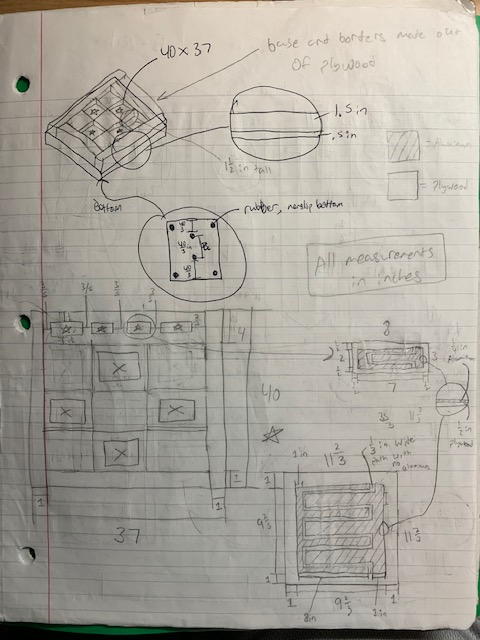
- In order to complete our project, we needed the help of the machine shop to build the design for us, since we alone did not have the tools to build the frame we needed. The design above is what we had originally presented to the machine shop to build. Since then, our design has changed a little bit, based on what we can do to make the project efficient in both time and cost of materials. Therefore, we have changed a few things, detailed in the pictures below. While our original plans have changed slightly, our project is still setting out to achieve the same goal, and though we may have to wait a little bit to let the machine shop do their work, we will continue to make changes to our breadboard design and code to make it easier to implement when we are able to.
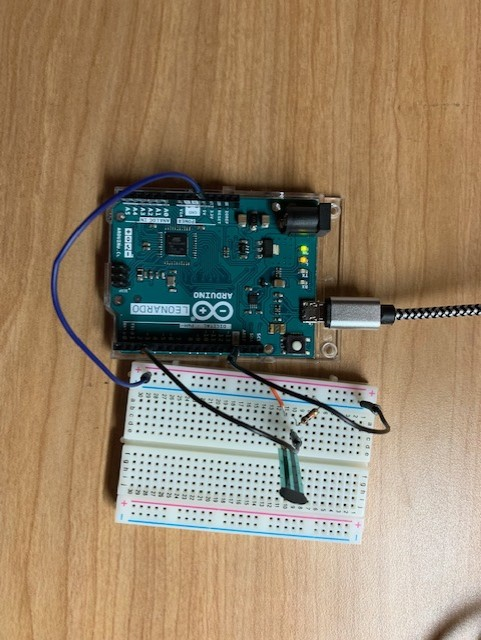
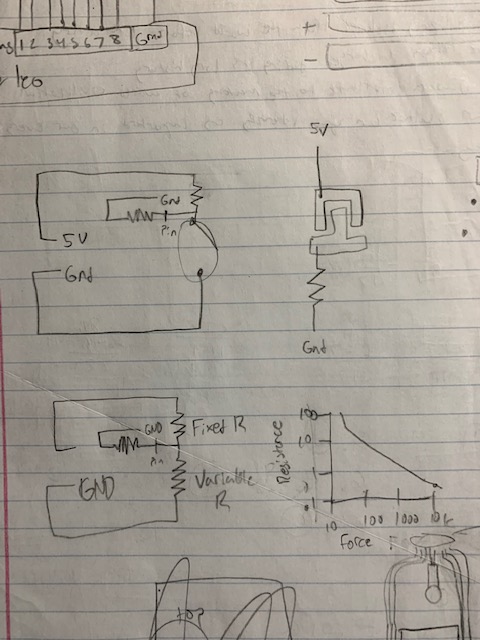
- Our setup seems rather simple when looking at it currently. We had originally used buttons for testing, and had planned on using aluminum foil plates that connected with force for the final product. We later wanted something that was easier to work with and something that would make our design easier to build for the machine shop. We tried using the flex sensor, but the way it worked proved to be troublesome for us during testing, and would be tough to implement given our design. Finally, we landed on the force sensitive resistor, which is seen in our circuit design above. We only have one force sensitive resistor to test with right now, and so we also only have the wiring for one input currently. Later, however, when the board is ready, we will be applying multiples of this same design, one for each button we need to work with. Right now, however, we have made good progress with the test design, and hopefully our code and design should be ready by the time we get the board, so we can install it quickly and easily. Once we get our board from the machine shop, we will have to solder everything in order for our design to flow properly, as well as finding a good resistance to set the force sensitive resistor to, since it will differ slightly when being used with the board compared to when we are testing with the breadboard only.
- Code
- The code we had originally used as a guideline can be found on this page: https://github.com/SuperMakeSomething/usb-ddr-dance-pad/blob/master/dancePadCode.ino
- We have made a few slight variations to the code, mainly to match our needs in terms of which inputs go to which outputs as well as for working with delays to find the best time interval for playing. Though changes are few, we still have changed the code a little bit, so here is a link to our new code as well: https://docs.google.com/document/d/1KzqtGK33X-QiXBv2KdTLoV2F5CMCP4m4Mnpr169Gv7Y/edit?usp=sharing


