| Name | NetID | Section |
|---|---|---|
| Udit Pai | upai3 | ECE 120 |
| Arush Bansal | abans3 | ECE 120 |
Statement of Purpose
The project is creating a custom controller for use with games on PC and, if possible, also video game consoles such as the Nintendo Switch and the Xbox Series X. The controller will have 2 joysticks, 4 face buttons, a directional pad/4 directional buttons, 4 shoulder buttons, 2 rear paddles, and 3 options buttons, and will use an Arduino to interface with the PC it is connected to via USB or Bluetooth. This controller will also have software that we make to add profiles to it, so you can map different commands to each button and save it. The profile currently in use can be indicated with LEDs. This controller is unique in its ability to store multiple profiles. We were also thinking of using a fingerprint sensor to switch profiles on the fly depending on the user, but decided against implementing it for now.
Background Research
We first looked up how to create a custom controller and found some videos on the topic. We also looked at some Arduino boards to find ones that had enough input ports for our buttons and sticks. We considered straight up buying controller PCBs but decided against it as they were a bit too expensive and hard to work with. Our main inspiration for this project was that we were both appalled at prices of official game controllers, so we thought 'Why not just make our own controller?'. We have thought of using fingerprint sensors in the past and thought it would be cool to implement it into a controller. Initially we had the idea of just making a basic controller, but then we thought 'We can do anything here, why not make it different?' so we decided to make it have extra rear shoulder buttons, be able to switch between wired and wireless through Bluetooth, and be able to have multiple control profiles.
Block Diagram / Flow Chart
System Overview
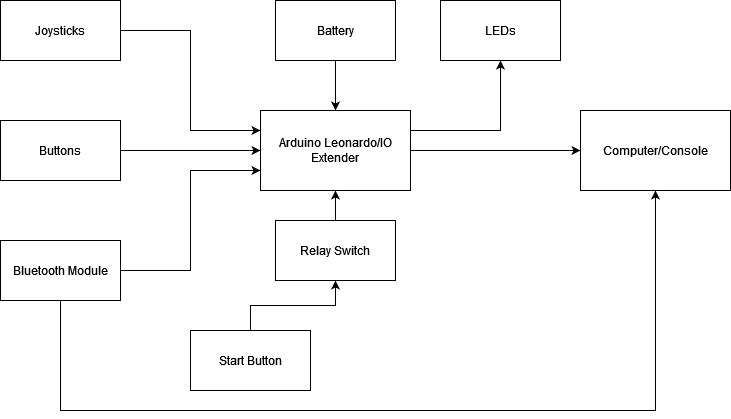
The joysticks, buttons, Bluetooth module, and slide switch all connect to the Arduino, which is powered by a battery. The slide switch works as the on/off switch for the entire controller, and is thus directly connected to the battery, so the Arduino actually gets fed power through the switch. The Arduino then processes inputs and outputs them to the computer or console that it is connected to, either by wire or via the Bluetooth module. It also outputs to the LEDs connected to it to signal whether it is on and what profile is in use at the moment.
Parts
| Part Name | Quantity | Unit Price | Vendor | Link |
|---|---|---|---|---|
| Arduino Leonardo with Headers | 1 | $ 21.95 | Sparkfun | https://www.sparkfun.com/products/11286 |
| HC-05 Bluetooth Module for Arduino | 1 | $ 0 | Honors Lab Inventory | N/A |
| Generic LEDs | 3 | $ 0 | Honors Lab Inventory | N/A |
| 9V D Battery | 1 | $ 0 | Honors Lab Inventory | N/A |
| DC Battery Harness | 1 | $ 0 | Honors Lab Inventory | N/A |
| 5V Relay Module for Arduino | 1 | $ 0 | Honors Lab Inventory | N/A |
| Analog 2-Axis Thumb Joystick with Select Button | 2 | $ 5.95 | Adafruit | https://www.adafruit.com/product/512 |
| 15pack Colorful Round Tactile Button Switches | 1 | $ 5.95 | Adafruit | https://www.adafruit.com/product/1009 |
| 16mm Momentary Push Button Switches | 6 | $ 0.95 | Adafruit | |
| 10pack 12x12x6mm Tactile Switch Buttons | 1 | $ 2.50 | Adafruit | https://www.adafruit.com/product/1119 |
| SparkFun 16 Output I/O Expander | 1 | $ 6.50 | Sparkfun | https://www.sparkfun.com/products/13601 |
| SPST Slide Switch | 1 | $ 1.14 | Digikey | https://www.digikey.com/en/products/detail/cw-industries/GF-123-3011/4089772 |
Possible Challenges
Some challenges that we foresee in working on our project are figuring out how to actually solder stuff properly, as we do not have much experience with soldering, as well as learning how to CAD a shell for the controller, figuring out the wiring for the whole system and keeping it compact enough to fit in the shell, and learning how to set up an Arduino through code as both of us have very little experience with Arduinos and electronics in general.
Link to report: https://docs.google.com/document/d/1x-oxjfUqrxzzVkfECBFWMLgm2fJbiAKwGicpHj-w09k/edit?usp=sharing
Link to video: https://drive.google.com/file/d/1gz5LGN2rjD6PTFqbr5PIb_OUuZjT1oae/view?usp=sharing
References
[1]A. Joseph, "Interfacing Bluetooth Module (HC-05) with Arduino Uno", Arduino Project Hub, 2020. [Online]. Available: https://create.arduino.cc/projecthub/akshayjoseph666/interfacing-bluetooth-module-hc-05-with-arduino-uno-f5209b. [Accessed: 02- Dec- 2021].
[2]"Choosing an Arduino for Your Project - learn.sparkfun.com", Learn.sparkfun.com. [Online]. Available: https://learn.sparkfun.com/tutorials/choosing-an-arduino-for-your-project. [Accessed: 02- Dec- 2021].
[3]"Standard Arduino Comparison Guide - SparkFun Electronics", Sparkfun.com. [Online]. Available: https://www.sparkfun.com/standard_arduino_comparison_guide. [Accessed: 02- Dec- 2021].
[4]"SX1509 I/O Expander Breakout Hookup Guide - learn.sparkfun.com", Learn.sparkfun.com. [Online]. Available: https://learn.sparkfun.com/tutorials/sx1509-io-expander-breakout-hookup-guide/all. [Accessed: 02- Dec- 2021].
[5]"How to Make Your Own PC DIY Gaming Controller Using Arduino", YouTube. [Online]. Available: https://www.youtube.com/watch?v=bDikklGx-tM. [Accessed: 20- Sept- 2021].
[6]"Making a PC Game Controller with Arduino Uno", YouTube. [Online]. Available: https://www.youtube.com/watch?v=EkzCk_oesJk. [Accessed: 20- Sept- 2021].
[7]Heironimus, M., "GitHub - MHeironimus/ArduinoJoystickLibrary: An Arduino library that adds one or more joysticks to the list of HID devices an Arduino Leonardo or Arduino Micro can support.", GitHub. [Online]. Available: https://github.com/MHeironimus/ArduinoJoystickLibrary. [Accessed: 02- Dec- 2021].
[8]"GitHub - sparkfun/SparkFun_SX1509_Arduino_Library: Arduino library for the SX1509 16-I/O GPIO expander.", GitHub. [Online]. Available: https://github.com/sparkfun/SparkFun_SX1509_Arduino_Library. [Accessed: 02- Dec- 2021].
