
Kirchhoff's Laws
Using KVL to find voltages across generic elements
Learn It!
Pre-Requisite Knowledge
To understand this section, you need to know the following concepts:
Goal
Using KVL
Use KVL to find the voltages across generic elements in a circuit
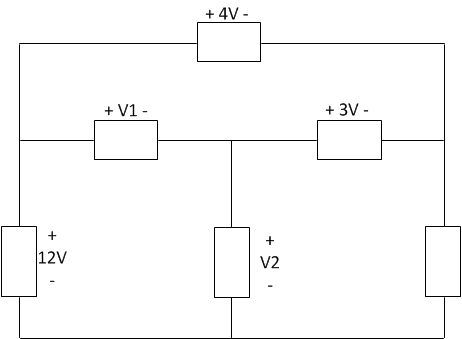
Find the values of \(V_1\) and \(V_2\) in the diagram at left.
\( \begin{equation} a. V_1 = 1 \text{ V} \text{ and } V_2 = 13 \text{ V} \\b. V_1 = 1 \text{ V} \text{ and } V_2 = 11 \text{ V} \\c. V_1 = 5 \text{ V} \text{ and } V_2 = 7 \text{ V} \\d. V_1 = 7 \text{ V} \text{ and } V_2 = 5 \text{ V} \\e. V_1 = 7 \text{ V} \text{ and } V_2 = 19 \text{ V} \end{equation} \)
\( \begin{equation} a. V_1 = 1 \text{ V} \text{ and } V_2 = 13 \text{ V} \\b. V_1 = 1 \text{ V} \text{ and } V_2 = 11 \text{ V} \\c. V_1 = 5 \text{ V} \text{ and } V_2 = 7 \text{ V} \\d. V_1 = 7 \text{ V} \text{ and } V_2 = 5 \text{ V} \\e. V_1 = 7 \text{ V} \text{ and } V_2 = 19 \text{ V} \end{equation} \)
+
?
What are these boxes?
Part 1
Find the first unknown voltage
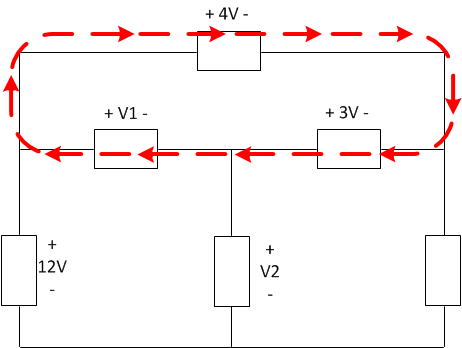
Let's pick a loop to analyze. We would prefer to use a loop that contains only one unknown. The left loop has both \(V_1\) and \(V_2\), but the top one contains only \(V_1\).
+
⇨
Finding the signs
\[V_1 \quad 4 \quad 3 = 0 \]
Now we apply KVL to find the (unknown) \(V_1\). We know it will involve \(V_1\), 4 and 3.
\[+V_1 \quad 4 \quad 3 = 0\]
Now we need to determine what sign each of the elements takes. Getting this wrong will mess up everything, so let's be careful. When traveling from the \(-\) terminal to the \(+\) terminal, we assign that a positive sign because it's a voltage rise. This means that \(V_1\) will be positive.
\[+V_1 -4 +3 = 0\]
However, across the 4 V element we are traveling from the \(+\) terminal to the \(-\) terminal. That's a voltage drop, so we assign a negative sign. This means that 4 will be negative.
Across the 3 V element, we are traveling from the \(-\) terminal to the \(+\) terminal, another rise. So the 3 is positive.
Across the 3 V element, we are traveling from the \(-\) terminal to the \(+\) terminal, another rise. So the 3 is positive.
\[+V_1 -4 +3 = 0\]
Final KVL Equation
+
?
Reasoning behind this loop
We chose the loop to be going clockwise because that would make \(V_1\) positive in our equation, which makes it more convenient to solve. We could have made it counterclockwise but that would have been a little more work.
+
!
Alternative loop
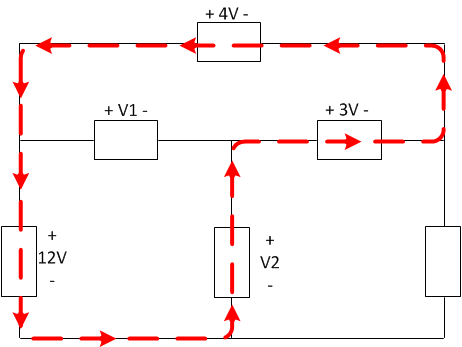
We could have chosen this loop and started by solving for \(V_2\). But since this loop has 4 elements rather than 3, it would be more work. Extra loops can be an effective way to check your work, though, because you didn't use them to construct your answer
★
\[V_1 = 1 \]
Combining terms and moving the constants to the right hand side gives us an answer.
+
?
What if we got a negative value?
Note that it is possible we could have obtained a negative value for \(V_1\). That is fine because the polarity labels around voltage just indicate a reference polarity and don't mean that the polarity should be one way or the other.
Part 2
Finding the second unknown voltage
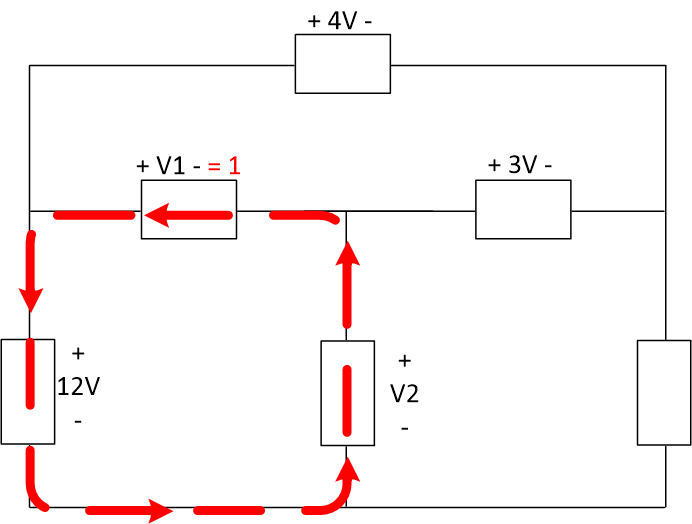
Now that we have \(V_1\), we can find another loop that gives us \(V_2\).
\[+V_2 + V_1 - 12 = 0\]
Now we use KVL again. The voltage across the 12 V element is a drop, so it appears as negative in our equation.
+
?
Why this loop?
We chose counter-clockwise this time, because we want \(V_2\) to be positive in our final equation.
+
⇨
Solve KVL equation
\[V_2 = 12- V_1\]
Move everything except \(V_2\) to the right hand side by subtraction.
Note that we kept \(V_1\) as a variable. If we had made a mistake, having it in variable form makes it easier to fix when re-doing a problem.
Note that we kept \(V_1\) as a variable. If we had made a mistake, having it in variable form makes it easier to fix when re-doing a problem.
\[V_2 = 12-1\]
Substitute \(V_1=1\)
\[V_2 = 11\]
Substitute \(V_1=1\)
★
\[V_1 = 1 \text{ V} \text{ and } V_2 = 11 \text{ V}\]
Choice \(b\) was the correct answer

