|
| CS440/ECE448 Fall 2021Assignment 3: Configuration Space PlanningDue date: Friday, October 14 11:59pm |
In this assignment you will write code that transforms a shapeshifting alien path planning problem into a configuration space, and then search for a path in that space. See the Robotics sections of the lectures for background information.
General guidelines
Basic instructions are the same as in MP 1. Specifically, you should be using Python 3.8 with pygame installed, and you will be submitting the code to Gradescope. Your code may import modules that are part of the standard python library, and also numpy and pygame.
For general instructions, see the main MP page and the syllabus.
You will need to adapt your A* code from MP 2.
Many animals can change their aspect ratio by extending or bunching up.
This allows animals like cats and rats to fit into small places and squeeze
through
small holes.
You will be moving an alien robot based on this idea. Specifically,
the robot lives in 2D and has three degrees of freedom:
Notice that the robot cannot rotate. Also, to change from the
long vertical form to/from the long horizontal form, the robot must
go through the round form, i.e., it cannot go from its vertical oblong shape to its horizontal oblong shape directly.
The round form is a disk (or a filled circle). The horizontal or vertical long form is a "sausage" shape, defined by
a line segment and a distance "d", i.e., any point within a given distance "d" of the LINE SEGMENT between the alien's head and tail is considered to be within the alien .
For each planning problem you will be given a 2D environment specified by:
You need to find a shortest path for the alien robot from its starting position
to ONE of the goal positions.
The tricky bit is that the alien may not pass through any of the
obstacles. Also, no part of the robot should go outside the workspace.
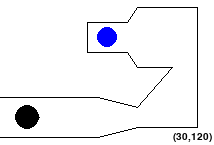
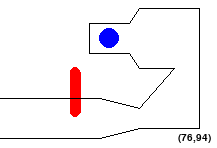
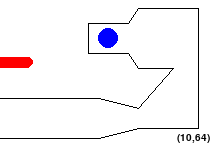
So configurations like the following are NOT allowed:
Also note that, since we are discretizing the state space, we want to
add a safety buffer equal to the half diagonal of a square whose side
length is the granularity we're using to digitize our map.
Specifically, if the granularity is G, we want
our alien to be at least \(\frac{G}{\sqrt{2}}\) units way from any
obstacles and the same distance away from the edges of the workspace.
This ensures that the alien will not accidentally bump into an
obstacle of go out of bounds while executing its path in the real
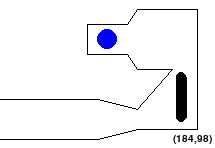
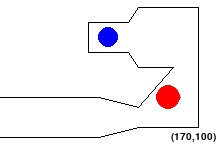
world. This is important for, configurations like the one below, where the
granularity is set to 10 pixels:
Note that it seems that the alien turned red despite not visibly colliding with any wall. That is because at this coarse granularity, the safety buffer is very large. Keep that in mind as
you visually debug later (this effect should be less perceptible at finer granularities).
Note that for reaching the goal, we DO NOT apply the collision buffer we use for obstacles and out-of-bounds checking, as we want to guarantee that we actually touch the goal.
In order to represent the alien's configuration space as a 3D maze, you will digitize the alien's current shape and 2D movement patterns.
Each shape of the alien ('Vertical', 'Ball', 'Horizontal') can be represented by a "level" in the maze, while the walls in the maze
are determined by the configurations where the current shape collides with obstacles.
It is important to remember that the robot's configuration is comprised of both its (x,y)
centroid position and its shape! In the mazes we
want you to solve, the robot will have to switch its shape to reach the goal.
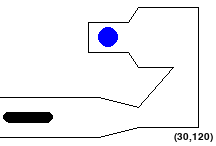
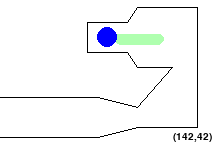
Here is how the map from this configuration looks:
You can play with the maps (stored in config file "maps/test_config.txt") by manually controlling the robot by executing the follwing command:
Once the window pops up, you can manipulate the alien using the following keys:
search.py
To implement search, you will also need to finish the implementation of MazeState in state.py. It might help to review some of the states you made in the previous MP. Complete all of the TODOs to finish the implementation. Note that unlike the previous MP, we do not include the MST in the heuristic, because we only need to reach one goal. Given the new objective, our old heuristic would not be consistent and admissible.
Run part 1 by using the following command
You can control the agent with keyboard inputs as usual by using arrow keys to navigate on the same level and 'u' and 'd' to move up/down a level
The alien robot has two forms that are represented with geometric shapes:
Form 1 (Ball):
A disk with a fixed radius. This entire disk is the alien's body.
Form 2 (Oblong): An oblong (sausage shape). This is represented as a
line segment with a fixed length and a radius. Any point within
the specified radius of the line segment belongs to the alien's
body, hence its sausage-like appearance.
We provide a helper class to help you: Alien.
Do not modify this class . To solve MP3, you will likely find the following Alien methods to be useful:
alien.py
The main geometry problem is then to check whether
To do this, you need to implement the following functions:
geometry.py
Problem Statement

![]()
Part 0: Understanding Map configuration
Each scene (or problem) is defined in a settings file. The settings file must specify the alien's inital position, geometry of the alien in its different configurations, the goals and their geometry and the edges of
the workspace.
Here is a sample scene configuration:
  [Test1]
  Window : (300, 200)                     # (Width, Height)
  Obstacles : [
                  (0,100,100,100),  #(startx,starty,endx,endy)
                  (0,140,100,140),
                  (100,100,140,110),
                  (100,140,140,130),
                  (140,110,175,70),
                  (140,130,200,130),
                  (200,130,200,10),
                  (200,10,140,10),
                  (175,70,140,70),
                  (140,70,130,55),
                  (140,10,130,25),
                  (130,55,90,55),
                  (130,25,90,25),
                  (90,55,90,25)
              ]
  Goals : [
              (110, 40, 10)               # (x-coordinate, y-coordinate, radius)
          ]
  Lengths: [40,0,40]
  Widths: [11,25,11]
  StartPoint: [30,120]
python3 mp3.py --human --map Test1 --config maps/test_config.txt
Feel free to modify the config files to do more self tests by adding test maps of your own.
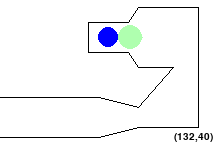
While implementing your geometry.py file, you can also use this mode to manually verify your solution, as the alien should turn red when touching an obstacle or out of bounds, and should turn green when validly completing the course, as shown in the initial figures.
Part 1: Adapt A*
The first part of this MP is to extend your A* code from MP2 to handle 3D mazes.
Your A* code must be able to handle the possibility that there are multiple goals.
However, unlike MP 2, your code does not have to touch all the goals.
It should consider the maze "solved" when it reaches the first goal.
Your new A* code should be added to this file:
python3 part1.py mazes/small-3d
python3 part1.py mazes/small-3d --human
NOTE: unlike MP2, in this MP, the maze might not have a path! So be sure to handle this case properly and return None! Also notice that the astar function now takes an extra argument ispart1. You should pass this argument as it is when you call getNeighbors() Don't change it as it will mess up the tests.
Part 2: Geometry
The second part of this MP is to work out the geometrical details to build your configuration space map.
These functions are easier to implement if you know how to compute (1) distances between a point and a line segment for these functions, as well as (2) distances between two line segments.
So you need to implement three additional helper functions in geometry.py for computing these quantities (we recommend they be implemented in the order below):
Lecture note "geometry cheat sheet" should be helpful, as well as drawing down and considering some examples. Be sure to use numpy.isclose at places where appropriate; your code should not complain the likes of "RuntimeWarning: invalid value encountered in double_scalars."
Remember again that we want our alien to be at least \(\frac{Granularity}{\sqrt{2}}\) away from any obstacles and from being out of bounds. Also note that. when checking for equalities using floating point numbers, you can get inconsistent values for the least significant bits due to machine precision. Using np.isclose(x,y) IS NECESSARY TO ENSURE CONSISTENCY in your results
In addition, in robotics, it is commonplace to err on the side of caution - Therefore, If the alien is found to be TANGENT to either the WALLS or the BOUNDARIES it should be considered as AN INVALID configuration - i.e. should return True in the collision checking. We have built in some assertions at the bottom of geometry.py to help with basic debugging, which can be executed by:
python3 geometry.pyAs mentioned before, once this class is properly implemented, you can also perform visual validation by running:
python3 mp3.py --human --map [MapName] --config maps/test_config.txtThe file maps/test_config.txt contains several maps. MapName is the name of the one you'd like to run. That is, MapName should be Test1, Test2, Test3, Test4, or NoSolutionMap.
Part 3: Transformation to Maze
The third part of this MP is to transform the movement and transformation space of the alien into a 3D maze. As mentioned before, the alien has three degrees of freedom: x,y, and shape. You can find more details about these shapes in alien.py
In each shape, the alien's centroid position is limited to a different movement space due to new constraints imposed by the new shape. This is the key to this part of the MP.
Your main task for part 3 of this MP is to use the geometry functions defined in the previous section to construct an MP2-style maze to be transversed by the alien during its motion. This maze will have three levels, one for each body shape. Specifically:
- 'Horizontal' is level 0
- 'Ball' is level 1
- 'Vertical' is level 2
Within each level, the rows and columns in the maze match to the robot's (x,y) centroid position. The number of rows and columns of the maze is defined by the dimensions of the workspace as well as the chosen granularity. The number of positions in the row or column is \(\frac{\text{maxposition} -\text{minposition}}{\text{granularity}} + 1 \). For this MP, minposition is always zero.
In order to ensure uniformity in the shapes of the mazes, we provide you with two helper functions in utils.py, configToIdx and idxToConfig. These functions will give you the correct correspondence between a robot configuration and a maze index. YOU MUST USE THEM TO ENSURE CONSISTENCY FOR THE AUTOGRADER and to make your lives easier.
In order to perform this task, you will define the function transformToMaze(alien,goals,walls,window, granularity) in transform.py
- transformToMaze(alien, goals, walls, window,granularity): This function takes in an alien instance, list of goals, list of line segments representing walls, and a window size and a granularity. It then returns a maze instance based on these arguments.
- The granularity parameter determines how many cells will be contained in a given interval.
- The maze class can be found in maze.py.
- We then generate a maze instance by calling the maze constructor from maze.py and passing in the path to the ASCII file.
The maze file is defined by an ASCII file with the following conventions:
- wall: %
- start: P
- waypoint: .
- level separator/end of file marker: #
Your generated maze must abide by the ASCII conventions above before you can instantiate a Maze object and save it to a file by calling maze.saveToFile(FILENAME).
Here is an example of a maze representation from small-3d:
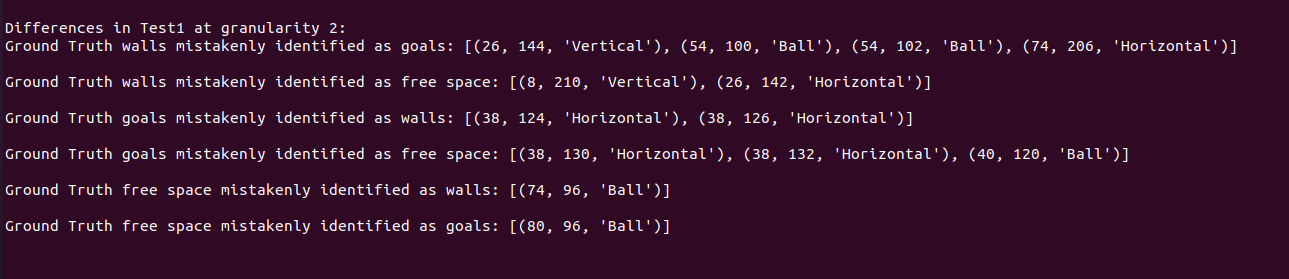
To fill in the maze positions for each level, you will use the geometry functions you implemented in part 2 to evaluate collision, goal, and out of bound states for centroid positions. This will define your movement space for each level. The bruteforce solution is to check all centroid positions for collisions with different maze options. However, there may be more efficient ways to do this using shortcuts to bypass unnecessary checking. We have provided you with the ground truth mazes for all the test maps calculated at 2,5 and 10 pixels of granularity. If you wish to validate your solution, you can run
python3 transform.pyWhile initially debugging, you might wish to change the list of granularities and maps you are building the maps for in the __main__ section of transform.py so you can get quicker feedback. By default, it will generate the maps for all example maps at 2,5 and 10 pixels of granularity and compare those to the ground truth mazes. If it identifies discrepancies between your map and the ground truth, it will highlight those as shown below:
Part 4: Searching the path in Maze
In this section, you put all of the ingredients together! You will receive a given map, discretize it using your Part 3 code, and use your A* search algorithm to find the shortest path to any of the goals. You can test all of the components together with:
python3 mp3.py --map [MapName] --config maps/test_config.txt --save-maze [MazeDestinaton].txtWhere MapName is in [Test1,Test2,Test3,Test4,NoSolutionMap]. If all your parts are implemented correctly, you should see two outputs. The first of them is an animation of the solution you just found playing in the main screen (you can press escape to kill it).
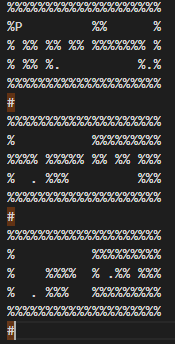
The second of them is the maze version of the map you just solved, which can be found in the file you specified as MazeDestination. Below is an example of the maze generated for Test1 with granularity 6. Notice that these digitized mazes can get large if you select a finer granularity or a map that's more complex.

Provided Code Skeleton and Deliverables
The code you need to get started is in this zip file. You will only have to modify and submit following files:
- geometry.py
- transform.py
- search.py
- state.py
Do not modify other provided code. It will make your code not runnable.
You can get additional help on the parameters for the main MP program by typing python3 mp3.py -h into your terminal.
Please upload search.py, state.py, transform.py, and geometry.py (all together) to gradescope.
Do not submit extra files to gradescope.