Learning Objectives
- Practice string and list manipulation in the context of file I/O
- Practice writing and using written functions in Python
- Introduce seeded random data generation
- Introduce how to measure runtime of operations in Python
- Investigate the efficiency of different Python implementations and common packages
Getting set up
While most of the mini-project is autograded (and should be submitted like any regular assignment), Prairielearn does not have the physical memory or speed to do meaningful data science. Accordingly, you will need to run part 3 (and thus all previous components) on your own machine. You are strongly encouraged to keep an active Git repository of your work – the final submission will require that you share your Github.
For part 1 and part 2, you will only need to submit the following on Prairielearn:
generate.ipynb
You will only need to edit the following functions:
generateRow()generateCSV()generateString()generateGraph()getRowMax()countTotalOccurrences()countUniqueStrings()firstMatchSubstring()getNeighbors()checkPathExists()
For part 3, you will need to submit:
- Three PDFs corresponding to each of the timing experiments
- A short write-up explaining the Big O of each function based on your experiments
- A link to your git repo
Assignment Description
Synthetic data generation is a very powerful tool in the data sciences. Whether you want to test the efficiency of your method on some totally random datasets of varying sizes, or generate approximately accurate ‘in silico’ simulations to save on the cost of doing real-world experimentation, the ability to create your own data as needed is incredibly valuable. As a fun starting project for CS 277, you will write code capable of generating the most common data formats – comma separated values files (.csv), string text files (.txt), and graph datasets using edge lists (commonly also .csv or space-separated files)
In part 2, to help review Python fundamentals and get you used to handling list datasets, you will implement a separate analysis function on each of the datasets you generated in part one. These same code implementations will also be used in part 3, where you will explore how the runtime of each function changes as the randomly generated datasets grow in size.
As part 3 is a class-wide experiment, your individual part in the project is to benchmark your personal implementation for each function in part 2 and write a short report on your findings (alongside submitting several line plots of the overall performance). After the deadline, as a class we will explore what methods (Python built-ins, Pandas, NumPy, etc…) you all chose to use and which one turned to be more efficient on average!
Part 1: Generate Datasets
In part one of this mini-project, you are tasked with creating several functions capable of generating random datasets of arbitrary size and values in both .csv and .txt format. Pay careful attention to the suggested random functions as well as the precise string formatting you are being asked to use – the autograder will expect an identical match on both. In addition to the autograder, to assist you in debugging your code several example files have been generated for you and a helper function compareFiles() defined here should help you identify the specific lines that are mismatched.
generateRow() and generateCSV()
# generateRow
# Create a string storing a .csv formatted row line of the appropriate size and min/max given
# INPUT:
# minval, an optional integer specifying the minimum [inclusive] random value to generate. Default is 0
# maxval, an optional integer specifying the maximum [inclusive] random value to generate. Default is 99
# colcount, an optional integer argument storing the number of columns in the row. Default is 2
# seed, an optional argument storing the seed of Python's random module. Default is None
# OUTPUT:
# A string storing the row of the CSV
def generateRow(minval=0, maxval=99, colcount=2, seed=None):
# generateCSV
# Create a .csv file containing random numbers of the specified size and min/max given
# To match the autograder, you should generate rows from top to bottom using generateRow()
# You should NOT pass the seed argument to generateRow() -- what happens if you do?
# INPUT:
# fname, a required string storing the name of the csv file to be created (always ends in .csv)
# minval, an optional integer specifying the minimum [inclusive] random value to generate. Default is 0
# maxval, an optional integer specifying the maximum [inclusive] random value to generate. Default is 99
# rowcount, an optional integer argument storing the number of rows to generate for the CSV. Default is 100
# colcount, an optional integer argument storing the number of columns in the row. Default is 2
# seed, an optional argument storing the seed of Python's random module. Default is None
# OUTPUT:
# None, instead a file is created at the path specified by fname with the content described above
def generateCSV(fname, minval=0, maxval=99, rowcount=100, colcount=2, seed=None):
A fully numeric dataset is a staple in the data sciences, describing everything from (x, y) coordinates in a 2D plane to daily climate information across a dozen unique metrics and everything in between. When generating a random variant of such datasets, the most important details are the expected range of values and the probability distribution of these values. In our case, we will settle for a uniform random distribution with the same possible range of values for every number in a row using random.randint().
While you are always encouraged to identify the sub-problems that make up a complex programming task, here we have already split the creation of a .csv file into two parts. In the first part, you will generate a single random row as a string and – once you have successfully implemented and tested this function – you are strongly encouraged to use the line-by-line generator to simplify the code for your actual .csv generator. Both functions will share certain inputs that together will let you generate arbitrary sized (defined by colcount and rowcount) numeric datasets consisting of integer values from minval to maxval.
Of critical importance to this MP, as this mini-project will use data generated by these functions as part of a class-wide analysis of computational performance, your ‘randomly’ generated values must be identical to everyone elses (and the autograder). This sounds daunting but requires only that you follow the following rules exactly. If it helps, these rules also serve as some helpful hints to get you used to open ended programming projects:
-
Values should be generated using
random.randint()with the appropriate min and max values and generated one row at a time from left to right, top to bottom. This will allow the autograder’s ‘randomly’ generated files to exactly match your own through the use of the same seeded values and generation order. If you are struggling to match the precise values used by the autograder, check to make sure you havent inverted the generation order and then contact course staff for assistance. -
There should be no spacing between commas in your CSV and you should not have a trailing comma on each line. The autograder will remove whitespace from the ends of each row but will not otherwise modify your strings before parsing them. While a reasonable CSV parser will be able to handle whitespace in your functions, one of the things being assessed in this assignment is your fundamental understanding of string formatting so do your best to match the exact format shown and described here even if its a little pedantic. The trailing comma, on the other hand, is a big deal as it implies that your CSV has an extra column with no value, which is a very real parsing error that can happen if you arent careful with your data format. For example,
A,B,Chas three columns (A, B, and C) butA,B,C,has four (A, B, C, ‘’).
As an example of the intended output for each function (larger examples can be found in the example directory in your Prairielearn workspace):
generateRow(minval=0, maxval=5, colcount=3, seed=1)
1,4,0
The numbers here are generated using random.seed(1) and will always be produced in the same sequence. Try it on your own by copying and running the code below!
random.seed(1)
print(random.randint(0, 5)) # 1
print(random.randint(0, 5)) # 4
print(random.randint(0, 5)) # 0
generateCSV(‘tmp.csv’, 0, 9, 5, 3)
8,2,2
2,6,8
7,5,3
3,7,9
9,4,4
This command would generate a file ‘tmp.csv’ that contains the following. Note that the file generated has an empty line at the very end – the autograder will check and account for this by stripping whitespace but is otherwise very unforgiving from other discrepancies.
generateString()
# generateString
# Create a line-separated list of random strings from an input alphabet
# To match the autograder, you should generate strings one character at a time sampling with replacement
# This will require using random.choice()
# INPUT:
# fname, a required string storing the name of the text file to be created (always ends in .txt)
# linelen, a required integer describing the length of each string being generated
# linecount, a required integer describing the total number of strings to generate
# charList, an optional list of strings storing the alphabet to generate with. Default is ascii_lowercase
# seed, an optional argument storing the seed of Python's random module. Default is None
# OUTPUT:
# None, instead a file is created at the path specified by fname with the content described above
def generateString(fname, linelen, linecount, charList=list(string.ascii_lowercase), seed=None):
A line separated string dataset is the format of choice for computational genomic datasets, many supporting or supplemental materials in publications, and string data parsing experiments. Here you are tasked with creating a function that will generate a linecount number of random strings built from a charList alphabet, each of length linelen. While this is a greatly simplified version from many actual synthetic datasets (which would likely be built on some underlying model or probability distribution), this does remain a straightforward way to produce a uniform random string set – which is a great way to build a ‘control’ test dataset!
As with the CSV, your ‘randomly’ generated values must be identical to everyone elses (and the autograder). To do so, use the following rules:
-
Strings should be built one character at a time, sampling with replacement using
random.choice()from the inputcharList. This will allow the autograder’s ‘randomly’ generated strings to exactly match your own through the use of the same seeded values and generation order. If you are struggling to match the precise values used by the autograder, check to make sure you havent inverted the generation order and then contact course staff for assistance. -
Each line in the file contains one string, generated and written to file from top to bottom. You would have to go out of your way to generate out of this order, but it’s possible to do so! Dont!
As an example of the intended output (larger examples can be found in the example directory in your Prairielearn workspace):
generateString(‘tmp.txt’, linelen=4, linecount=3, charList=[‘A’, ‘B’, ‘C’, ‘D’], seed=5)
CCAD
BABA
CDBD
As before, a trailing \n is acceptable but your function must be otherwise fixed in its output. Note that if you ran random.choice() 12 times with the appropriate inputs you would generate CCADBABACDBD. From there its just a matter of formatting your string appropriately from left to right top to bottom.
Optional Consider: As you work to complete this function, consider how we might implement a more advanced version of this same string generation. In particular, rather than give every character an equal weight, how might you change the function definition and implementation if each character has its own probability of being selected (the total still adding up to 1)?
generateGraph()
# generateGraph
# Create a line-separated list of edges given an input list of strings and an edge count
# Each edge is stored on its own line as a start and end vertex using a space-separated string
# To match the autograder, you should generate pairs of strings using random.sample()
# Unlike random.choice(), sample will sample without replacement.
# INPUT:
# fname, a required string storing the name of the text file to be created (always ends in .txt)
# inList, a required list of strings storing the vertices (nodes) of the graph being generated
# edges, an optional argument storing the number of edges to generate. Default value is 5 edges
# seed, an optional argument storing the seed of Python's random module. Default is None
# OUTPUT:
# None, instead a file is created at the path specified by fname with the content described above
def generateGraph(fname, inList, edges=5, seed=None):
Graphs are a very interesting data structure to study – they are often stored as an ‘edge list’ but graph algorithms on lists are very inefficient. While we will explore graphs (and how to make them efficient) much later in the course, the standard graph format is nothing more than a list of edges and is worth exploring now. Here you are tasked with creating a random graph based on an input list of strings inList. We will think of each of these strings as a separate node or vertex in the graph and generate random lines (edges) connecting them.
As we will not allow the startpoint of an edge to be the endpoint, instead of sampling with replacement we will need a random function capable of selecting two different vertices at the same time. This is what random.sample() is for!
As with the CSV, your ‘randomly’ generated values must be identical to everyone elses (and the autograder). To do so, use the following rules:
-
Each edge is generated sampling with replacement using
random.sample()from the inputinList. This will allow the autograder’s ‘randomly’ generated edges to exactly match your own through the use of the same seeded values and generation order. If you are struggling to match the precise values used by the autograder, check to make sure you are using the correct function, then make sure you are generating edges from top to bottom, and then contact course staff for assistance. -
Each row of the file contains one edge, formatted as
<string1> <string2>with a space in between. We could also have stored this as a.csvbut for a simple unweighted graph, a.txtis sufficient.
As an example of the intended output (larger examples can be found in the example directory in your Prairielearn workspace):
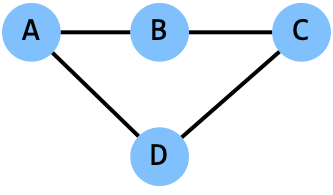
generateGraph(‘tmp.txt’, inList=[‘A’, ‘B’, ‘C’, ‘D’], edges=5, seed=5)
C D
C D
A B
B C
A D
Note that our random graph implementation can produce duplicate edges – this is not a great way to generate a random graph but one that is useful for our purposes later. Ignoring duplicates also lets us not worry about the fact that the edge ‘A B’ and the edge ‘B A’ are (for our purposes) the same edge. This will be relevant in part 2.
Part 2: Data Analysis
In part two of this mini-project, you are tasked with creating several functions which can read in .csv and .txt files and perform different data analysis tasks. Unlike in part 1, you have much more freedom of design here – you can use pandas, numpy, or built-in methods to read in and process your files. Just be sure the code you are submitting is your own work and no one elses! The functions you are implementing here are meant to review your Python fundamentals, not your ability to use chatGPT.
getRowMax()
# getRowMax
# Finds the maximum integer value for a given row in a csv formatted file
# INPUT:
# fname, a required string storing the name of the csv file to be created (always ends in .csv)
# row, a required integer storing the index of the row to search. The index is 0 based (the first row is row 0).
# OUTPUT:
# An integer output storing the maximum value present in the input row, or -1 if the row does not exist.
def getRowMax(fname, row):
Write a function that when given a string containing the path to a csv file and an integer storing the index of a row in the file (starting from 0), return the max value found at that row in the file. If the index is out of bounds (the file does not have that many lines), you should return -1 instead.
As an example, given the following file (tmp.csv):
2,6,8,4,7
9,2,4,1,4
7,5,3,7,3
2,3,8,3,3
The output for each row would be:
print(getRowMax('tmp.csv', 0)) # 8
print(getRowMax('tmp.csv', 1)) # 9
print(getRowMax('tmp.csv', 2)) # 7
print(getRowMax('tmp.csv', 3)) # 8
print(getRowMax('tmp.csv', 4)) # -1 (and any higher number would return this)
countTotalOccurrences()
# countTotalOccurrences
# Count the number of exact matches given a csv file and a value of interest.
#
# INPUT:
# fname, a required string storing the name of the file being searched
# inVal, a required integer storing the value being searched for throughout the document
# OUTPUT:
# An integer storing the total number of times inVal is present anywhere in the csv
def countTotalOccurrences(fname, inVal):
Write a function that when given an input csv file by pathname and an input value, counts the total number of times that value occurs in the file.
As an example, given the following file (tmp.csv):
2,6,8,4,7
9,2,4,1,4
7,5,3,7,3
2,3,8,3,3
The output for a subset of values would be:
print(countTotalOccurrences('tmp.csv', 0)) # 0
print(countTotalOccurrences('tmp.csv', 1)) # 1
print(countTotalOccurrences('tmp.csv', 2)) # 3
print(countTotalOccurrences('tmp.csv', 3)) # 5
print(countTotalOccurrences('tmp.csv', 4)) # 3
countUniqueStrings()
# countUniqueStrings
# Count the number of unique strings present in a file. Each line is its own string
#
# INPUT:
# fname, a required string storing the name of the text file to be created (always ends in .txt)
# OUTPUT:
# An integer storing the count of unique strings in the file
def countUniqueStrings(fname):
Write a function that when given an input text file, counts the total number of unique lines present in the text file.
As an example, given the following file (tmp.txt):
B C
A B
A B
D B
D A
The output would be:
print(countUniqueStrings('tmp.txt')) # 4
firstMatchingSubstring()
# firstMatchingSubstring
# Find and return the index (0-based) of the line that first contains the input string
# If the input string is not present in the file, return -1
#
# INPUT:
# fname, a required string storing the name of the text file to be created (always ends in .txt)
# inStr, a required string storing the substring to look for in each line
# OUTPUT:
# The 0-based index of the match (or -1 if the substring is not present)
def firstMatchingSubstring(fname, inStr):
Write a function that when given an input text file and a string as input, returns the index of the first line to contain the substring. If the substring doesnt exist anywhere in the file, return -1.
As an example, given the following file (tmp.txt):
B C
A B
A B
D B
D A
The output for a subset of values would be:
print(firstMatchingSubstring('tmp.txt', "A B")) # 1
print(firstMatchingSubstring('tmp.txt', "D")) # 3
print(firstMatchingSubstring('tmp.txt', "Q")) # -1
getNeighbors()
# getNeighbors
# Find and return a list of all neighbors for a given input vertex
# You may assume all input text files are edge list formatted.
# '<str1> <str2>' implies an edge between vertex str1 and vertex str2
# NOTE: Edges are bidirectional! 'A B' is both an edge from A to B and an edge from B to A
#
# INPUT:
# fname, a required string storing the name of the text file to be created (always ends in .txt)
# inStr, a required string storing the substring to look for in each line
# OUTPUT:
# A list of strings storing the neighbors of the input vertex. Each neighbor should be listed once.
# If there are no neighbors, return an empty list
def getNeighbors(fname, inStr):
Given an input text file containing an edge list and an input string storing a vertex label, return a list of all vertices that are neighbors to that vertex. The order of the neighbors does not matter but the list must contain all actual neighbors exactly once. Also note that our edges are bidirectional – so when looking for neighbors of A you will have to look for everything of form X A and A X, while also making sure not to duplicate an edge in the final return. Have fun!
As an example, given the following file (tmp.txt):
B C
A B
A B
D B
D A
The output for a subset of values would be:
print(getNeighbors('tmp.txt', "A")) # ['B', 'D']
print(getNeighbors('tmp.txt', "D")) # ['B', 'A']
print(getNeighbors('tmp.txt', "Q")) # []
checkPathExists()
# checkPathExists
# Find and return a list of all neighbors for a given input vertex
# You may assume all input text files are edge list formatted.
# '<str1> <str2>' implies an edge between vertex str1 and vertex str2
# NOTE: Edges are bidirectional! 'A B' is both an edge from A to B and an edge from B to A
#
# INPUT:
# fname, a required string storing the name of the text file to be created (always ends in .txt)
# inList, a required list storing a path through the graph as an ordered list of string vertices
# You may assume inList is at least length 2, but it may contain vertices which dont exist
# OUTPUT:
# A bool (True or False) based on whether the path given as input exists in the graph
# That is to say, check that each edge transition is directly possible
def checkPathExists(fname, inList):
Given an input text file and a list of strings, check if there is a direct path in the graph through the vertices in order. You may assume the input list is always at least length two (at least one edge), but the vertices in the path may not exist in the file. Before writing this, consider carefully what you need to look for in the file and how you can best find the necessary information.
As an example, given the following file (tmp.txt):
B C
A B
A B
D B
D A
The output for a subset of values would be:
print(checkPathExist('tmp.txt', ["A", "C"])) # False
print(checkPathExist('tmp.txt', ["A", "B", "C", "D"])) # False
print(checkPathExist('tmp.txt', ["A", "B", "D"])) # True
print(checkPathExist('tmp.txt', ["A", "C", "1"])) # False
Part 3: Runtime Efficiency (Theory and Practice)
You should only start part 3 of the mini-project once you have received an 100% on the first two parts through the autograder.
In the final part of this mini-project, we will explore as a class the various runtimes of the functions you wrote in part 2, using datasets generated using the functions you wrote in part 1. To do this, download the Python notebook for part 3 off of Prairielearn onto your local machine. You will need to copy over each of the function definitions you wrote in the earlier parts onto this file but once you have imported all your definitions, it should run from start to finish without any additional coding work. Instead, your job is to observe and document the runtime behavior of your functions on your local machines and answer the questions provided on Prairielearn. This includes both reporting your specific run-time information, creating a single PNG that summarizes some of your running times, and writing a short report for three of the implemented functions (countTotalOccurrences, countUniqueStrings(), checkPathExists()) that answer the following:
-
What variables play a role in the runtime of each function?
-
Using just the variables you have described, what is the Big O of your implementation of the function?
-
Does the timing information generated match the Big O you are claiming? Why or why not?