API Adventures
Assigned: 2022-02-16
Due Date: 2022-02-22 by 11:59PM U.S. Central Time
Update: UI Webpage Released
You can now test your Adventure API on our online UI! It accepts the JSON standard described by the docs below, so you'll want to make sure you understand what the website expects from the API in order to get things to render correctly. If you haven't read the docs below, then you haven't implemented the API and the below link will send back an error. Please read all of the instructions in the doc below this section.
Possible Issues You May Experience
For your convenience, we host the frontend and you host the backend; it's easier this way than making everyone get the devtools needed to run the frontend locally. However, there are a couple of baked-in security modules that your browser has to avoid this exact situation. While normally this is a great idea, we will need to make an exemption for our frontend. Don't worry, as the only requests the website makes are to your API, and that's it.
Stuck on "Could not load game"
As the documentation mentions below, you must first visit the API from a browser to make a security exemption. Visit https://localhost:8080/adventure/v1/ping from your browser, and you will be greeted with a page like this:
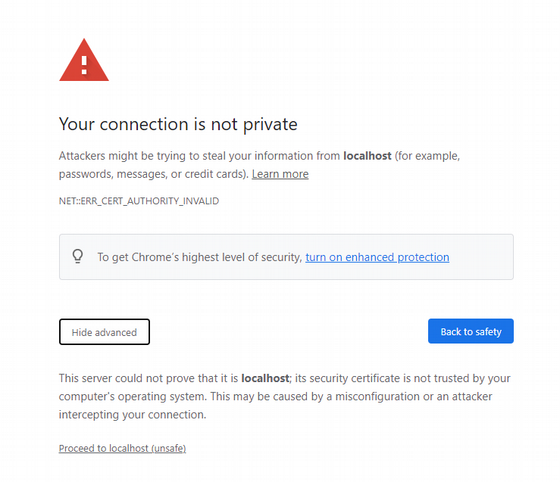
Please click on the "Advanced" button and click on the "Proceed to localhost (unsafe)" link. This should take you to an output from the API. Once this is done, you can navigate back to the Adventure UI page, and things should be working (if your API was working in the first place).
MacOS Chrome Users Can't Find the "Proceed to localhost (unsafe)
MacOS's version of Chrome has a special way of allowing you to proceed to the page when you see this warning:
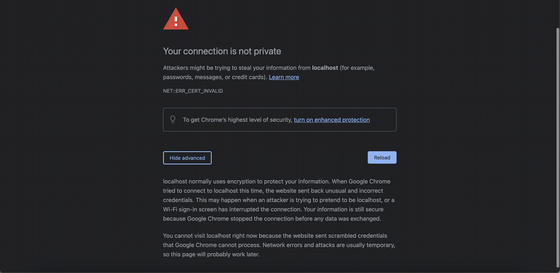
Click anywhere in this page to focus it, and type thisisunsafe on your keyboard. It should then allow you through to the site.
Some Issue Referencing "Access-Control-Allow-Origin"
Your browser protects you from CORS attacks intuitively, but for this assignment, we need to circumvent those rules. Your server is locally hosted but the website is remotely hosted, and thus the frontend will sometimes complain about CORS or Access-Control-Allow-Origin headers.
For Windows Chrome users:
- Open up Command Prompt (go to your Start menu, type "cmd", hit Enter).
- Run this command:
start chrome.exe --user-data-dir="temp_chrome" --disable-web-security --ignore-certificate-errors - In the browser that starts, you should be able to visit the same URL, and the CORS & certificate issues should be resolved.
For MacOS Chrome Users
- Open up Terminal
- Run this command:
open -n -a Google\ Chrome --args --user-data-dir="/tmp/chrome_dev_test" --disable-web-security --ignore-certificate-errors - In the browser that starts, you should be able to visit the same URL, and the CORS & certificate issues should be resolved.
Assignment
You will not need to create a new repo this week, as you'll be working in the previous amazing adventure repo.
This week's assignment is another adventure game, but we've made it more interesting by creating a website that will allow you to play your very own game visually! You'll be able to return not just text, but videos & images by URL, so you can add some extra visual flair to your game.
Note: We strongly recommend starting on this assignment early. A lot of your work will be refactoring your last week's implementation to work with our new requirements. Our suggested day-to-day plan is to spend the first couple days making those refactors to your implementation, then spend a day or two working on the API, and the last day cleaning up your code. This assignment is much more manageable if you work on it a bit each day rather than tackling it all at once :) And don't forget to ask questions & take notes in code review!
Gradescope
There is no autograder for this assignment, but you still must submit your GitHub repository to Gradescope.
Goals
- Implementing game logic code separate from UI code
- Working with HTTP REST APIs
- Enhancing your text output with images + video
Instructions
Background
Last week, we asked you to build a text adventure game, but we also asked you to keep the engine as a discrete unit from the console interaction code. As you can imagine, there are tons of ways to play an adventure game. Some adventure games have fully-fledged 3D graphics, some are on 2D maps w/ sprites. While we're not going quite as far as these options, we are going to introduce a new UI to play your game with support for image/audio feedback! The best part: you'll be able to play your game right from the browser! We've created an Adventure website that supports playing a game through an Adventure API.
Wait, what is an API? API stands for Application Programming Interface, that is, an "interface" that allows two different applications to interact programmatically. You have never seen our Adventure website before, and your program currently does not support it. However, if we define an API contract between your game engine and our website, the two can work together to create a really cool experience!
We're not leaving you in the dust when it comes to creating this API: we've set up a local server for you to run that handles requests from the website, and we've written out all the methods you'll have to fill in. Your task is to define the interactions with your game engine.
Part 0 - Improving your Adventure Game Engine
After code review, you should have received some advice about your game engine's design. We recommend you start by implementing this feedback, as it will very likely help you define the API interactions later on. Things to be paying attention to:
- Your game engine might take input from a
new Scanner(System.in), and give back output throughSystem.out.println(). This won't be the primary interaction in this assignment, as you're getting user input from theCommandclass, and you're returning feedback through theGameStatusclass. - You may have a central loop that runs the game while some condition is true. This creates a bit of an issue with our design, as while your game is looping, we can't send back a response to the client! See if you can re-frame your public facing method(s) to modify & return the new game status after a command has been issued, and move that loop to a CLI-specific class.
- You may make changes that are specific to getting your engine to work with the API. However, your old CLI interaction must still work by the final version of this assignment.
Part 0.5 - Custom Feature/Command
As was stated in last week's docs, you will be working on a custom feature/command for your game. A couple things to keep in mind:
- The feature cannot be trivial to implement. It cannot be a slight variation of a required command nor can it rely on the code used in those commands for the most part.
- This isn’t the main part of the assignment; It shouldn’t take more than 1-2 hours so don’t stress out over it.
Here are a few examples of valid custom features to inspire you:
- A command that prints your history of traversed rooms, in order
- A command that prints the shortest distance between two rooms (feel free to look up algorithms for this)
- A feature that interacts with a web API in some creative way (here are some examples)
- You could use a riddle/trivia API to create puzzles that block your path
- You could use a profanity checking API to react in some interesting way (like when your user gets super frustrated at your Desert Bus homage map)
Part 1 - Understanding the Provided Code
When you cloned the project last week, you may have noticed a student.server package. This is where the API is defined: it has a server, a resource with URL paths, a service, and some POJOs. Let's go through what each of these are so you're familiar when you see them:
AdventureServer
This class holds the server for running your API locally. You are free to look through it, but it should be 100% set up for you, and any changes might interfere with the normal behavior of the API. The server is hosted on https://0.0.0.0:8080, which is port 8080 on your local machine. The base URL for the API is https://0.0.0.0:8080/adventure/v1; that is to say, anytime we talk about an API path, it's always prefixed with this. The website knows how to work with exactly this URL, so please don't change it!
AdventureResource
This class holds methods that allow the API to access your "resource". Resources are to REST APIs as objects are to Object Oriented Programming: they represent a store of data with some methods to operate on said data. Because our API is a REST HTTP API, we invoke these methods through visiting certain URLs. That's how the website can get data from your API without having to run Java: it only needs to know the URL to call, and the server will package a response that the website can handle.
You'll see some methods with documentation explaining what they do, but you'll also see some @ annotations above all of them.
@GET/@POST are HTTP verbs that respectively mean "access" a resource and "add to/change" a resource. When you see one of these above a method, it means the client needs to use that verb to call the method.
@Path represents the relative URL path a client needs to visit to call this method. Remember, all of these paths are prefixed with the base path: in our case, https://0.0.0.0:8080/adventure/v1/. So if you saw a method like
@GET
@Path("/ping")
public String ping() {
  return "pong";
}
...then that method would be invoked if the client sent a GET request to https://0.0.0.0:8080/adventure/v1/ping.
Lastly, you'll see some @Produces and @Consumes annotations. These say that the method should expect the request & response, respectively, to be of the specified type. We only use JSON to transfer our data, so you'll only see us using @Produces(MediaType.APPLICATION_JSON) and/or @Consumes(MediaType.APPLICATION_JSON) on our API methods.
You will not need to make many changes in here, but we will ask you to fill in the ping() method with the response "pong". You will also see we use AdventureService here.
AdventureService
This is a Java interface that defines a basic contract for your Adventure API on the Java side of things. The job of an interface class in Java is to force any class that uses it to implement the listed methods. You have certainly seen a very popular interface in Java before: List! Interfaces allow us to treat different objects the same way when it comes to these methods. That's why I can write
List<String> strings = new ArrayList<>();
// or
List<String> strings = new LinkedList<>();

string.add("Hi there!");
The add method is part of the List interface, and if I changed what type of underlying list I was using, it would not make me go back and change the calls to add.
We didn't force your game engine to conform to a certain class structure, so the biggest task of this assignment is for you to implement this interface and create your own Adventure service that works with our API.
Part 2 - Implementing the API
Just like last week, you are free to implement the API however you can, but because you , you will need to make sure your API implementation follows the API contract. You should start out by implementing AdventureService. Your class should look like
public SomeAdventureService implements AdventureService {
  ...
}
You may notice that IntelliJ gives you a red squiggly line under the first line. If you recall, a class that implements an interface must define all the methods in the base interface. You can right click the red line, Show Context Actions > Implement methods, and it will automatically implement basic versions of the methods for you.
Your API must support multiple instances of the game, such that two clients could play a game at the same time. Lucky for you, web servers handle this very nicely outright, but your service will need a way to store a game instance for each instance ID. The instance ID comes from the URL, and the AdventureResource extracts it for you, and passes it to your service through methods.
Here are the methods you must implement, with a description:
void reset()
This method should clear out any instances of your adventure game, and reset the instance ID back to zero.
int newGame() throws AdventureException
This method is called when we want to create a new instance of a game. You should instantiate a new instance of the game, assign an id to it, and store it by its id.
GameStatus getGame(int id)
This method returns the current status for game instance with the ID of id. This includes what should be displayed to the user, what commands are available, whether or not the last action was an error, the instance id, and any additional game state the user needs. The GameStatus documentation more precisely explains its fields.
boolean destroyGame(int id)
This method destroys a game instance with the ID of id, clearing it from your service permanently.
void executeCommand(int id, Command command)
This method informs the game instance with the ID of id that a command has been issued to it. The command should be handled by the game instance, and the state for that game should be updated. The new state will be returned to the client the in the same way that getGame does.
You must find a way to implement these five methods to work with your game engine in order for the API to properly work.
Testing the API
To check to see if everything is working as planned, you should just go to the src/main/java/student/Main.java class and run main. Then, visit https://localhost:8080/adventure/v1/ping. You should see something saying "Your connection is not private. danger blah blah security blah blah risk blah ...". You need to click "Advanced/Show Details" and proceed to "localhost (unsafe)/Accept the risk and continue/Visit this website". Then you'll see a blank screen or some text; this means you are ready to begin testing out the UI. To see more about why your browser is warning you, see the section on "More about servers, ..., SSL, ...".
To test with the UI, visit https://courses.grainger.illinois.edu/cs126/sp2022/adventure It should automatically recognize your server and start a new instance if you've implemented the service correctly.
The above instructions will be modified as we're making some finishing touches to the website, but you can start working on the API portion without it for now. We'll post on Campuswire.
Deliverables and Grading
For the project to be considered complete, your submission must (in the order we suggest you tackle this):
- Must implement (at least) one custom command/feature
- Implement any feedback from last week
- Your game must still work with the console interface, not just the API
- Have a class that implements
AdventureService- Implement
resetto clear out instances of the adventure games - Implement
newGameto create a new instance of your adventure game & store it - Implement
getGameto return the current status of the game - Implement
destroyGameto purge a game from your stores - Implement
executeCommandto update your game's state based on the command
- Implement
- Be able to play game fully through the website
As always, many points on this assignment are made up of aspects of your physical code and your design. Keep using correct style conventions according to the Google Java Style Guide, and think about how you can make a large application like this modular.
We're also paying a lot of attention to Object Decomposition on this assignment, as you will be working with a variety of objects, and you have the chance to improve your designs from last week. Make sure you are placing methods in the classes where they make the most sense, and also make sure data flows through your objects in a clean, extensible manner.
Assignment Rubric
Click here to view
Note! New items in bold
Readability and flexibility of code
- Modularity: each method should perform one distinct task
- It should be easy to read through each method, follow its control flow, and verify its correctness
- The code should be flexible/ready for change (no magic numbers, no violations of DRY)
Object decomposition
-
Choice of classes to create
-
-
Classes should be coherent units and have clear purposes
-
Classes should not be too “big” or be responsible for too much functionality
-
- If a “big” class contains things which aren’t closely related, it may be appropriate to break off part of it into a new class. (This is similar to decomposing long functions into modular units.)
-
If a group of global/static functions are all operating on the same data/object, they should probably be bundled together into a class
-
As an example, the information stored in parallel arrays is often closely related, so it’s usually good design to group the information into a class and combine the parallel arrays into a single array
-
-
Placement of methods
-
- Functionality should be placed in the class that it's most related to
-
Member variables stored by each class
- Classes should store their data using the most intuitive data structure
- No "missing" member variables
- No member variables which should be local variables
- No redundancy / storing multiple copies of the same data in different formats
-
Encapsulation
- Appropriate access modifiers
- Member variables should generally only modified by member functions in the same class
- The interface of a class should be intuitive/abstract, and external code should only interact with the class via the interface
- By intuitive, we mean that it should be easy to understand and use the class, and there shouldn’t be any hidden assumptions about how the class should be used
- By abstract, we mean that an external client shouldn’t need to worry about the internal details of the class
- No unnecessary getters/setters
- In Java, getters should not return a mutable member variable
Documentation
- Specifications
- Specifications are required for all functions which are part of the public interface of a class
- Specifications should precisely describe the inputs and outputs of a function, and should also describe what the function does (e.g. mutating state of object)
- Specifications should also be formatted properly (e.g. follow Javadoc style for Java assignments)
- Inline comments should not describe things which are obvious from the code, and should describe things which need clarification
Naming
- Semantics: names should effectively describe the entities they represent; they should be unambiguous and leave no potential for misinterpretation. However, they should not be too verbose.
- Style: names should follow the Google Java/C++ Style Guide
Layout
- Spacing should be readable and consistent; your code should look professional
- Vertical whitespace should be meaningful
- Vertical whitespace can help create paragraphs
- Having 2+ empty lines in a row, or empty lines at the beginning or end of files, is usually a waste of space and looks inconsistent
- Horizontal whitespace should be present where required by the Google Style Guide
- Vertical whitespace should be meaningful
- Lines should all be under 100 characters; no horizontal scrolling should be necessary
Testing
- You should make sure all types of inputs and outputs are tested.
- If category A of inputs is likely to cause different behavior than category B, then you should test inputs from both categories
- Boundary/edge cases often cause different/unexpected behavior, and thus, they should be tested
- Your tests should ensure that the application state is correctly updated. For example, if a function mutates an object, you can’t just check that the return value is correct. You must also ensure that the object reflects those changes.
- Your tests should cover all of the functionality that you’ve implemented. In other words, every line of code should be exercised by some test case, unless the assignment documentation says otherwise
- Each individual test case should only serve one coherent purpose. Individual test cases should not have assertions testing unrelated things
- Your tests, like your code, should be organized and easy to understand. This includes:
- Easy to verify thoroughness / all possibilities covered
- Easy to verify the correctness of each test case
- Clear categories of test cases, where similar tests are grouped together
- In Java, this can be accomplished by inserting comments to separate groups
- Test case names make the purpose of each test case clear
- Here is one possible way to name test methods in JUnit
- Different test files for different source files
Process
- Commit modularity
- Code should be checked-in periodically/progressively in logical chunks
- Unrelated changes should not be bundled in the same commit
- Commit messages
- Should concisely and accurately describe the changes made
- Should have a consistent style and look professional
- First word of the message should be a verb, and it should be capitalized
Presentation
- Arrived on time with all necessary materials and ready to go
- Good selection of topics to focus on
- Logical order of presentation
- Appropriate pacing and engagement of the fellow students
- Speaking loud enough and enunciating clearly
Participation
- Each student should contribute at least one meaningful comment or question for every other student who presents in his/her code review
- Students must behave respectfully to moderator and other students
Weightings
Your grades for each section of the rubric will be weighted as follows:
- Readability and flexibility of code (15%)
- Object decomposition (20%)
- Documentation (10%)
- Naming (10%)
- Layout (5%)
- Testing (20%)
- Process (10%)
- Presentation (5%)
- Participation (5%)