Setting Up C++ And The Basics of the Build Process
Now that the time has come to switch to C++, you'll need to set up your working environment to work with C++. Setting up your environment with our recommended settings will greatly simplify us being able to help you in office hours.
The IDE
To standardize the experience for everyone, you must use CLion as your IDE. This is another JetBrains product, so you should be familiar with the user interface/experience. If you haven't received the JetBrains software suite for free yet, you can do so with your university email here. Get CLion here or from the JetBrains toolbox program if you elected to download that when installing IntelliJ.
C++ Build Environment
Depending on what platform you are developing on, you need to follow a different set of steps to set up for C++ development / compiling.
Windows Users
To start with, you'll need to install Visual Studio 2015, and no other version. If you installed a different version of Visual Studio, it probably came with different build tools, and you'll need to uninstall them. If this applies to you, start at step one. If you are starting fresh, start at step two.
- Uninstall
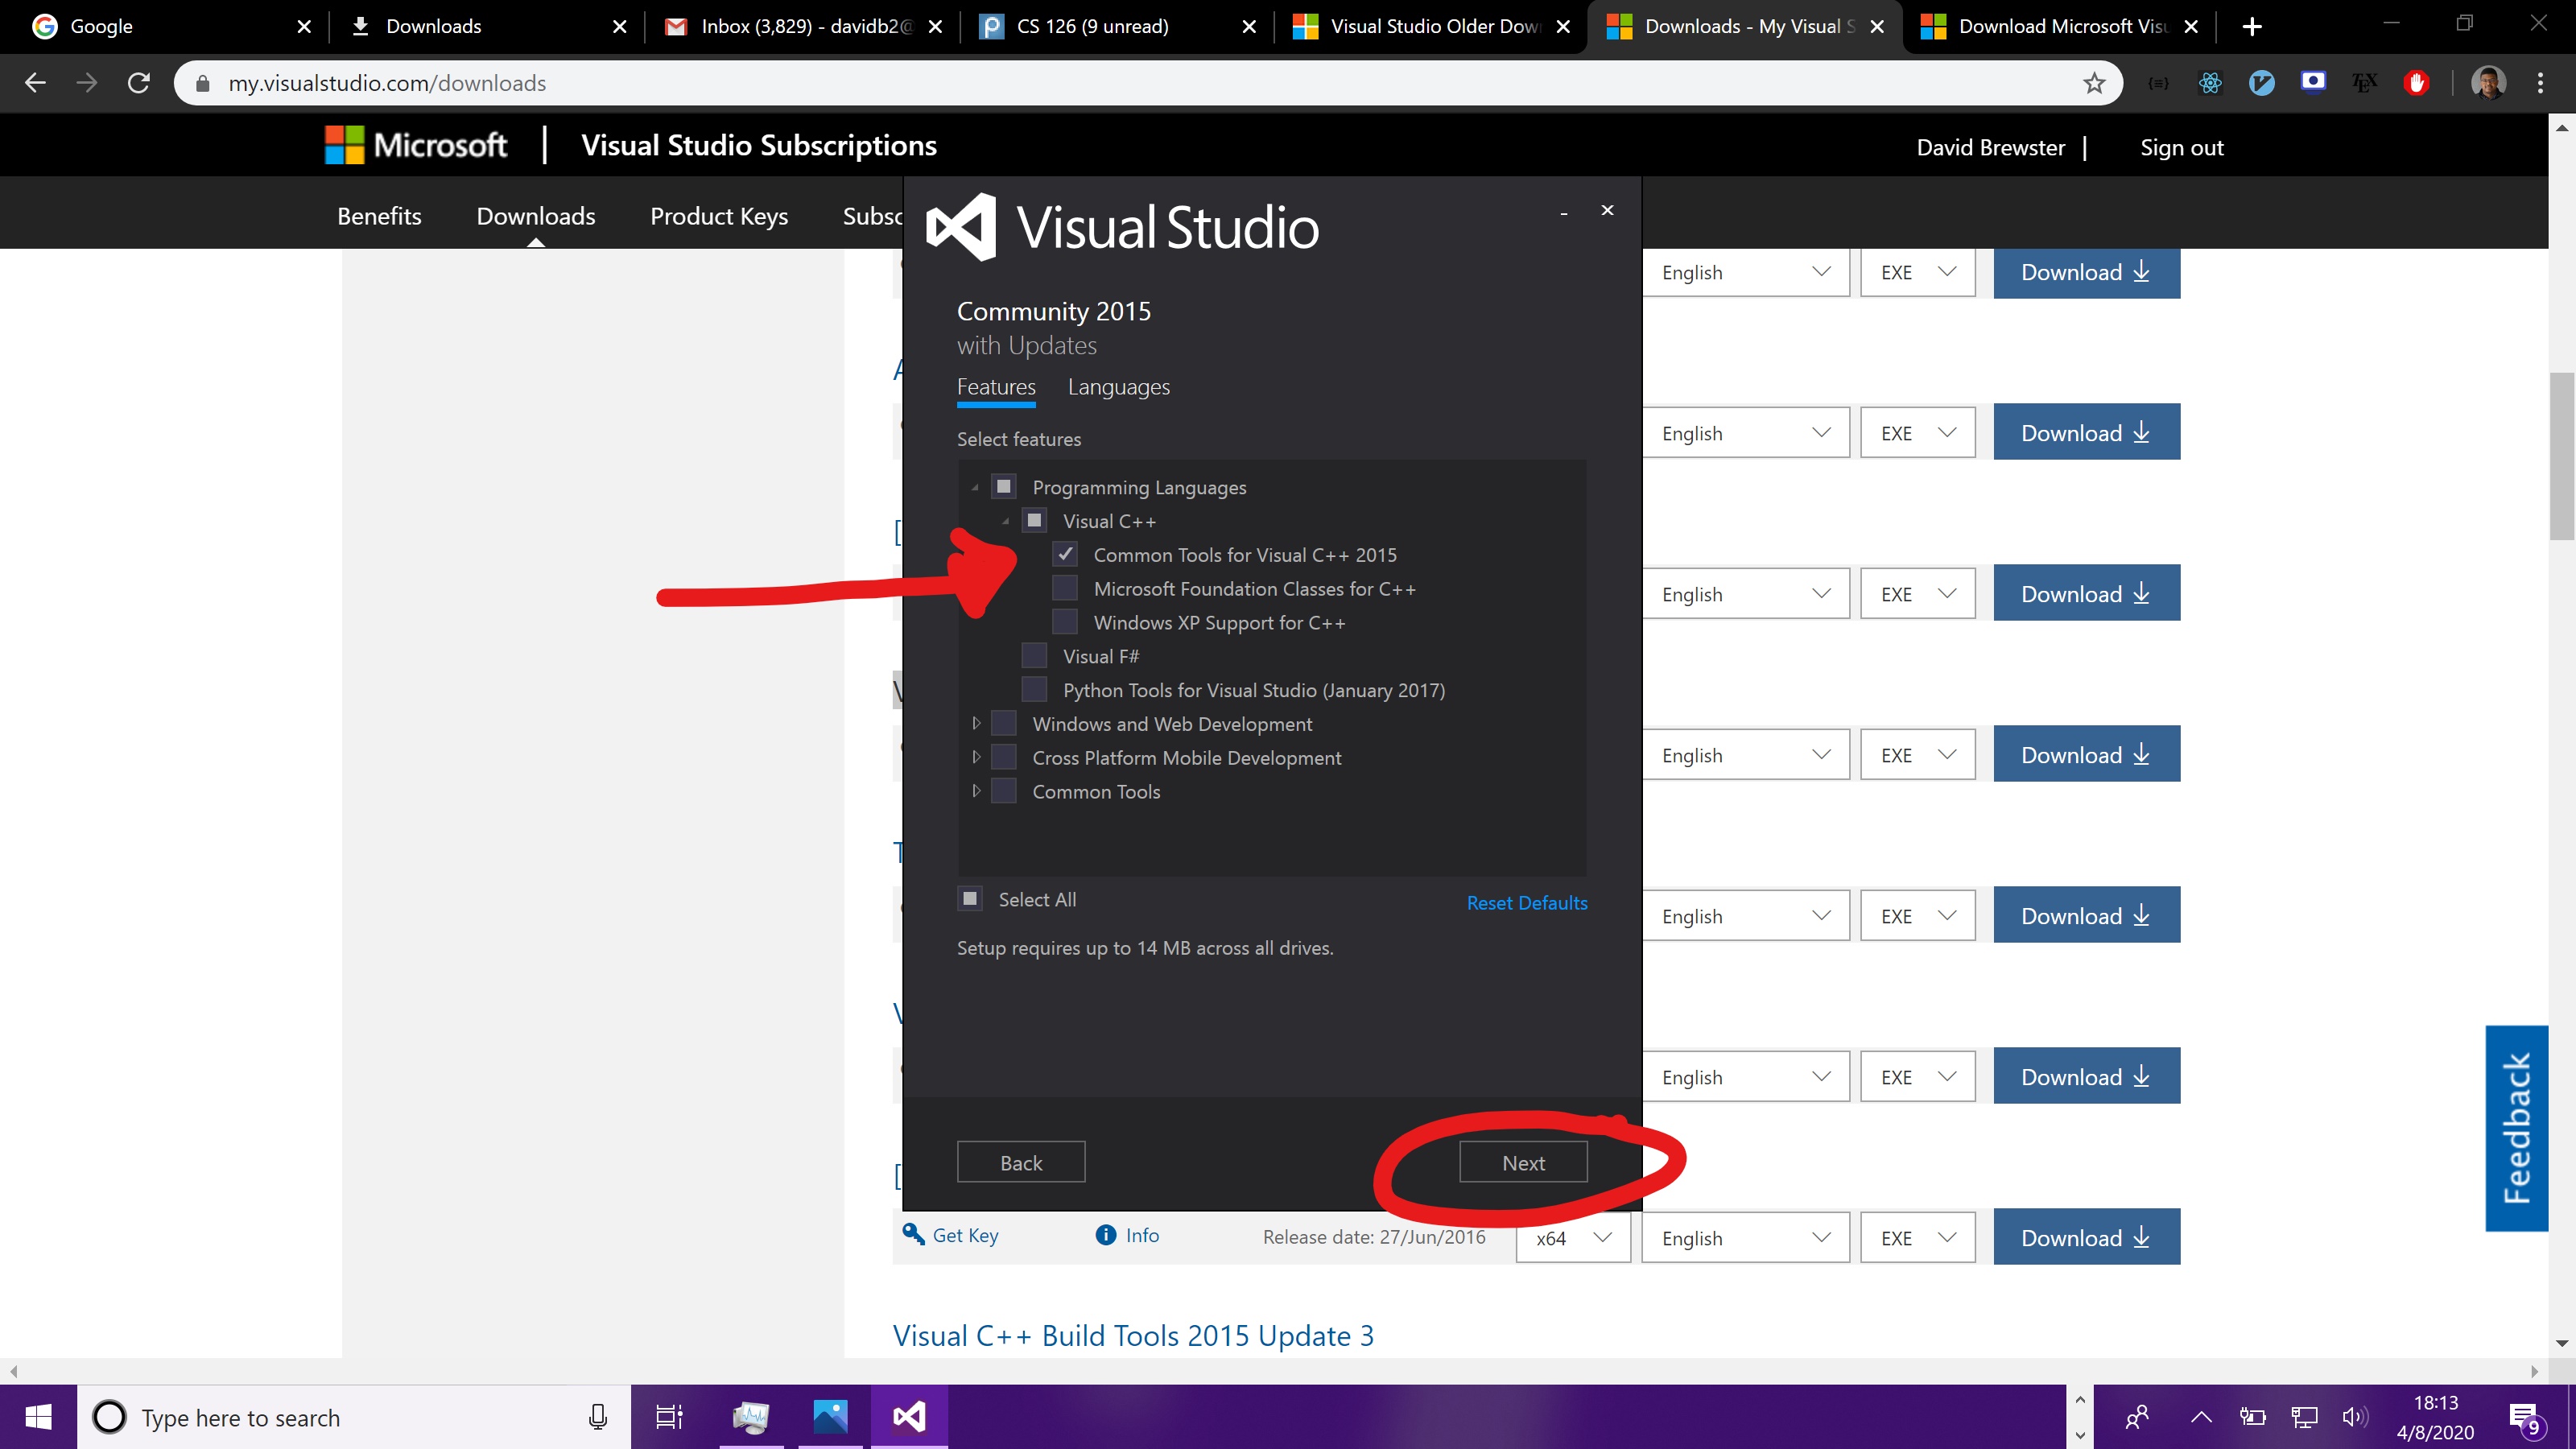
Visual Studio Build Tools 2019(or any other year besides 2015) if present on your machine by navigating toControl Panel > Programs > Programs and Features > Uninstall a Program, and then uninstallVisual Studio Build Tools 2019. - Go to: https://my.visualstudio.com/Downloads?q=visual%20studio%202015&wt.mc_id=o~msft~vscom~older-downloads. You'll also be able to access this page by going to https://my.visualstudio.com/downloads and searching for
2015. If it requires you to sign in, you should be able to use your U of I credentials or your Github credentials: it doesn't matter. - Next, download
Visual Studio Community 2015 with Update 3for your architecture (probablyx64). - Run the installer and if prompted, select
Modify. - Now, you only need to select the
Common Tools for Visual C++ 2015option, then clickNext. Note that this will take up around8GBon your machine.
- Continue along with the installation. The installation process can take a while (~20 minutes).
- After the installation is complete, you do not need to click the "Launch" button.
- Go back to CLion and make the default toolchain be a Visual Studio environment, pointing to
C:\Program Files (x86)\Microsoft Visual Studio 14.0. Confirm that there are no warnings.

macOS Users
The procedure is fairly simple for Mac users. Some systems will even have it preinstalled; you can check this by going to the Preferences | Build, Execution, Deployment | Toolchains menu in CLion, and see if the compiler and Make detection are successful.
If not, you can open up a terminal, and run
xcode-select --install
and when a prompt pops up, click the Install button. Restart CLion and check to see that the tools are now being detected in the Toolchains menu.
The full version of the instructions can be found here.
For Both Platforms
Ensure that everything is being detected. If you visit the Preferences | Build, Execution, Deployment | Toolchains menu in CLion, you should see green checkmarks under CMake and the Debugger section. Additionally, Make, C compiler, and C++ compiler should all say "Detected". If you notice something different, make a post to Campuswire or attend office hours.
The Build Process
If you have some time for some extra reading, we'd like to talk you through the build process in C++ so that you are familiar with what is happening behind the scenes. Your written code is converted to a runnable executable in three phases:
- Preprocessing
- Compiling
- Linking
We will cover each of these three parts below, familiarizing you with the tools involved and their functions.
Preprocessing
This is a unique step where your code is transformed to be ready for compilation. This may sound odd; in theory, your code should be ready for compilation as-is, right? C++ is unique in that it has a language feature called preprocessor directives. These are special statements that start with a #. These are useful for various compiler-level tasks, like organizing your projects (the #include directive), creating macros / platform specific code blocks (the #define directive), and including compiler options (the #pragma directive). There are many more, but these are the only ones you should encounter in this class. The preprocessor then identifies these directives and replaces them with code that the compiler can interpret.
For example, the #include directive that you use to include headers in your C++ source files performs a text substitution when preprocessed: it literally grabs the text content of the header file referenced and pastes it where the directive was. As discussed in lecture, header files include declarations of all of the functions & classes your program uses. In other words, they signify the existence of implementations, whether they're coming from your code or external libraries. This will make sense when we get to linking, but just know that header files are essential for compilation, and they must be #included in any file that defines / uses their functions.
On the topic of #include, there are two ways of loading header files. One is
#include <nlohmann/json.h>
and the other is
#include "nlohmann/json.h"
... a subtle but important difference.
The <> version means that the preprocessor will search some predefined system directories and user-defined include directories. This is generally what you should be using to include built-in or library headers.
The "" version means that the preprocessor will search in the directory relative to the file where the directive was used. If it can't find the file, then the preprocessor will fall back to searching the directories that <> uses. As a general rule, use the "" for files in your directories and <> for anything that you downloaded/that is built in. If you find yourself including files from parent directories, then you probably should be adding those directories to the list of directories that <> searches.
If you'd like to learn more, read about the history & function of the preprocessor here.
The Compiler
Compilation of C++ code is the process of converting each compilation unit, usually referred to as a translation unit, into an object file that the linker can later use. The translation unit is the preprocessed output of each source file you include in compilation.
Some examples of C++ compilers:
gcc/g++, GNU environmentclang/clang++, LLVM environment (Mac users are recommended to use this, and XCode installs this by default)MSVC, Microsoft Visual C++ environment (Windows users will be using this)MinGW/MSYS2, "Minimalist GNU for Windows" environmentCygwin, yet another C++ environment for Windows
Let's say you are using g++. Compiling two source files (hello.cc and world.cc) at the C++ 11 language level would by done by running:
g++ -std=c++11 -c hello.cc world.cc
This will then output two object files, hello.o and world.o. These files can be combined into a library (meaning you don't need to distribute source code with your libraries).
You might have been wondering when the .cc files were going to come into play, as you only ever #include .h files. This is fundamentally how source files, which implement the header declarations, are included. However, you will be working with a higher-level interface for doing this: many build tools have been written to abstract away the command-line nature of compilation. We'll get to that in a bit.
The Linker
The last step in the build process, linking is where we take everything and combine it all into either an executable program or a library. Throughout CS 126, you will be generating executables and running them through CLion run configurations (just like how you did in IntelliJ).
The linker, besides bundling the object files together, also verifies all of the symbols and as long as you are using static libraries, also ensures that symbols have definitions.
If you want to go more in-depth on C++ linking and libraries, check out this blog post.
Build Systems
As was mentioned before, you aren't expected to have to manage all of your building from the command-line. After all, we're programmers and we're known for being lazy. There are many great open-source build systems for C++, including:
- plain old Makefiles using GNU
Make, designed by Stu Feldman (You'll work with this in CS 225 and CS 241) CMakeby Kitware (This is the one we use in CS 126)Buckby FacebookBazelby GoogleNinja
When you start to get summer internships and take later CS classes, knowing how to leverage a build system in your projects will be essential, so we are getting you started with a commonly used C++ build tool, CMake. This also helps standardize the build process to some extent, as both macOS and Windows users will use CMake, even though the underlying compiler will be different.
We will be covering CMake in depth more later. For your first C++ assignment, you shouldn't need to make any modifications to the CMakeLists.txt file which defines your build. In later assignments, however, you may want to include some libraries or add some more source files, which will involve changing that file.