Snake
Assigned: 2020-04-06
Due Date: 2020-04-14 by 11:59PM U.S. Central Time
Assignment Spec
The rubric can be found here.
Gradescope
You will need to submit your GitHub repository to Gradescope.
Part 0: Getting Started
Get your copy of the repository here: https://classroom.github.com/a/pygIQb9Z
This assignment will use the Cinder framework.
You can download the latest version Cinder for your platform here. The latest version is v0.9.2.
Here is a basic tutorial on how to develop Cinder projects: https://libcinder.org/docs/guides/tour/hello_cinder_chapter1.html.
Here is some documentation: https://libcinder.org/docs/reference/index.html.
Setting up Cinder + Snake
Windows Users: READ THIS!!!
Cinder v0.9.2 was built with Visual Studio 2015 in mind.
Thus, in order to build Cinder on Windows, you'll need to downgrade your
Microsoft Build Tools to v140 or v141.
Note that for the C++ TicTacToe assignment, you probably only installed
v142. So, below is a short guide on how to do this:
-
Uninstall
Visual Studio Build Tools 2019if present on your machine by navigating toControl Panel > Programs > Programs and Features > Uninstall a Program, and then uninstallVisual Studio Build Tools 2019. -
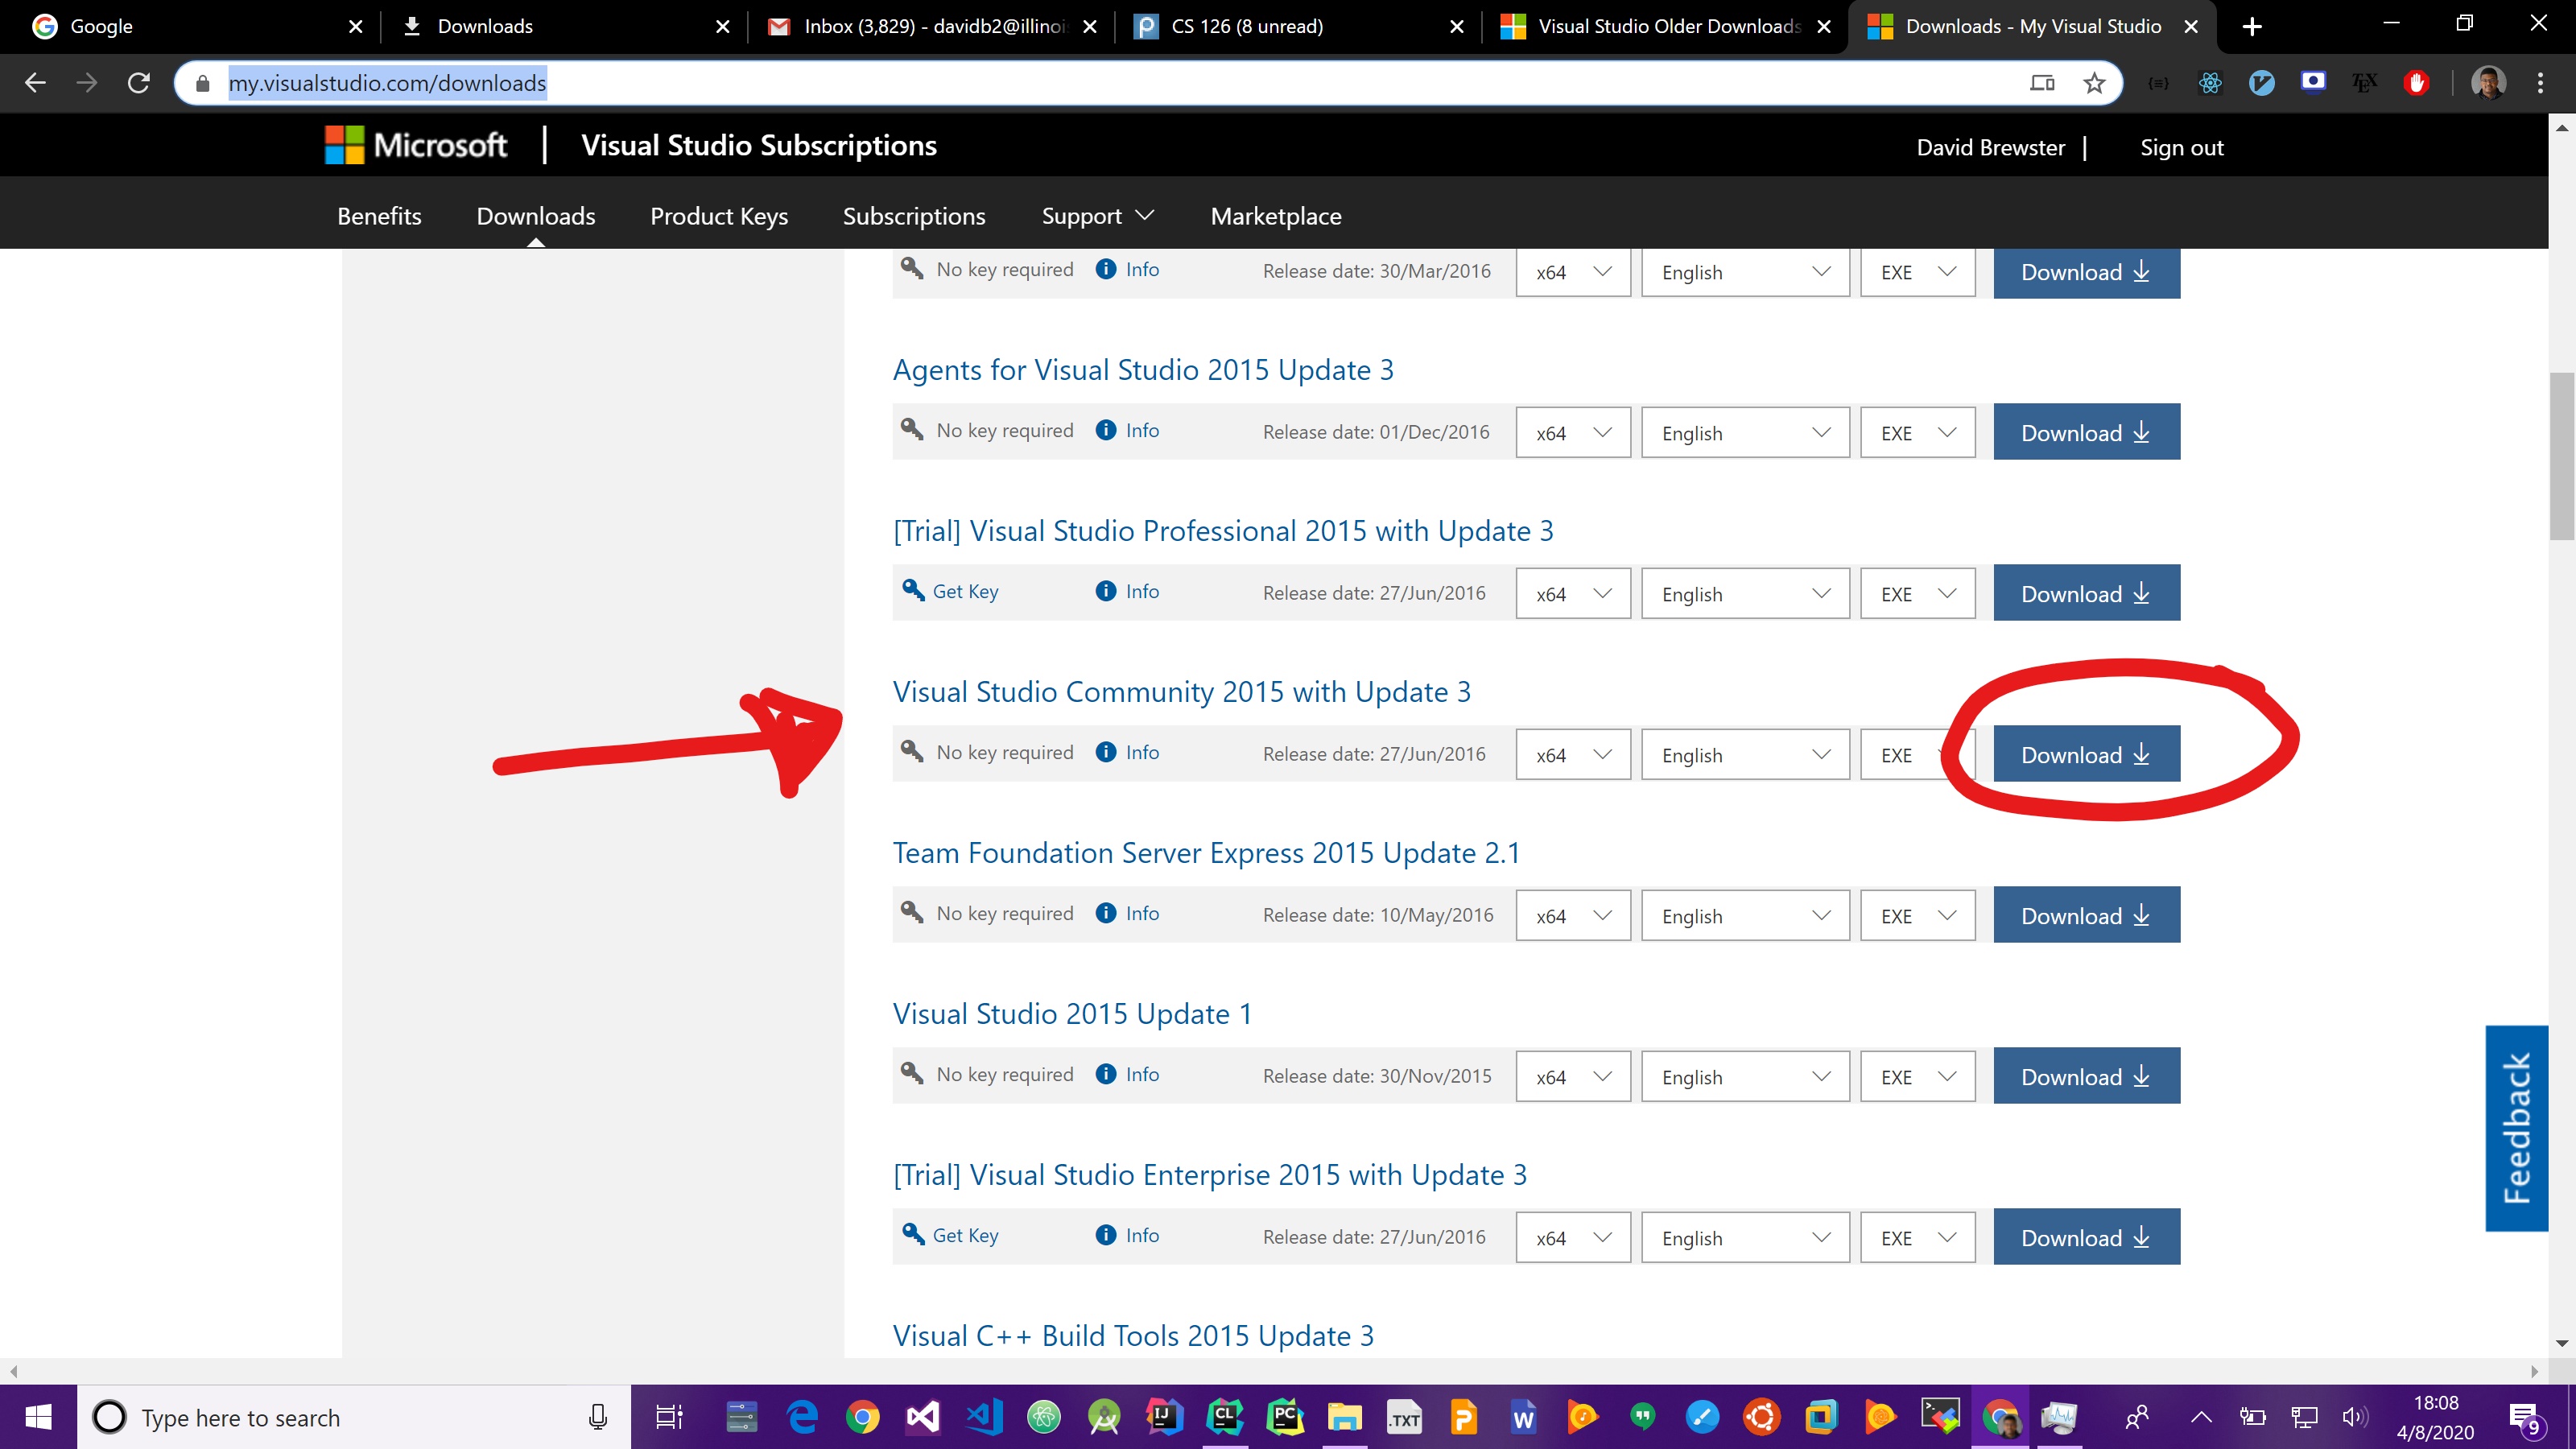
Go to: https://my.visualstudio.com/Downloads?q=visual%20studio%202015&wt.mc_id=o~msft~vscom~older-downloads. You'll also be able to access this page by going to https://my.visualstudio.com/downloads and searching for
2015.
-
Next, download
Visual Studio Community 2015 with Update 3for your architecture (probablyx64). -
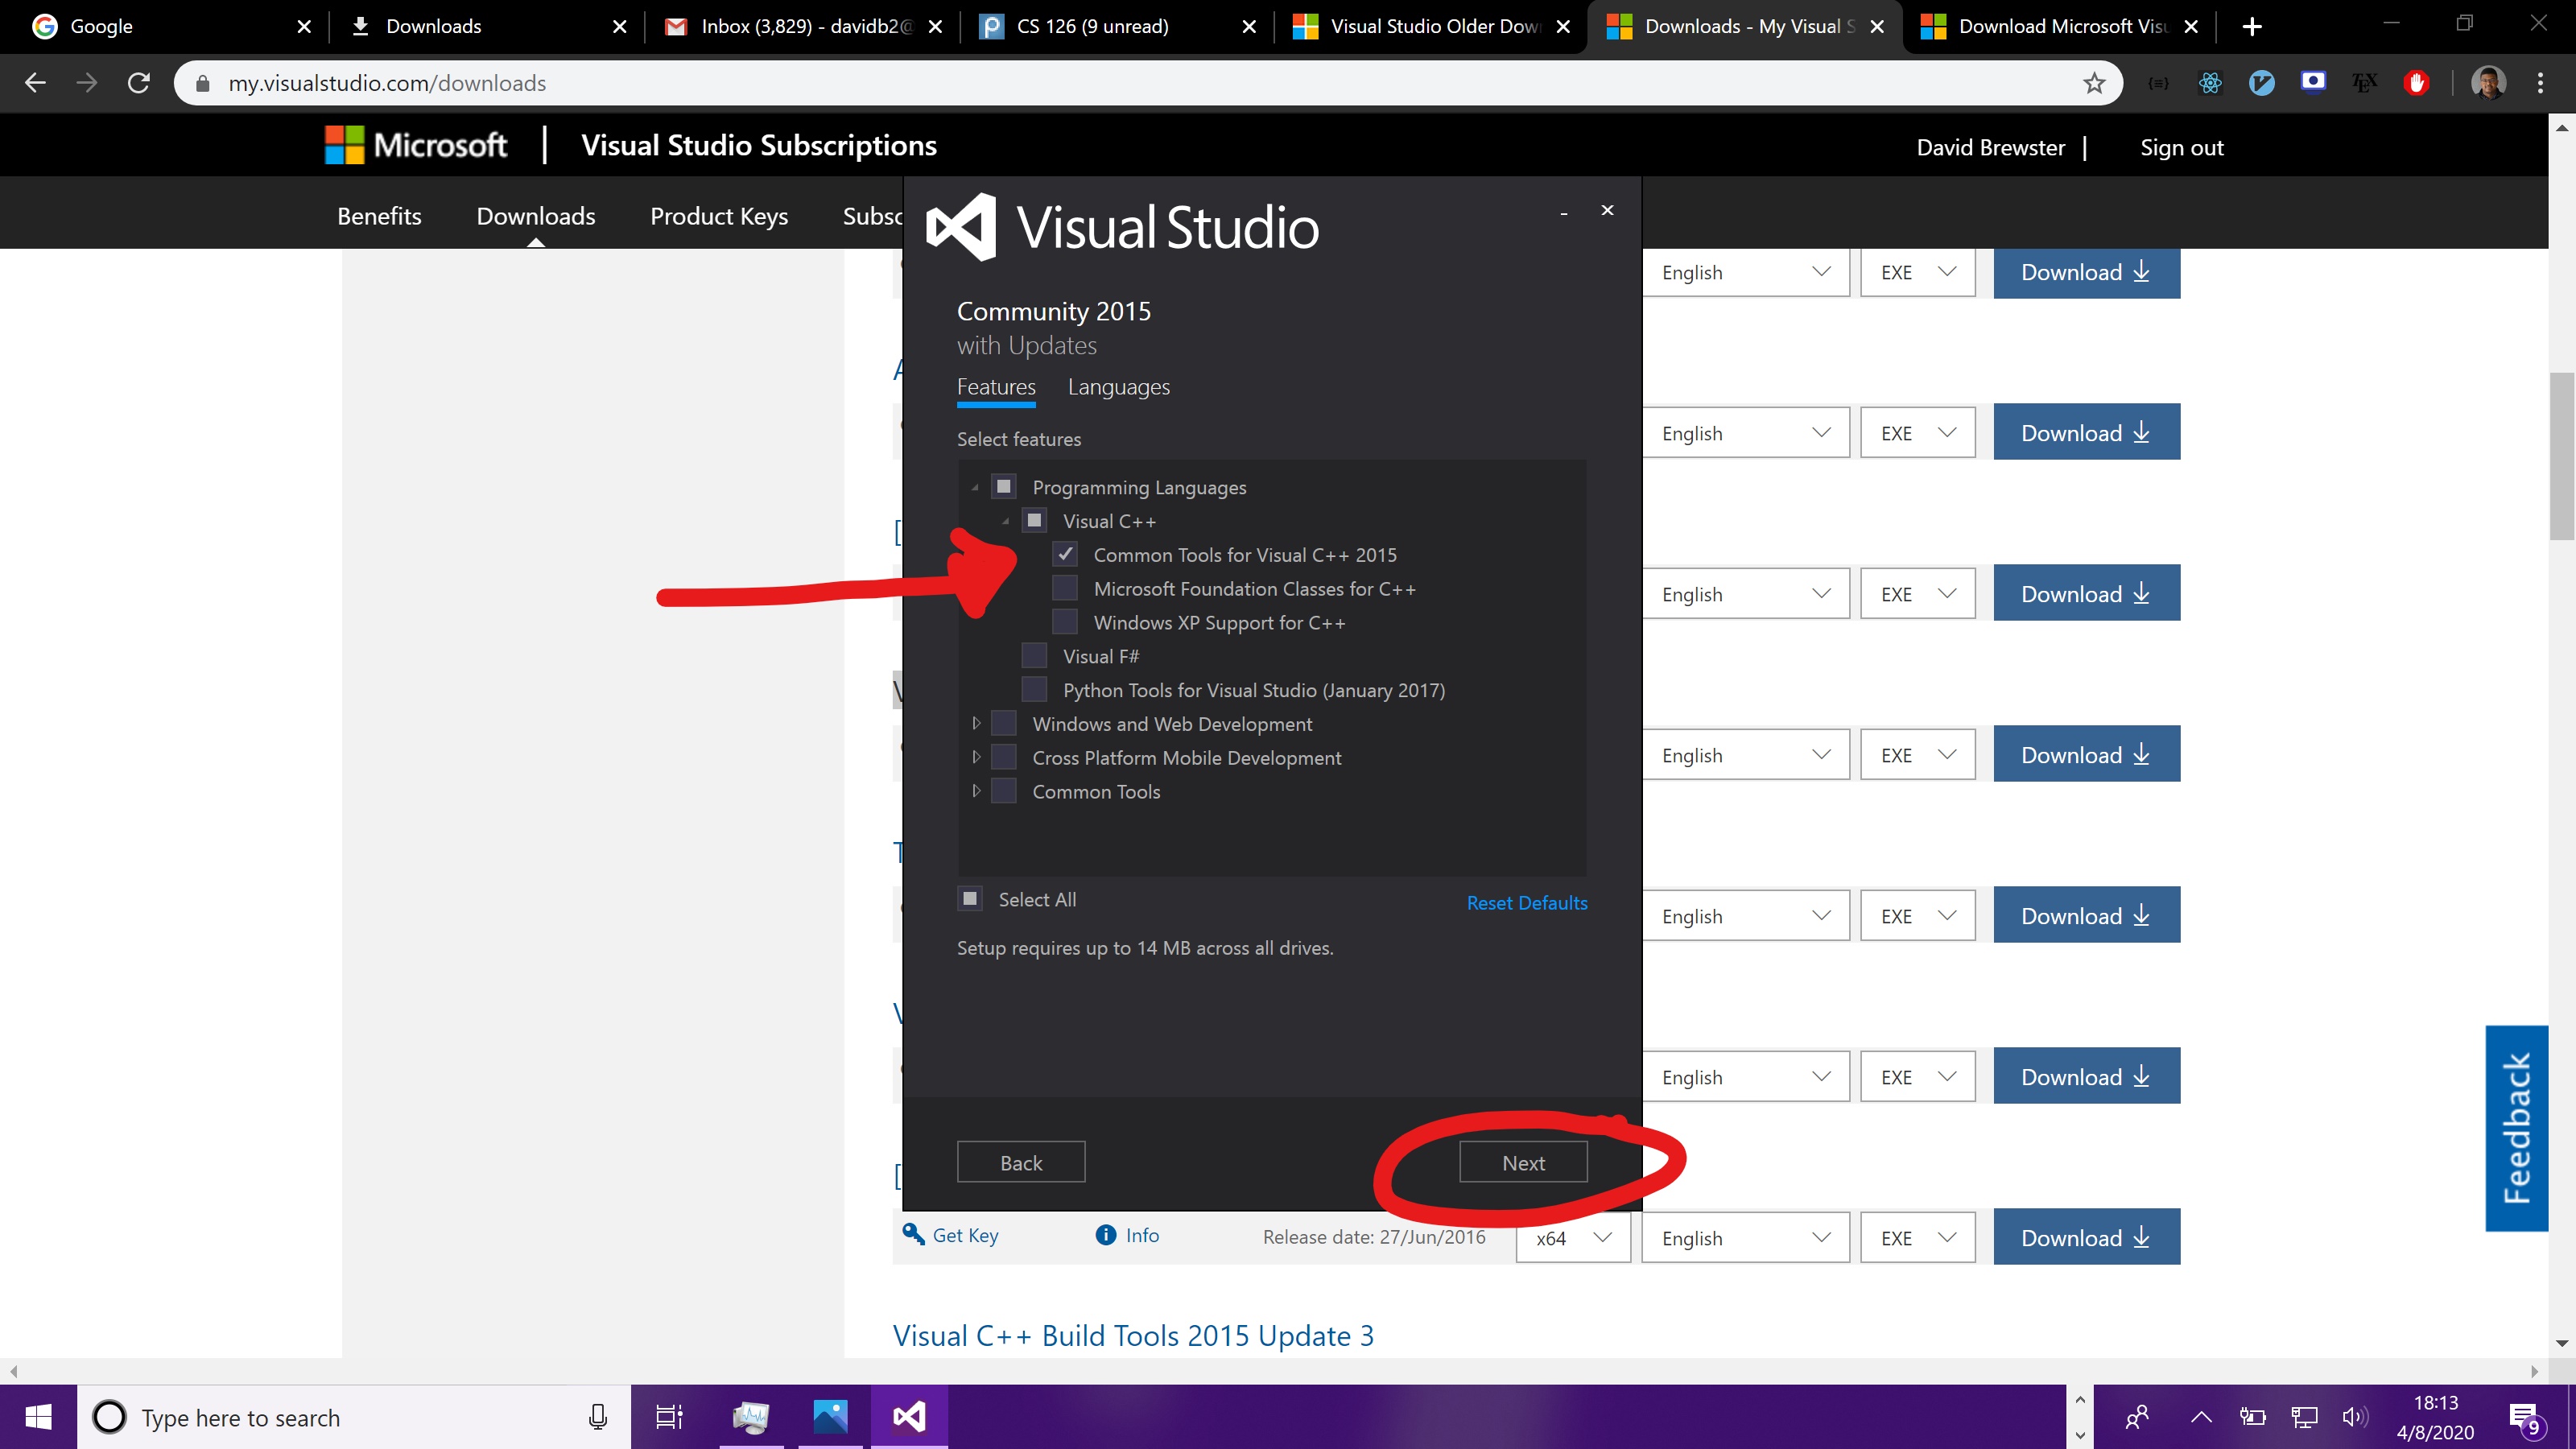
Run the installer and if prompted, select
Modify. -
Now, you only need to select the
Common Tools for Visual C++ 2015option, then clickNext. Note that this will take up around8GBon your machine.
-
Continue along with the installation. The installation process can take a while (~20 minutes).
-
After the installation is complete, do not need to click the "Launch" button.
-
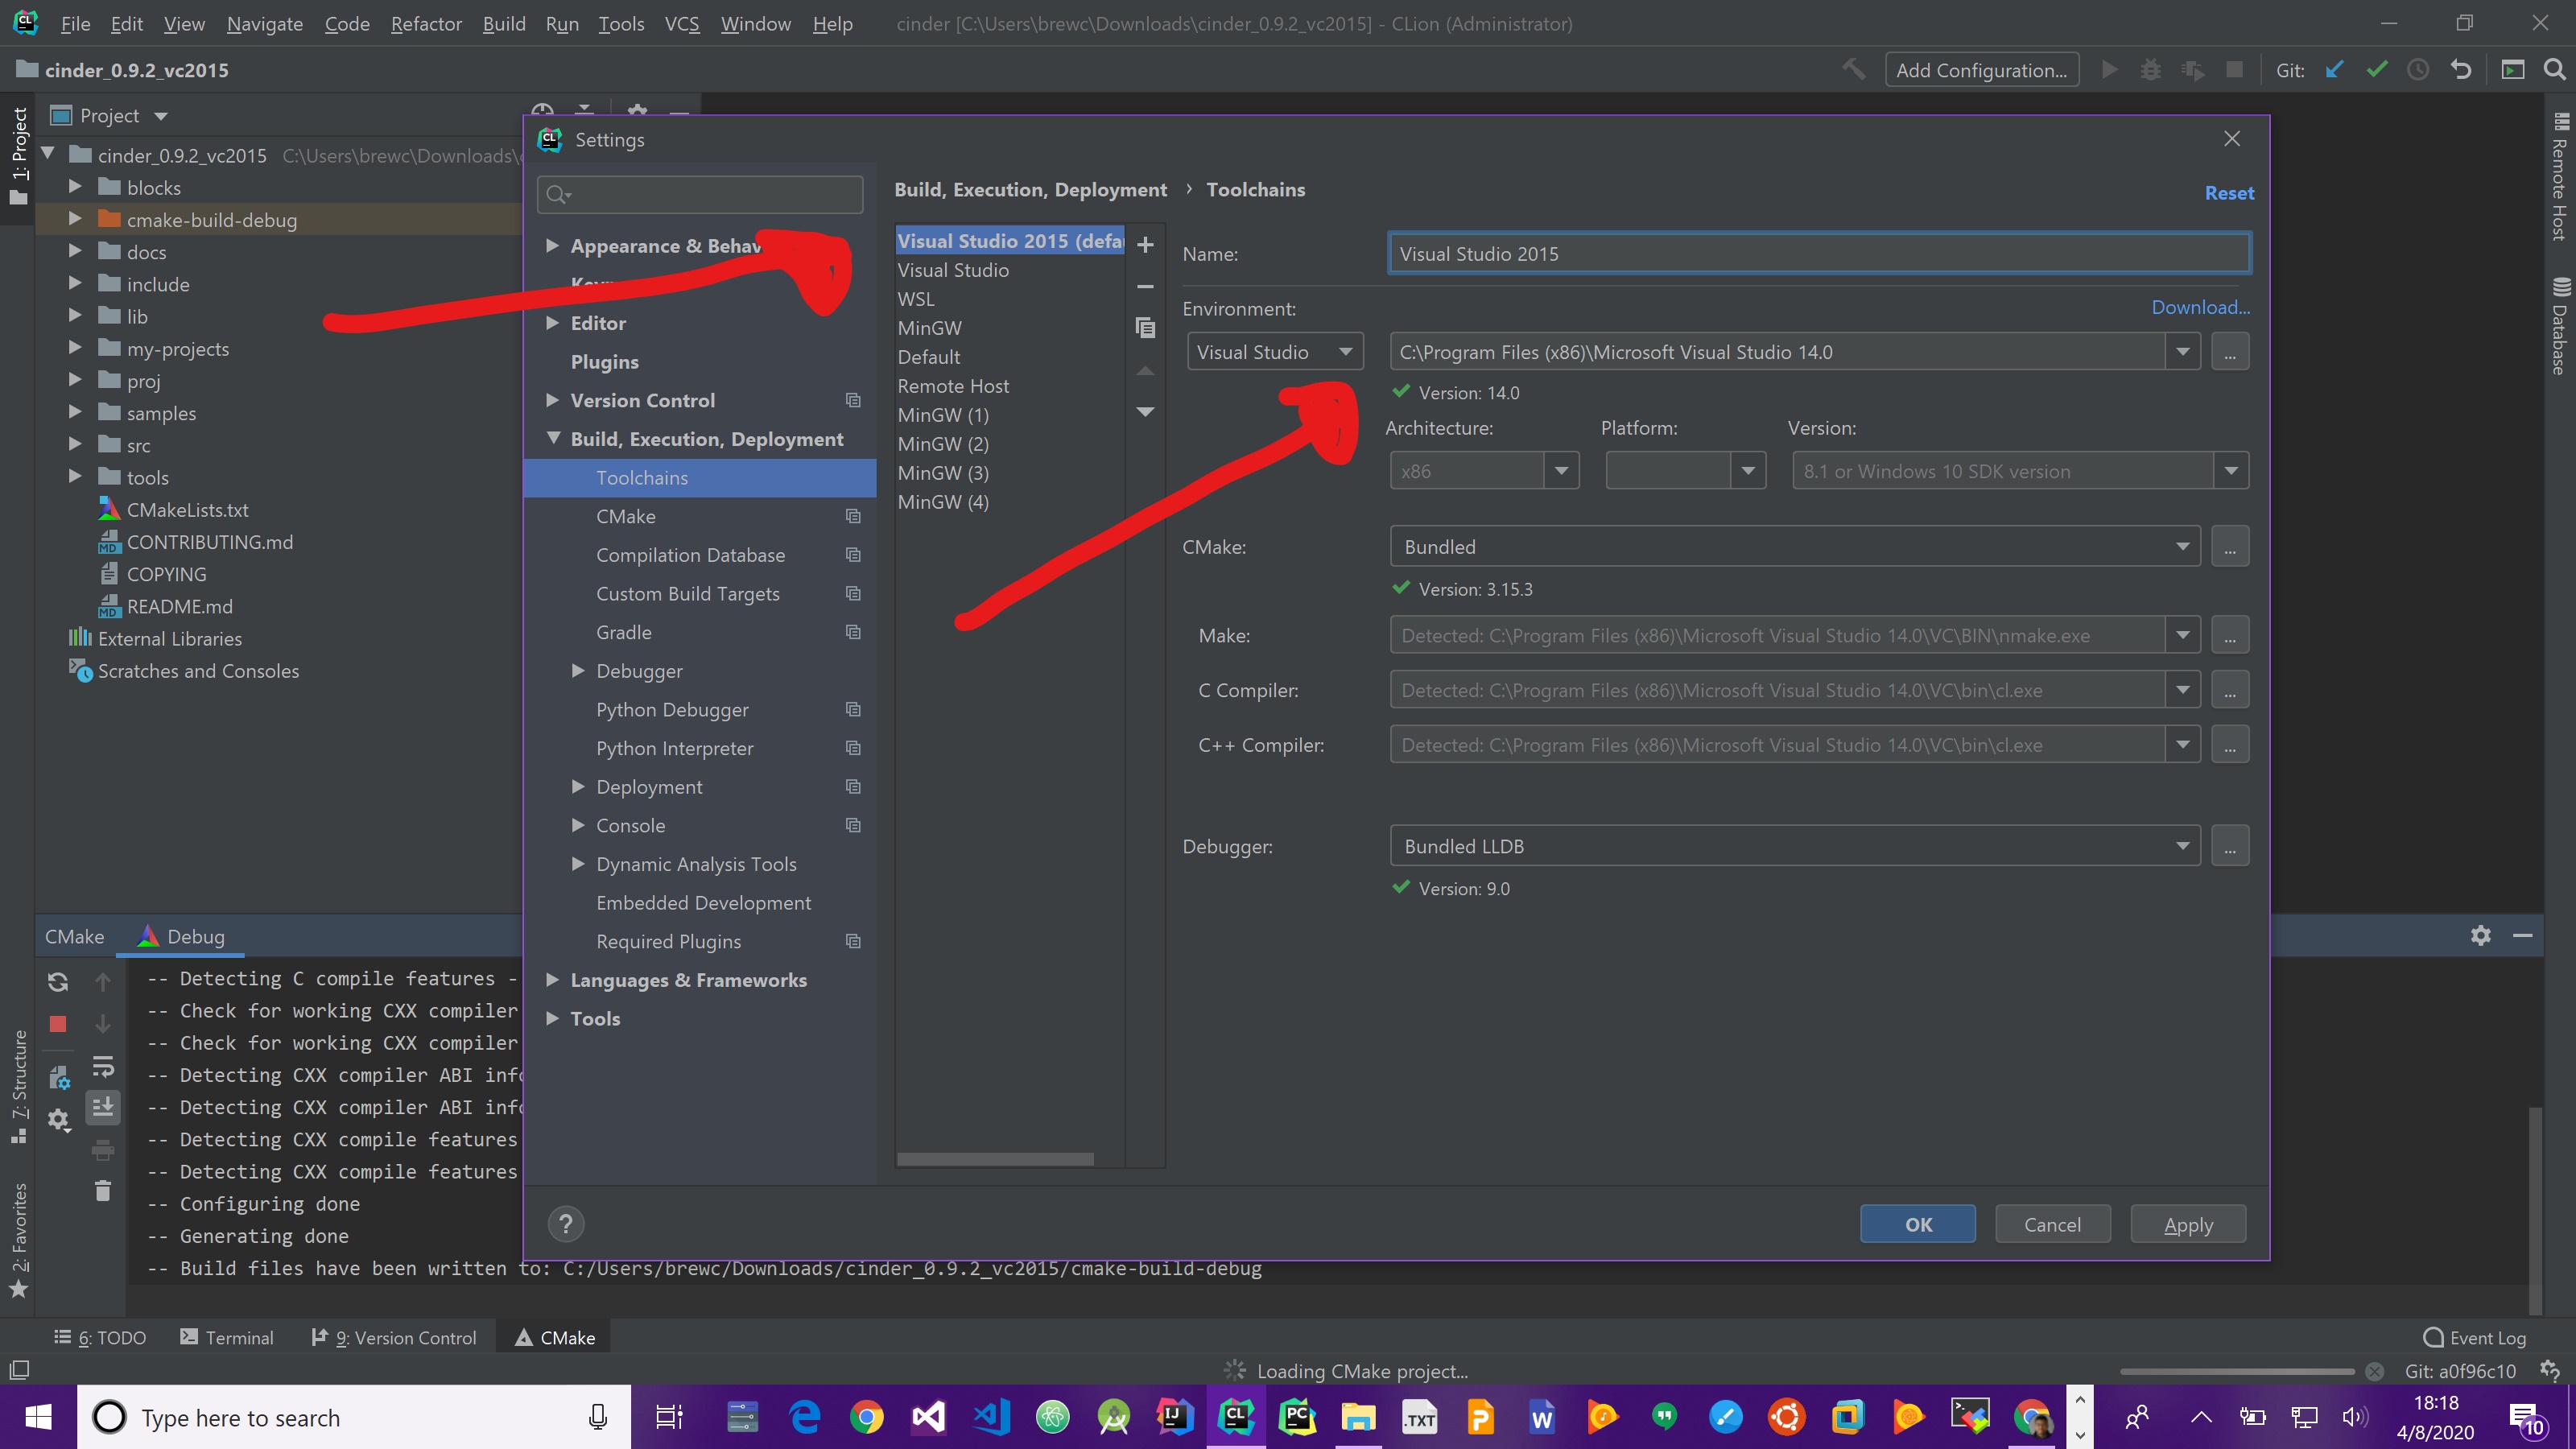
Go back to CLion and make the default toolchain be a Visual Studio environment, pointing to
C:\Program Files (x86)\Microsoft Visual Studio 14.0. Confirm that there are no warnings.
That's it!
As an added bonus, you now have Visual Studio 2015 installed if you ever want to use it in the future after this class is over.
- Download Cinder (v0.9.2) for your platform. Extract the downloaded item into a folder.
We’ll call this folder
~/Cinderthroughout the instructions - Open the
~/Cinderfolder in CLion and click the green build button. This will buildlibcinder. You only need to do this once per machine. This build might take a while. - Create a directory, say
my-projectsin~/Cinder. Clone thesnakeproject into this folder. You can checkout your repository here: - Open the
snakeproject in CLion, set the target tocinder-snakeand click the run button.
MacOS users: It’s possible that you may come across:
Error running 'cinder-snake': Cannot run program … cinder-snake.app/Contents/Resources"): error=13, Permission denied
In this case, try doing: Edit configurations -> Executable -> Select Other -> Find my-projects/snake/cmake-build-debug/Debug/cinder-snake/Contents/MacOS/cinder-snake
And click run once again.
Setting up the Database (SQLite)
- In CLion, navigate to
View > Tool Windows > Database. - Next, in the Database window, select the
Database propertiesbutton, which is between the Refresh and the Stop button. - There are two possibilities now:
i. If properties for
snake.dbare automatically selected, you can proceed to Step 4. ii. If there are no database properties selected, navigate toAdd > SQLite. - Next, there should be a highlighted link to download the necessary drivers for
SQLite. Click this link. - For the file of the datasource, select
snake-<your-netid>/assets/snake.db. - Press
Test Connectionto verify that the driver is set up correctly. Click theOKbutton in the - Now, you should run the
cinder-snaketarget and play the game to test out your database. - After the
cinder-snakeapplication has run, go back to the Database tab, click theRefreshbutton. You should now be able to see the schema of the database undersnake.db > schemas > main > leaderboard. Also, you’ll be able to manually execute queries by clicking theJump to Consolebutton at the top.
Interfacing through the program arguments
There are 4 different flags for the program (which you can modify via Edit Configurations -> Program Arguments):
size, default:16-- "the number of tiles in each row and column"tilesize, default:50-- "the size of each tile" in square pixelsspeed, default:50-- "the speed (delay) of the game", lower means fastername, default:CS126SP20-- "the name of the player", for database purposes
Part 1: Database Interaction
Every time the snake game is run, the following should be executed in order:
- Create a leaderboard table in the database if it does not already exist
- Add the name and score of the player into the leaderboard table after the game has ended
- Display the top players and their respective scores after the game has ended
- Display the top scores of the current player.
The logic and SQLite query for item 1 has already been provided to you.
The logic for item 2 and 3 have already been provided, but you will need to write the query for this.
For item 4, you’ll need to write the logic and the query. Don’t worry too much about the format of the text in the application: all that matters is that the current player’s high scores are visible somewhere.
The queries for the leaderboard can be found in src/leaderboard.cc.
The code will likely crash after the game ends due to the SQLite queries being initially empty/incorrect.
You may find it helpful to use try/catch statements in apps/snake_app.cc or in src/leaderboard.cc in order to catch these
exceptions, thus avoiding fatal unhandled exception messages.
We are using the SqliteModernCpp library to make SQLite queries from C++.
Take a look at the examples here: https://github.com/SqliteModernCpp/sqlite_modern_cpp/tree/dev.
There is great documentation on SQLite, which can be found here: https://www.sqlitetutorial.net/. Please try to play around with the local database that you have before asking questions on Piazza. The SQLite syntax is very intuitive.
Part 2: Customize Snake (Extensions)
In apps/snake_app.cc and apps/snake_app.h, you’ll find the main GUI code for snake. Implement each of these features, and make sure to test after you implement them:
- The color of the food is always green 😴 - Let’s make this more interesting. Make the color of the food change to a random color every
Tseconds - whereT = (1 / size_of_snake)(Note: this is not every frame) - There’s no sound in the game! Add at least two sounds - firstly, a background music track 🎵 that keeps playing on repeat while the game is playing. Second, add an eating sound when the snake eats a food box. You can find sound tunes at many places on the web.
- Get creative and add your own interesting twist on the game - something that doesn’t involve sound or changing colors. Try your best to make this non-trivial.
If you want to use a CinderBlock for any of this, you can clone the CinderBlock into your ~/Cinder/blocks directory, and then place the name of the directory of the cloned directory into the BLOCKS argument in apps/CMakeLists.txt. See more info here: https://www.libcinder.org/docs/guides/cmake/cmake.html#building-your-application-with-cmake. Note that the first part of this link isn’t relevant since CLion will invoke the necessary CMake commands for you when building.
Part 2b: Extra Credit
You can receive extra credit for extending the Snake application in any interesting way. The more significant and interesting the extension the more points you can receive; in general, each hour of additional work is a point of extra credit.
Grading and Deliverables
- You must show
Snakeworking with your database queries and at least3extensions, which includes the2required extensions from part 2.
This is not a coding-heavy assignment; we expect most of your time to
be spent on getting your IDE set up with Cinder. Spend the time now troubleshooting your build
environment, rather than later!
If you run into any build or linking errors, please post them to Piazza. It can be difficult to fix these problems on your own.
Known Bugs
Here is a list of bugs that we would like to document:
- There is a known bug (or feature) where the
Game Over :(text starts to flicker on MacOS and Windows. - Sometimes the app crashes at
src/engine.cc:128on the initial run. Try re-running the application. - Please let us know if you find any more bugs!